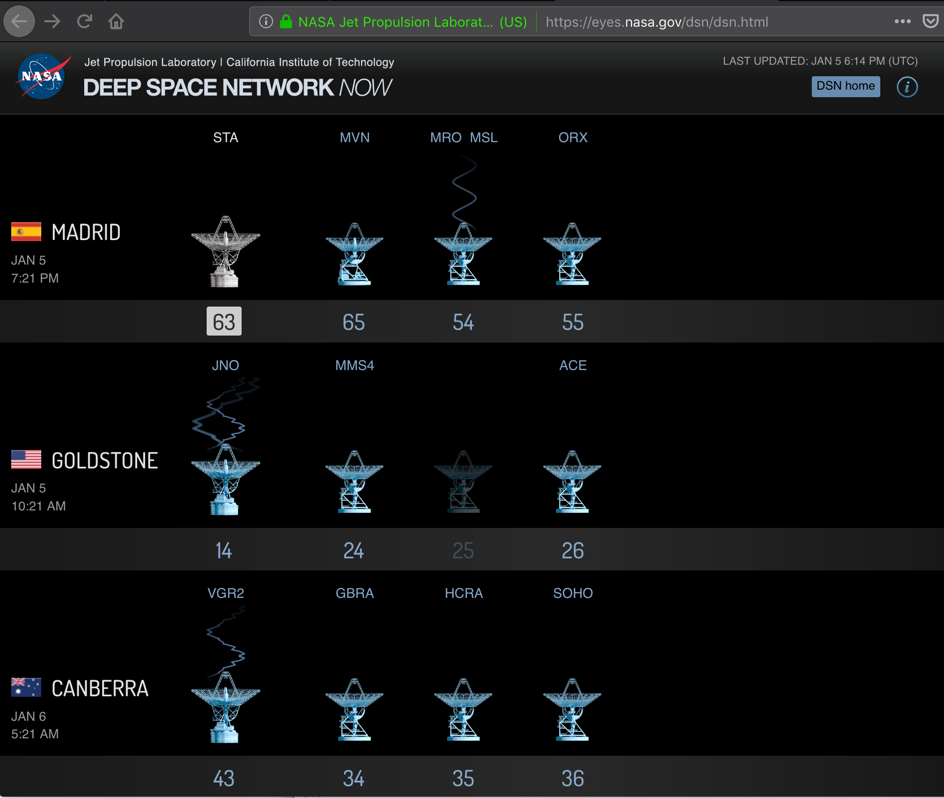
You can see live transmissions to spacecraft on this page , as shown below.您可以在此页面上看到航天器的实时传输,如下所示。
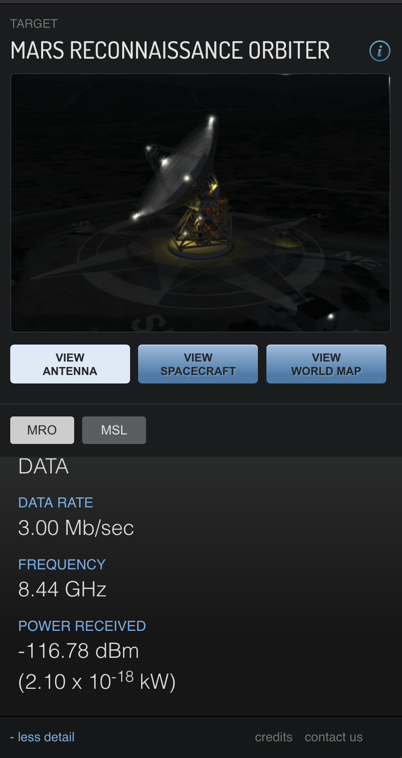
If you click a device that is in use, and click the "more detail" link in the lower right corner of the page, you see more information about the transmissions, as shown below.如果单击正在使用的设备,然后单击页面右下角的“更多详细信息”链接,您将看到有关传输的更多信息,如下所示。 When I did it, this data link was running at 3 Mb/sec.当我这样做时,这个数据链路以3 Mb /秒的速度运行。
https://sourceforge.net/projects/ion-dtn/ https://sourceforge.net/projects/ion-dtn/
Server 149 with IP 172.16.123.149服务器149 ,IP 172.16.123.149
Server 150 with IP 172.16.123.150服务器150 ,IP 172.16.123.150
You will have to adjust the network addresses and IDs in the instructions below to match your systems.您必须在下面的说明中调整网络地址和ID以匹配您的系统。
sudo apt update sudo apt update
sudo apt install build-essential -y sudo apt install build-essential -y
wget https://sourceforge.net/projects/ion-dtn/files/ion-3.6.2.tar.gz/download wget https://sourceforge.net/projects/ion-dtn/files/ion-3.6.2.tar.gz/download
tar xzvf download tar xzvf下载
cd ion-3.6.2 cd ion-3.6.2
./configure 。/配置
make使
sudo make install sudo make install
sudo ldconfig sudo ldconfig
For complete details of the configuration, see the "ION Deployment Guide.pdf" file in the ion-3.6.2 folder you just created with the previous commands.有关配置的完整详细信息,请参阅刚使用先前命令创建的ion-3.6.2文件夹中的“ION Deployment Guide.pdf”文件。
In a Terminal, execute these commands:在终端中,执行以下命令:
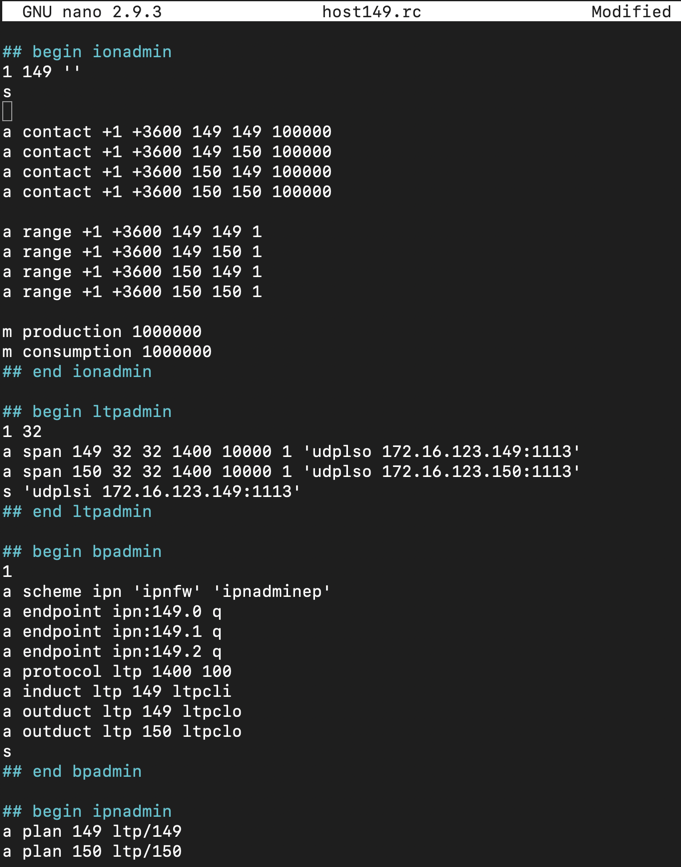
Paste in this code, as shown below.粘贴此代码,如下所示。mkdir dtn mkdir dtn cd dtn cd dtn nano host149.rc nano host149.rc
You will need to adjust the IP addresses for your network! 您需要调整网络的IP地址!
## begin ionadmin ## begin ionadmin
1 149 '' 1 149''
s小号

a contact +1 +3600 149 149 100000联系人+1 +3600 149 149 100000
a contact +1 +3600 149 150 100000联系人+1 +3600 149 150 100000
a contact +1 +3600 150 149 100000联系人+1 +3600 150 149 100000
a contact +1 +3600 150 150 100000联系人+1 +3600 150 150 100000

a range +1 +3600 149 149 1范围+1 +3600 149 149 1
a range +1 +3600 149 150 1范围+1 +3600 149 150 1
a range +1 +3600 150 149 1范围+1 +3600 150 149 1
a range +1 +3600 150 150 1范围+1 +3600 150 150 1

m production 1000000米生产100万
m consumption 1000000消费100万
## end ionadmin ## end ionadmin

## begin ltpadmin ## begin ltpadmin
1 32 1 32
a span 149 32 32 1400 10000 1 'udplso 172.16.123.149:1113' 300跨度149 32 32 1400 10000 1'udplso 172.16.123.149:1113'300
a span 150 32 32 1400 10000 1 'udplso 172.16.123.150:1113' 300跨度150 32 32 1400 10000 1'udplso 172.16.123.150:1113'300
s 'udplsi 172.16.123.149:1113' s'udplsi 172.16.123.149:1113'
## end ltpadmin ## end ltpadmin

## begin bpadmin ##开始bpadmin
1 1
a scheme ipn 'ipnfw' 'ipnadminep'一个方案ipn'ipnfw''ipnadminep'
a endpoint ipn:149.0 q端点ipn:149.0 q
a endpoint ipn:149.1 q终点ipn:149.1 q
a endpoint ipn:149.2 q终点ipn:149.2 q
a protocol ltp 1400 100协议ltp 1400 100
a induct ltp 149 ltpcli导入ltp 149 ltpcli
a outduct ltp 149 ltpclo outduct ltp 149 ltpclo
a outduct ltp 150 ltpclo outduct ltp 150 ltpclo
s小号
## end bpadmin ## end bpadmin

## begin ipnadmin ## begin ipnadmin
a plan 149 ltp/149计划149 ltp / 149
a plan 150 ltp/150计划150 ltp / 150

## end ipnadmin ## end ipnadmin
Save the file with Ctrl+X , Y .使用Ctrl + X , Y保存文件。 Enter . 输入
First we'll use the "killm" command, which kills any previously running ION processes.首先,我们将使用“killm”命令,该命令可以杀死任何先前运行的ION进程。 Then we'll start the ION server.然后我们将启动ION服务器。 On server 149, in a Terminal, execute these commands:在服务器149上,在终端中,执行以下命令:
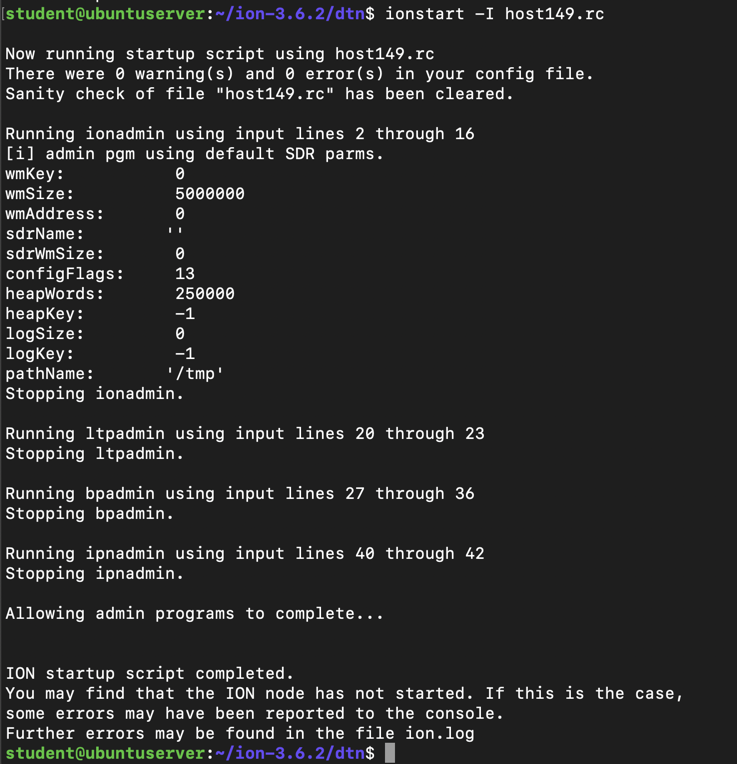
If your configuration file is correct, ION will start with "0 errors", as shown below.如果您的配置文件正确,ION将以“0 errors”开头,如下所示。 Otherwise you'll have to debug your file.否则你将不得不调试你的文件。killm killm ionstart -I host149.rc ionstart -I host149.rc
Execute this command to see the listening UDP socket, as highlighted in the image below.执行此命令以查看侦听UDP套接字,如下图所示。
ss -panu ss -panu

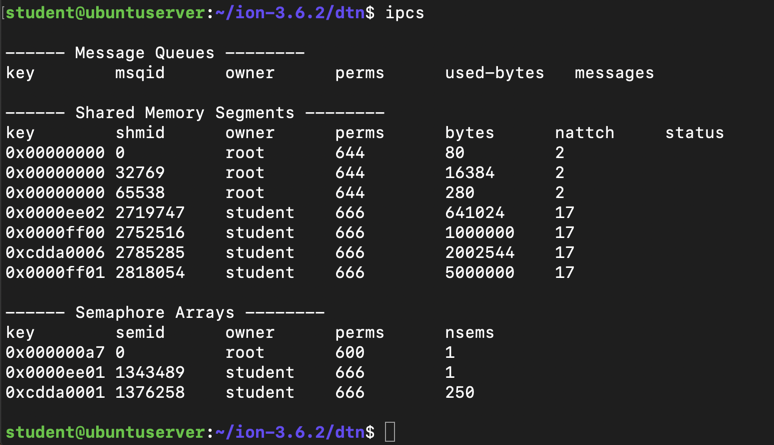
Execute this command to see the status of some ION services:执行此命令以查看某些ION服务的状态:
ipcs IPCS
Execute this command to send a "loopback" message from your server to itself, via DTN:执行此命令以通过DTN从服务器向自身发送“回送”消息:
Execute this command to see the message:执行此命令以查看消息:echo "Hello, World!"回声“你好,世界!” | | bpsource ipn:149.1 bpsource ipn:149.1
bpsink ipn:149.1 bpsink ipn:149.1

Paste in this code, as shown below.粘贴此代码,如下所示。mkdir dtn mkdir dtn cd dtn cd dtn nano host150.rc nano host150.rc
You will need to adjust the IP addresses for your network! 您需要调整网络的IP地址!
## begin ionadmin ## begin ionadmin
1 150 '' 1 150''
s小号

a contact +1 +3600 149 149 100000联系人+1 +3600 149 149 100000
a contact +1 +3600 149 150 100000联系人+1 +3600 149 150 100000
a contact +1 +3600 150 149 100000联系人+1 +3600 150 149 100000
a contact +1 +3600 150 150 100000联系人+1 +3600 150 150 100000

a range +1 +3600 149 149 1范围+1 +3600 149 149 1
a range +1 +3600 149 150 1范围+1 +3600 149 150 1
a range +1 +3600 150 149 1范围+1 +3600 150 149 1
a range +1 +3600 150 150 1范围+1 +3600 150 150 1

m production 1000000米生产100万
m consumption 1000000消费100万
## end ionadmin ## end ionadmin

## begin ltpadmin ## begin ltpadmin
1 32 1 32
a span 149 32 32 1400 10000 1 'udplso 172.16.123.149:1113' 300跨度149 32 32 1400 10000 1'udplso 172.16.123.149:1113'300
a span 150 32 32 1400 10000 1 'udplso 172.16.123.150:1113' 300跨度150 32 32 1400 10000 1'udplso 172.16.123.150:1113'300
s 'udplsi 172.16.123.150:1113' s'udplsi 172.16.123.150:1113'
## end ltpadmin ## end ltpadmin

## begin bpadmin ##开始bpadmin
1 1
a scheme ipn 'ipnfw' 'ipnadminep'一个方案ipn'ipnfw''ipnadminep'
a endpoint ipn:150.0 q端点ipn:150.0 q
a endpoint ipn:150.1 q终点ipn:150.1 q
a endpoint ipn:150.2 q终点ipn:150.2 q
a protocol ltp 1400 100协议ltp 1400 100
a induct ltp 150 ltpcli导入ltp 150 ltpcli
a outduct ltp 149 ltpclo outduct ltp 149 ltpclo
a outduct ltp 150 ltpclo outduct ltp 150 ltpclo
s小号
## end bpadmin ## end bpadmin

## begin ipnadmin ## begin ipnadmin
a plan 149 ltp/149计划149 ltp / 149
a plan 150 ltp/150计划150 ltp / 150

## end ipnadmin ## end ipnadmin

Save the file with Ctrl+X , Y .使用Ctrl + X , Y保存文件。 Enter . 输入
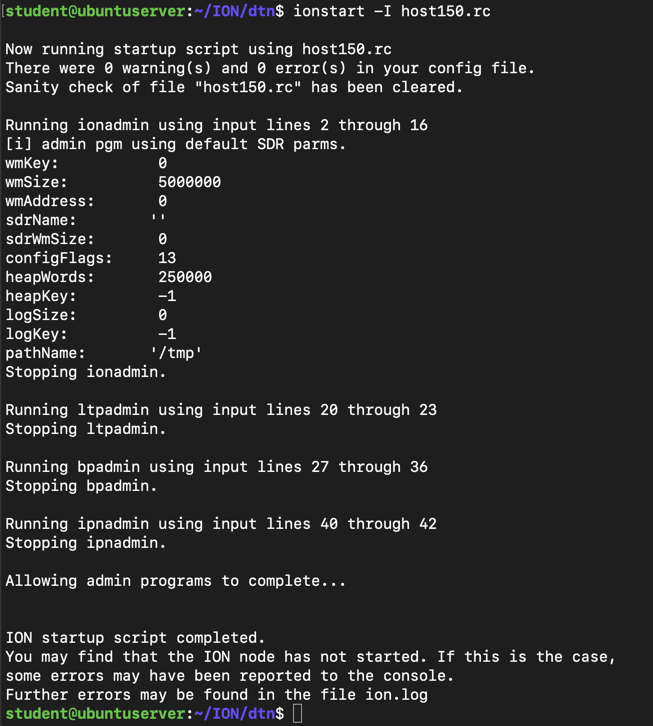
If your configuration file is correct, ION will start with "0 errors", as shown below.如果您的配置文件正确,ION将以“0 errors”开头,如下所示。 Otherwise you'll have to debug your file.否则你将不得不调试你的文件。killm killm ionstart -I host150.rc ionstart -I host150.rc
Execute these commands to send a "loopback" message from your server to itself, via DTN:执行这些命令,通过DTN从服务器向自身发送“环回”消息:
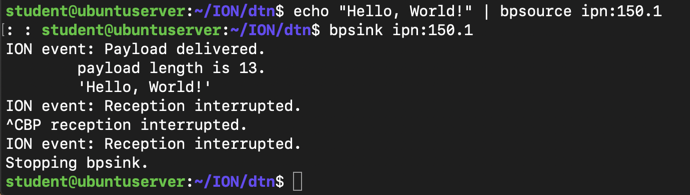
You should see the "Payload delivered", as shown below.您应该看到“Payload deliver”,如下所示。 Press Ctrl+C to exit "bpsink".按Ctrl + C退出“bpsink”。echo "Hello, World!"回声“你好,世界!” | | bpsource ipn:150.1 bpsource ipn:150.1 bpsink ipn:150.1 bpsink ipn:150.1
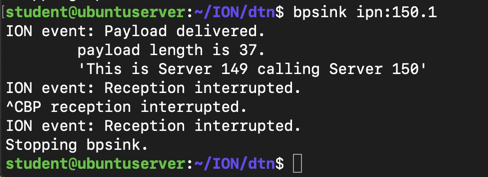
echo "This is Server 149 calling Server 150" | echo“这是服务器149调用服务器150”| bpsource ipn:150.1 bpsource ipn:150.1

On server 150, execute this command:在服务器150上,执行以下命令:
bpsink ipn:150.1 bpsink ipn:150.1
At the top of the Wireshark window, in the filter bar, enter this filter:在Wireshark窗口的顶部,在过滤器栏中输入以下过滤器:
ltp LTP
The traffic should appear in Wireshark, as shown below:流量应该出现在Wireshark中,如下所示:echo "This is Server 149 calling Server 150" | echo“这是服务器149调用服务器150”| bpsource ipn:150.1 bpsource ipn:150.1
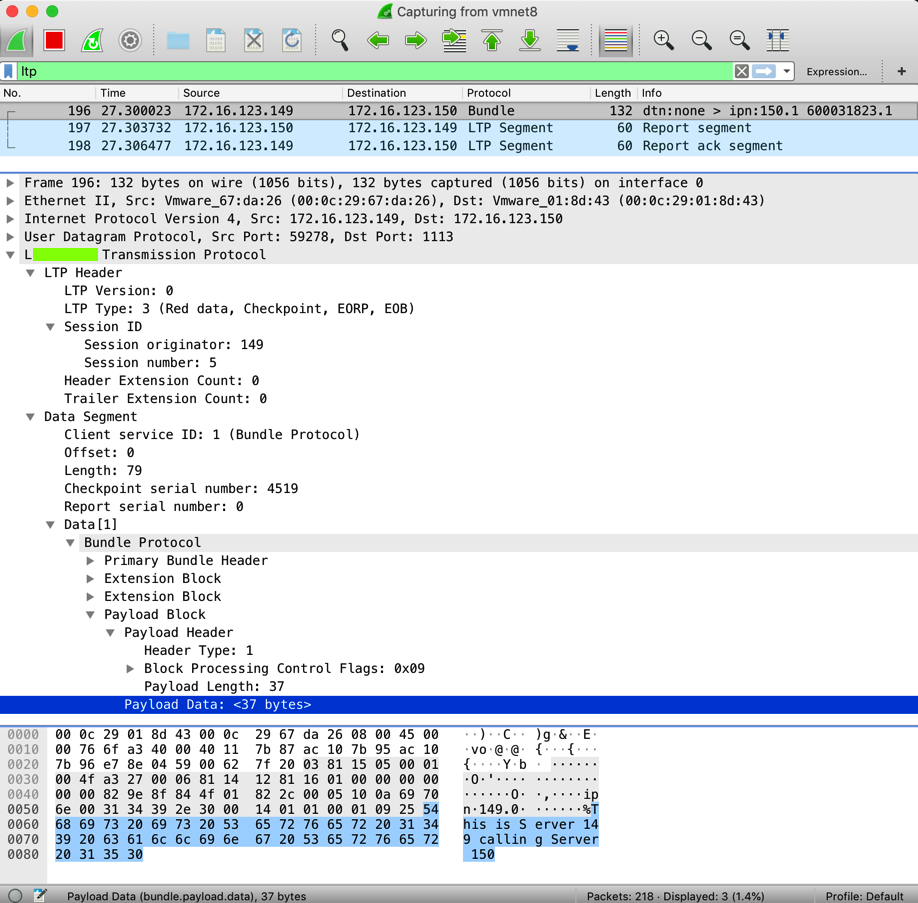
That's the flag.那是旗帜。
Converted to a CTF 3-1-19转换为CTF 3-1-19


