This will give us practice using apktool and Jadx.这将使我们使用apktool和Jadx练习。
This tutorial follows a tweetstream by @fs0c131y.本教程遵循@ fs0c131y的推文。
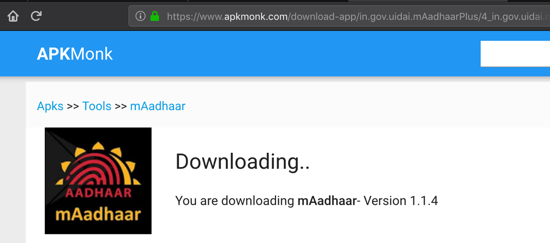
https://www.apkmonk.com/app/in.gov.uidai.mAadhaarPlus/ https://www.apkmonk.com/app/in.gov.uidai.mAadhaarPlus/
You should get this file: in.gov.uidai.mAadhaarPlus_2018-09-26.apk你应该得到这个文件: in.gov.uidai.mAadhaarPlus_2018-09-26.apk
If you are doing this project after Jan. 2019, the app may have been updated.如果您在2019年1月之后进行此项目,该应用程序可能已更新。 If you want the APK file I used, you can get it here .如果你想要我使用的APK文件,你可以在这里得到它。
On Kali, execute this command:在Kali上,执行以下命令:
adb install in.gov.uidai.mAadhaarPlus_2018-09-26/dist/in.gov.uidai.mAadhaarPlus_2018-09-26.apk adb install in.gov.uidai.mAadhaarPlus_2018-09-26 / dist / in.gov.uidai.mAadhaarPlus_2018-09-26.apk

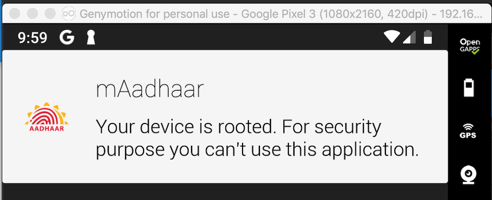
A message appears on your phone telling you that you cannot use this app, as shown below.手机上会显示一条消息,告知您无法使用此应用,如下所示。
Using 64-Bit Windows使用64位Windows
Launch your Windows machine.启动Windows计算机。 (Jadx is Java-based, so it should run on other platforms also, but I wrote these instructions using Windows.) Copy the in.gov.uidai.mAadhaarPlus_2018-09-26.apk file into your Windows machine. (Jadx是基于Java的,因此它也应该在其他平台上运行,但是我使用Windows编写了这些指令。)将in.gov.uidai.mAadhaarPlus_2018-09-26.apk文件复制到Windows机器中。Installing Java安装Java
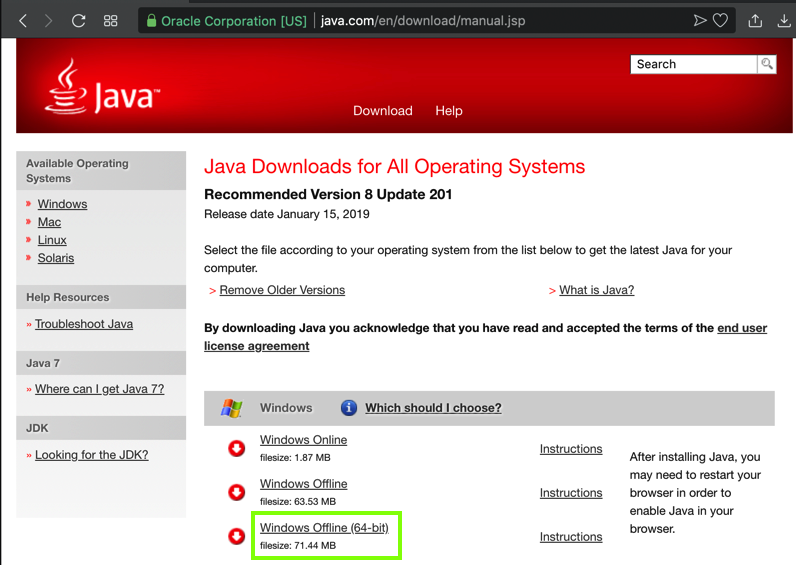
First open Control Panal and uninstall all old Java versions.首先打开Control Panal并卸载所有旧的Java版本。Then open a Web browser and go here:然后打开Web浏览器并转到此处:
https://java.com/en/download/manual.jsp https://java.com/en/download/manual.jsp
Download "Windows Offline (64-bit)" version and install it.下载“Windows Offline(64位)”版本并安装它。 as shown below.如下所示。
Installing Jadx on Windows在Windows上安装Jadx
Go here:到这里:https://github.com/skylot/jadx/releases/tag/v0.8.0 https://github.com/skylot/jadx/releases/tag/v0.8.0
Download jadx-gui , as shown below.下载jadx-gui ,如下所示。
Launch Jadx.启动Jadx。
Using Kali使用Kali
In Kali, execute these commands:在Kali中,执行以下命令:git clone https://github.com/skylot/jadx.git git clone https://github.com/skylot/jadx.git cd jadx cd jadx ./gradlew dist ./gradlew dist ./build/jadx/bin/jadx-gui ./build/jadx/bin/jadx-gui
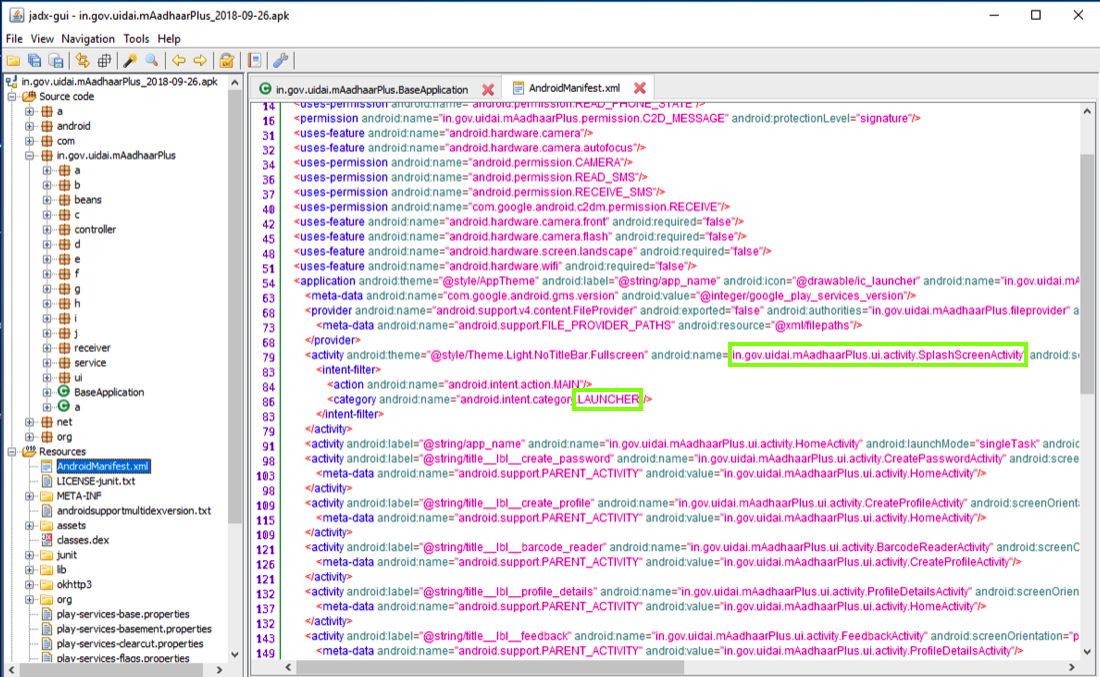
In the left pane, at the bottom expand Resources .在左侧窗格的底部展开Resources 。
Click AndroidManifest.xml .单击AndroidManifest.xml 。
The contents appear on the right side, as shown below.内容显示在右侧,如下所示。
Notice that the LAUNCHER activity, which runs when the app launches, is请注意,应用程序启动时运行的LAUNCHER活动是
in.gov.uidai.mAadhaarPlus.ui.activity.SplashScreenActivity in.gov.uidai.mAadhaarPlus.ui.activity.SplashScreenActivity
as outlined in green in the imager below.如下面的成像仪中的绿色部分所示。
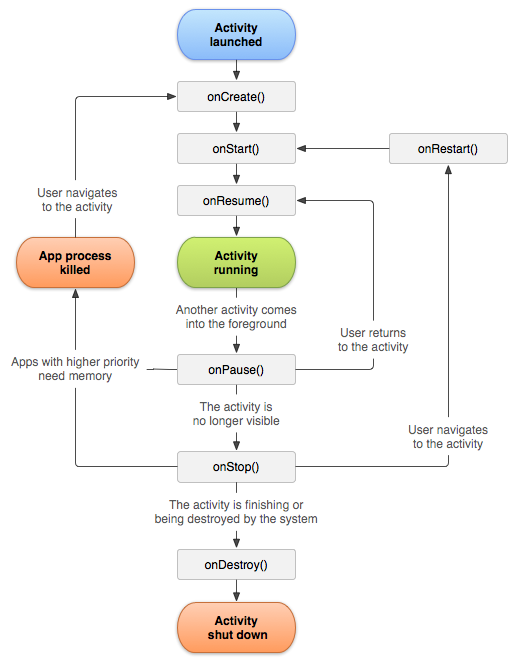
According to the official Android documentation , the first method called when an activity is launched is the "onCreate" method, as shown at the top of the diagram below.根据官方Android文档 ,启动活动时调用的第一个方法是“onCreate”方法,如下图顶部所示。
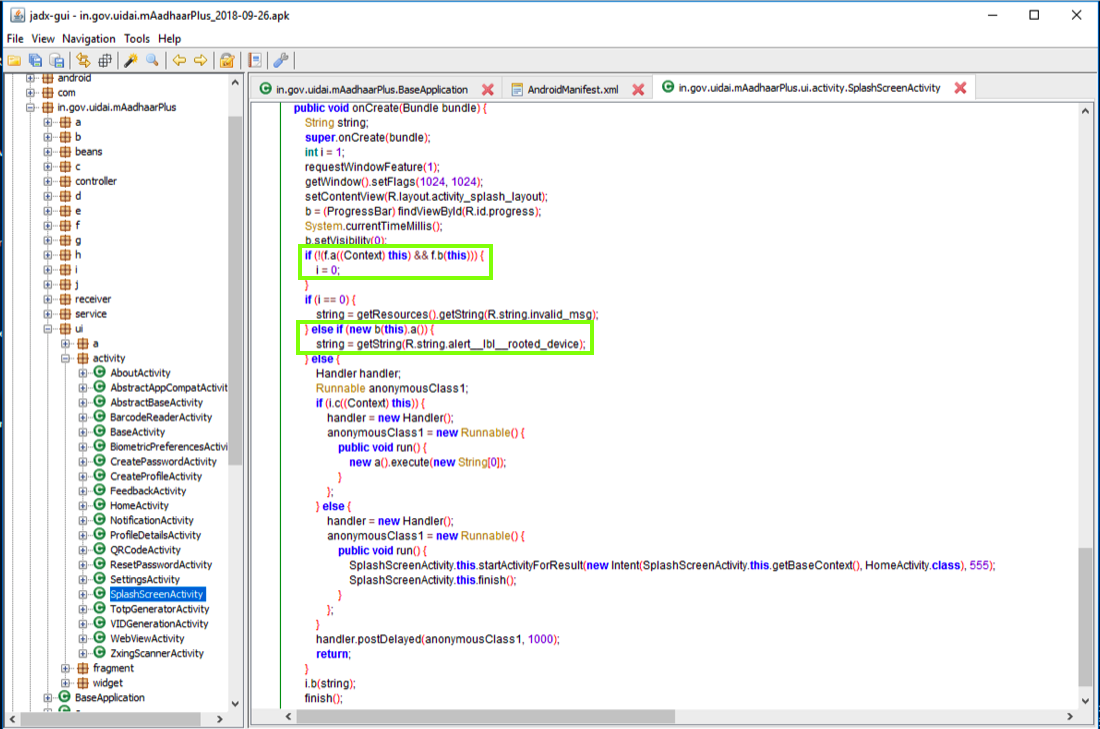
In the right pane, scroll down to the OnCreate() method.在右窗格中,向下滚动到OnCreate()方法。
Notice the two code sections outlined in green in the image below.请注意下图中以绿色标出的两个代码部分。
The first section is Integrity Verfication , using methods named fa and fb to detect app modification.第一部分是Integrity Verfication ,使用名为fa和fb的方法来检测应用程序修改。
The second section uses a method named b to detect rooted devices.第二部分使用名为b的方法来检测有根设备。
We want to disable both these operations.我们想要禁用这两个操作。
in.gov.uidai.mAadhaarPlus.ui.activity.bf in.gov.uidai.mAadhaarPlus.ui.activity.bf
as shown below.如下所示。

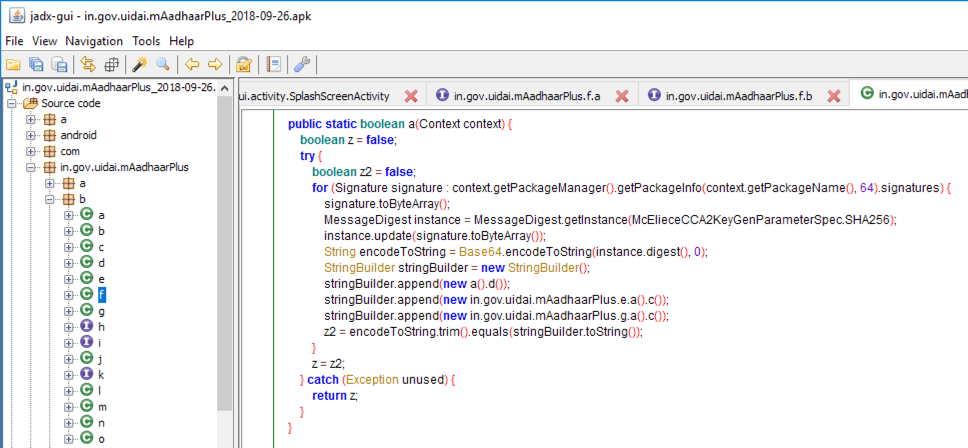
In the left pane, scroll up and navigate to that module.在左侧窗格中,向上滚动并导航到该模块。 Here you can find the a() method, as shown below.在这里你可以找到a()方法,如下所示。
This module compares a SHA-256 hash with a hard-coded value to see if the app has been modified.此模块将SHA-256哈希值与硬编码值进行比较,以查看应用程序是否已被修改。
On Kali, execute this command:在Kali上,执行以下命令:
apktool d -f -r in.gov.uidai.mAadhaarPlus_2018-09-26.apk apktool d -f -r in.gov.uidai.mAadhaarPlus_2018-09-26.apk
On Kali, execute this command:在Kali上,执行以下命令:
The main smali file path appears, highlighted in the image below.出现主要的smali文件路径,在下图中突出显示。grep SplashScreenActivity -r . grep SplashScreenActivity -r。 | | less -S少-S
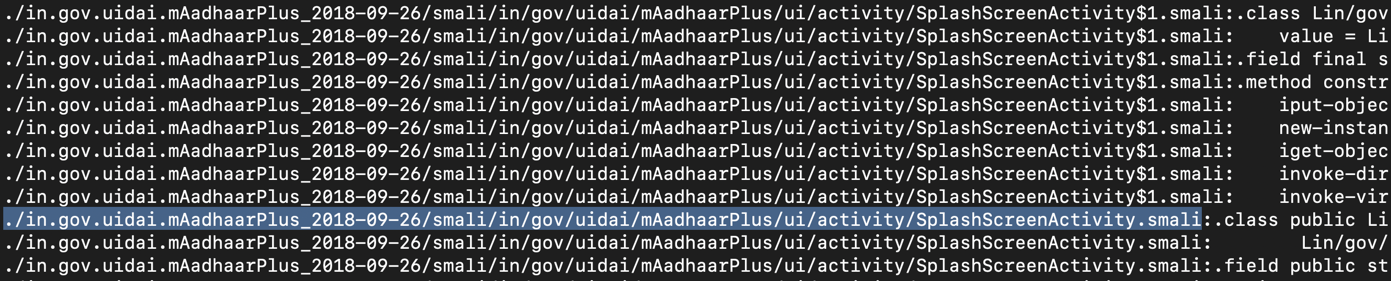
Press Q to exit "less".按Q退出“less”。
Execute this command to edit the file:执行以下命令编辑文件:
nano ./in.gov.uidai.mAadhaarPlus_2018-09-26/smali/in/gov/uidai/mAadhaarPlus/ui/activity/SplashScreenActivity.smali nano ./in.gov.uidai.mAadhaarPlus_2018-09-26/smali/in/gov/uidai/mAadhaarPlus/ui/activity/SplashScreenActivity.smali
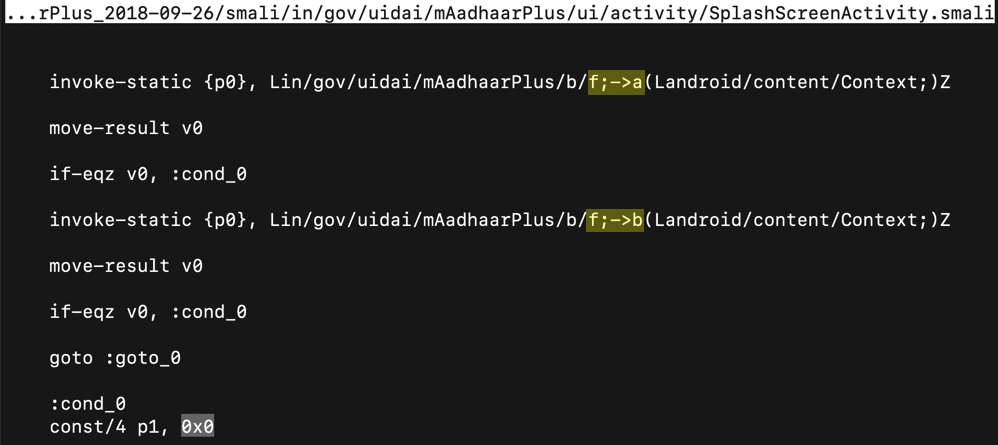
This code calls the f->a and f->b methods, highlighted in yellow in the image below.此代码调用f-> a和f-> b方法,在下图中以黄色突出显示。
If the app is modified, the code sets the parameter "p1" to zero, as highlighted in light gray in the image below.如果应用程序被修改,代码将参数“p1”设置为零,如下图中浅灰色突出显示。
Change the 0x0 value to 0x1 , outlined in green in the image below.将0x0值更改为0x1 ,在下图中以绿色标出 。
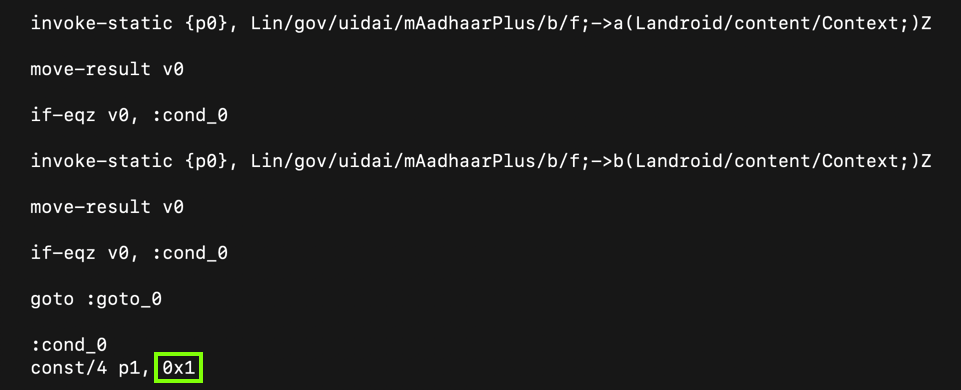
This modification allows us to change the app without being detected.此修改允许我们在不被检测到的情况下更改应用程序。
This code calls a scottyab RootBeer function to detect a rooted phone.此代码调用scottyab RootBeer函数来检测有根电话。 If the phone is rooted, it kills the app.如果手机已植根,它会杀死该应用。
To prevent that, add # characters to comment out the nine lines colored blue in the image below.为防止这种情况,请添加#字符以注释掉下面图像中的蓝色九条线。

Now the app will run on a rooted phone.现在该应用程序将在root电话上运行。
apktool b in.gov.uidai.mAadhaarPlus_2018-09-26 apktool b in.gov.uidai.mAadhaarPlus_2018-09-26

Execute this command:执行以下命令:
keytool -genkey -v -keystore my-release-key.keystore -alias alias_name -keyalg RSA -keysize 2048 -validity 10000 A prompt asks for a "keystore password".提示要求输入“密钥库密码”。 Enter password twice.输入密码两次。 Then a series of question asks for your name, etc. You can press Enter for each question except the last one, which you must answer yes to, as shown below.然后,一系列问题会询问您的姓名等。除最后一个问题外,您可以按Enter键 ,您必须回答“ 是” ,如下所示。

Enter the password of password when you are prompted to.出现提示时输入密码。jarsigner -sigalg SHA1withRSA \ jarsigner -sigalg SHA1withRSA \ -digestalg SHA1 -keystore my-release-key.keystore \ -digestalg SHA1 -keystore my-release-key.keystore \ in.gov.uidai.mAadhaarPlus_2018-09-26/dist/in.gov.uidai.mAadhaarPlus_2018-09-26.apk alias_name in.gov.uidai.mAadhaarPlus_2018-09-26 / dist / in.gov.uidai.mAadhaarPlus_2018-09-26.apk alias_name
The app is signed, as shown below.该应用已签名,如下所示。

adb install in.gov.uidai.mAadhaarPlus_2018-09-26/dist/in.gov.uidai.mAadhaarPlus_2018-09-26.apk adb install in.gov.uidai.mAadhaarPlus_2018-09-26 / dist / in.gov.uidai.mAadhaarPlus_2018-09-26.apk
It asks whether it can make phone calls.它询问是否可以拨打电话。 Click ALLOW .单击“ 允许” 。
In the "mAadhaar Consent" page, click OK .在“mAadhaar Consent”页面中,单击“ 确定” 。
In the "Usage Guidelines" page, at the top left, click the leftware-pointing arrow.在“使用指南”页面的左上角,单击左侧指向箭头。
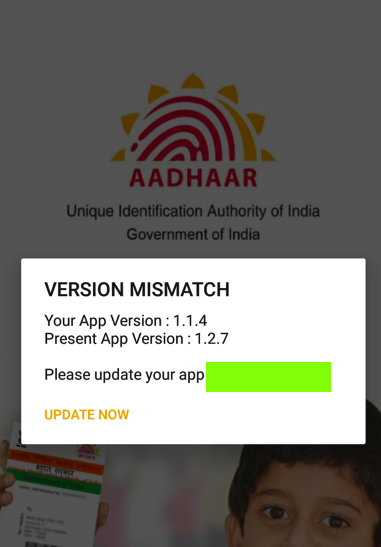
You get past the root detection, and see a "VERSION MISMATCH" screen, as shown below.您将通过根检测,并看到“VERSION MISMATCH”屏幕,如下所示。