In this project, we'll use a two-stage virtual environment from Azeria Lab, which consists of an Ubuntu Linux virtual machine which uses the QEMU virtualization software to run a virtual Raspberry Pi on ARM inside it.在这个项目中,我们将使用Azeria Lab的两阶段虚拟环境,该环境由一个Ubuntu Linux虚拟机组成,该虚拟机使用QEMU虚拟化软件在其内部运行ARM上的虚拟Raspberry Pi。
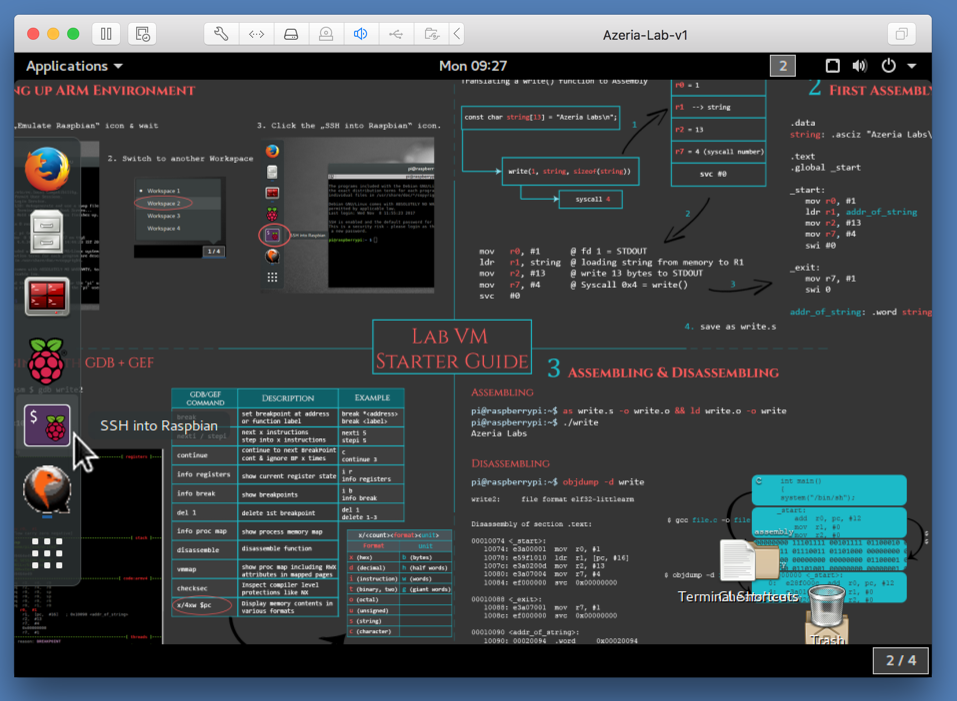
It emulates a 32-bit ARMv6 processor, as shown below.它模拟32位ARMv6处理器,如下所示。
http://azeria-labs.com/arm-lab-vm/ Download, unzip, and double-click the Azeria-Lab-v1.vmx fine to run the VM in VMware. http://azeria-labs.com/arm-lab-vm/下载,解压缩并双击Azeria-Lab-v1.vmx,以便在VMware中运行VM。
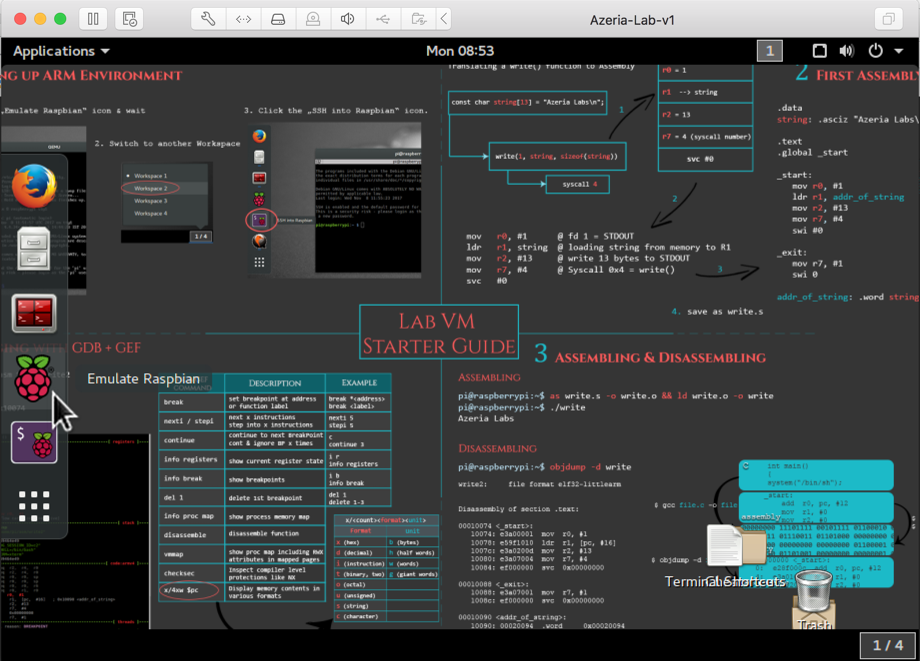
You see a desktop, as shown below.您会看到一个桌面,如下所示。
Note: if the machine times out due to inactivity, you'll need to enter the password azerialabs to wake it up. 注意:如果机器因不活动而超时,则需要输入密码azerialabs才能将其唤醒。
On the left side, click the " Emulate Raspbian " icon, as shown in the image above.在左侧,单击“ Emulate Raspbian ”图标,如上图所示。
The Raspberry Pi boots into its "Raspbian" OS, as shown below. Raspberry Pi引入其“Raspbian”操作系统,如下所示。
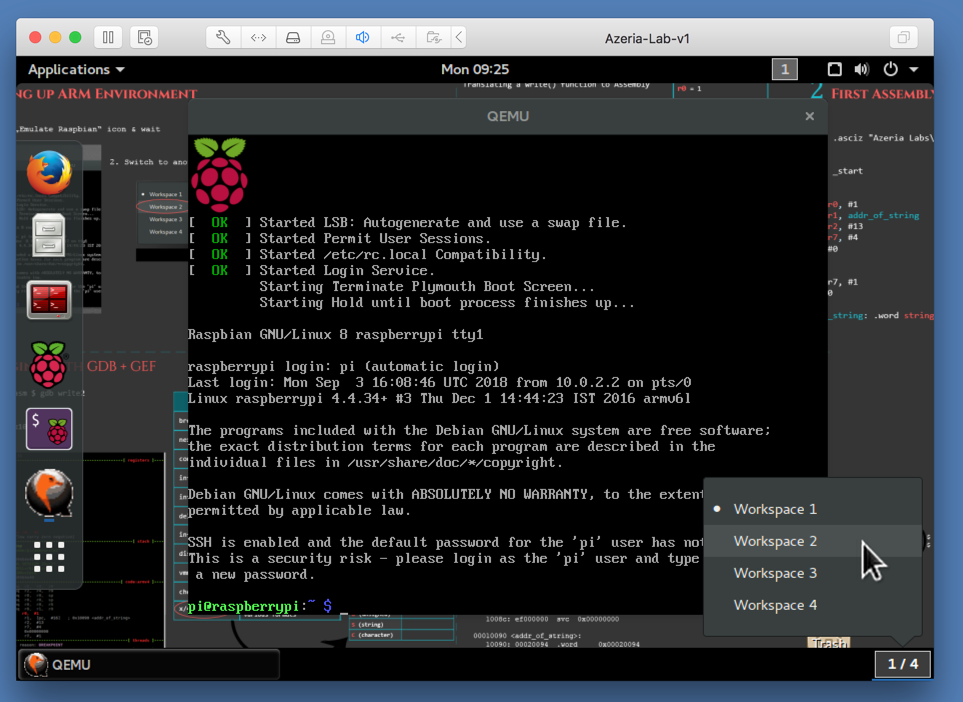
On the bottom right, click the 1/4 box.在右下角,单击1/4框。 In the list that pops up, click " Workspace 2 ", as shown in the image above.在弹出的列表中,单击“ 工作区2 ”,如上图所示。
A new workspace appears.出现一个新工作区。
On the left side, click the " SSH into Raspbian " icon, as shown in the image below.在左侧,单击“ SSH into Raspbian ”图标,如下图所示。
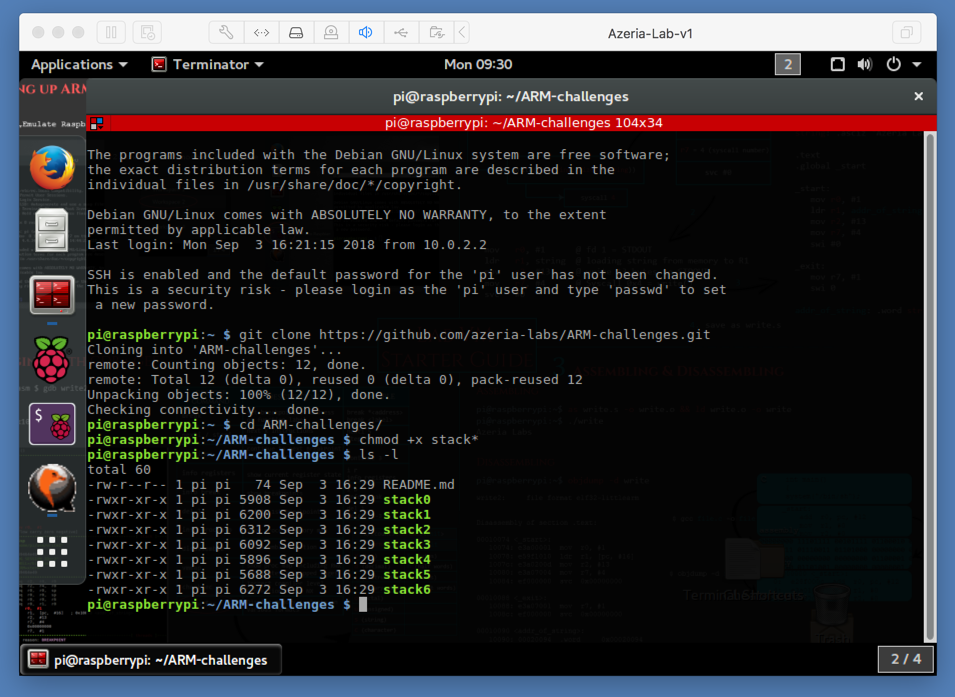
At the "pi@raspberrypi:~ $" prompt, execute these commands:在“pi @ raspberrypi:〜$”提示符下,执行以下命令:
A list of challenge files appears, as shown below.将显示挑战文件列表,如下所示。git clone https://github.com/azeria-labs/ARM-challenges.git git clone https://github.com/azeria-labs/ARM-challenges.git cd ARM-challenges/ cd ARM-challenge / chmod +x stack* chmod + x stack * ls -l ls -l
Troubleshooting Internet Access Internet访问疑难解答
If Raspbian cannot connect to the Internet, at the top left of the Azeria-Lab desktop, click Applications , Terminator , and test the internet with these commands:如果Raspbian无法连接到Internet,请在Azeria-Lab桌面的左上角单击“ 应用程序” ,“ 终结器” ,然后使用以下命令测试Internet:If the Azeria-Lab machine is not connected to the Internet, try disconnecting and reconnecting the network adapter from the VMware settings.如果Azeria-Lab计算机未连接到Internet,请尝试从VMware设置断开连接并重新连接网络适配器。ping google.com ping google.com ifconfig使用ifconfigOnce the Azeria-Lab machine is connected, close and restart the Raspberry Pi emulator.连接Azeria-Lab机器后,关闭并重新启动Raspberry Pi仿真器。 Note that "ping" does not work inside QEMU, which allows only TCP and UDP.请注意,“ping”在QEMU内部不起作用,QEMU仅允许TCP和UDP。
Screen Blanking屏幕消隐
To stop the screen going blank, I recommend this:要阻止屏幕变为空白,我建议这样做:Click the icon at the bottom on the left side, that consists of nine dots.单击左侧底部的图标,该图标由九个点组成。
On the right side, click the lower of the two dots to see the second page of icons.在右侧,单击两个点中的较低点以查看第二页图标。
Click the Settings icon.单击“ 设置”图标。
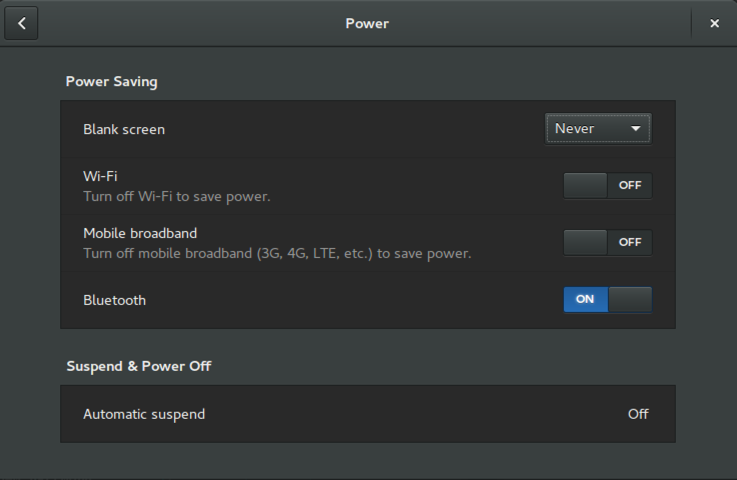
Click the Power icon.单击“ 电源”图标。
Set "Blank screen" to Never , as shown below.将“空白屏幕”设置为“ 从不” ,如下所示。
cat README.md cat README.md

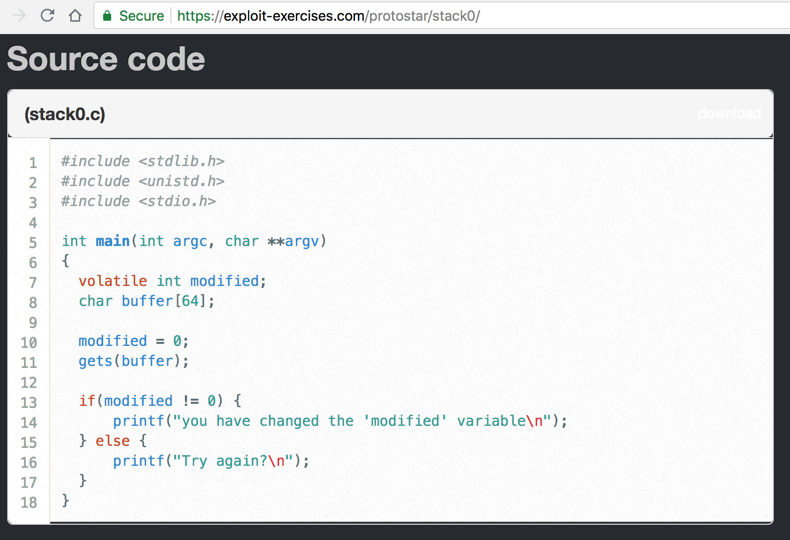
It defines an integer variable named modified and sets it to zero in line 10, as shown below.它定义了一个名为modified的整数变量,并在第10行将其设置为零,如下所示。
It then calls gets() to read user input into a buffer that is 64 bytes long, and checks to see if the modified variable has been changed.然后调用gets()将用户输入读入64字节长的缓冲区,并检查修改后的变量是否已更改。
In your emulated Raspberry Pi, at the "pi@raspberrypi:~ $" prompt, execute this command:在模拟的Raspberry Pi中,在“pi @ raspberrypi:〜$”提示符下,执行以下命令:
./stack0 ./stack0
A "Try again?" “再试一次?” message appears, as shown below.消息出现,如下所示。
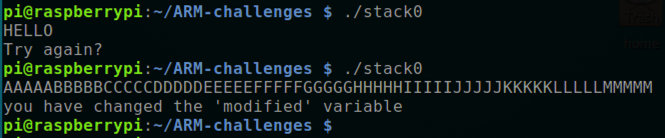
Run the program again and enter this long string.再次运行程序并输入此长字符串。 The program prints "you have changed the 'modified' variable", as shown above.该程序打印“您已更改'修改'变量”,如上所示。
AAAAABBBBBCCCCCDDDDDEEEEEFFFFFGGGGGHHHHHIIIIIJJJJJKKKKKLLLLLMMMMM AAAAABBBBBCCCCCDDDDDEEEEEFFFFFGGGGGHHHHHIIIIIJJJJJKKKKKLLLLLMMMMM
In your emulated Raspberry Pi, at the "pi@raspberrypi:~ $" prompt, execute this command:在模拟的Raspberry Pi中,在“pi @ raspberrypi:〜$”提示符下,执行以下命令:
gdb -q stack0 gdb -q stack0

In the debugger, at the gef> prompt, execute these commands to load "start0", breaking at the start of main():在调试器中,在gef>提示符下,执行这些命令以加载“start0”,在main()的开头处断开:
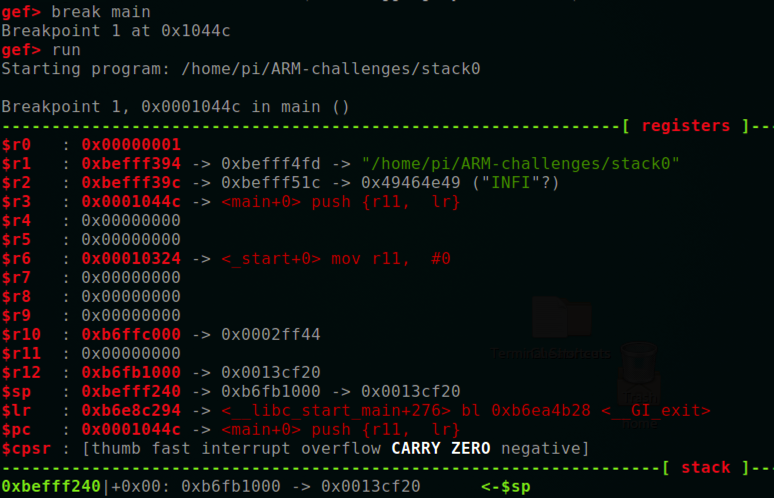
When the program breaks, it automatically prints out a whole page of information, as shown below.当程序中断时,它会自动打印出整页信息,如下所示。break main打破主力 run跑
The first section shows the registers .第一部分显示了寄存器 。
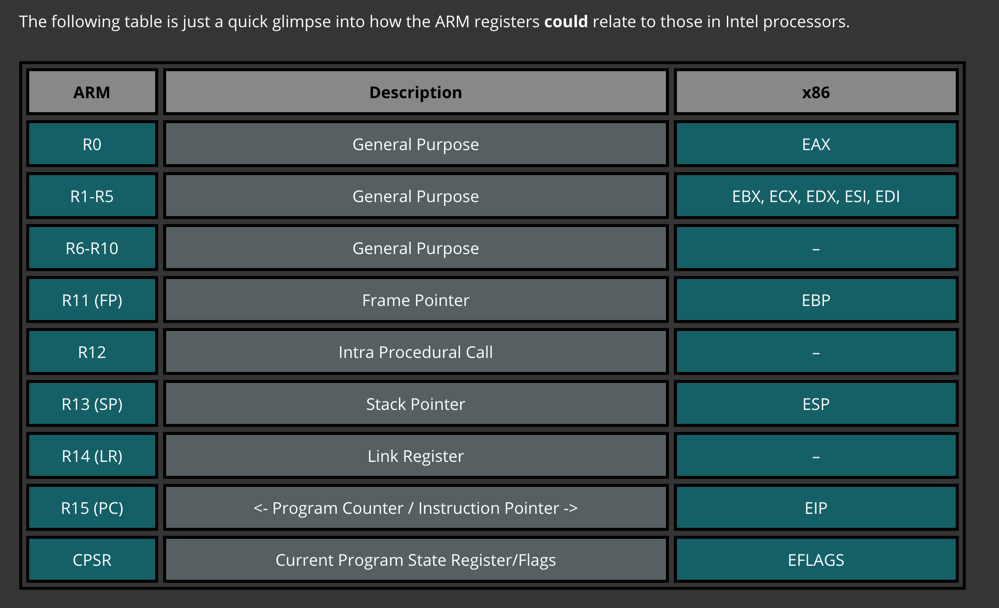
As shown below, the registers are similar to x86 registers.如下所示,寄存器类似于x86寄存器。
The most important registers for us are:对我们来说最重要的寄存器是:
After the registers, gdb shows these sections, as shown below.在寄存器之后,gdb显示了这些部分,如下所示。
disassemble main拆卸主体
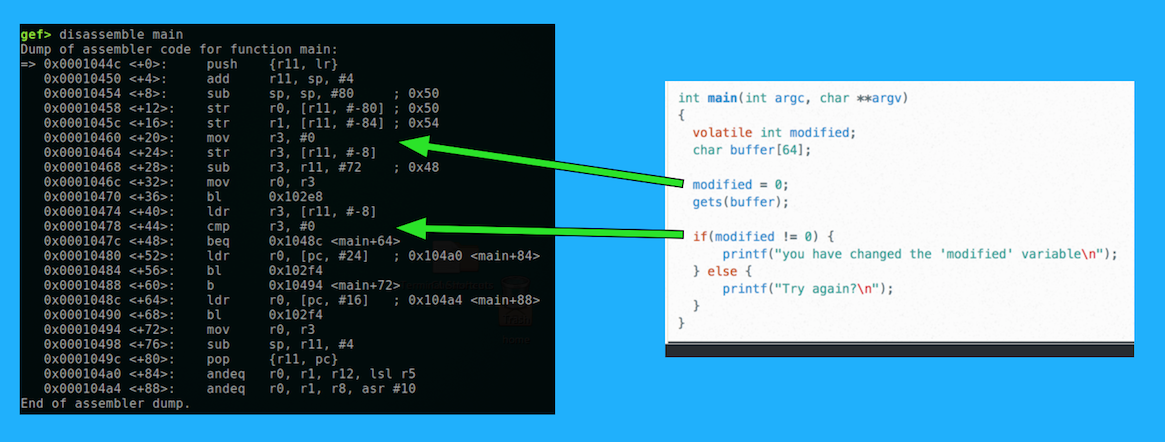
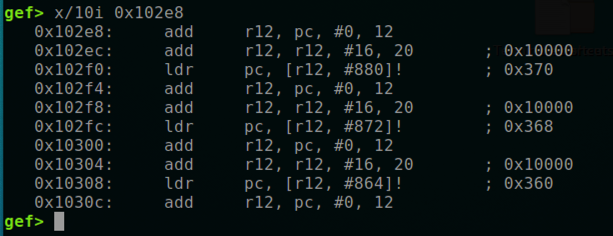
From context, it's apparent that 0x102e8 is gets() and 0x102f4 is printf() .从上下文来看,很明显0x102e8是gets()而0x102f4是printf() 。
You can use x to see the code at those addresses, but it's not very helpful, as shown below.您可以使用x查看这些地址的代码,但它没有多大帮助,如下所示。
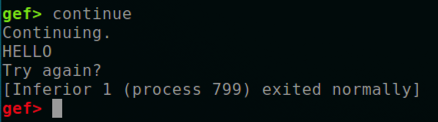
continue继续
The program says "Try again?", and exits normally, as shown below.该程序说“再试一次?”,并正常退出,如下所示。
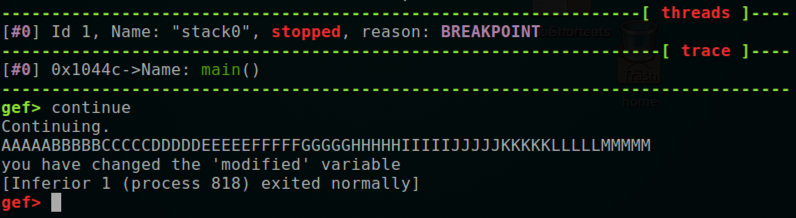
The program waits for input.程序等待输入。 Enter the line shown below and press Enter .输入下面显示的行,然后按Enter键 。run跑 continue继续
AAAAABBBBBCCCCCDDDDDEEEEEFFFFFGGGGGHHHHHIIIIIJJJJJKKKKKLLLLLMMMMM AAAAABBBBBCCCCCDDDDDEEEEEFFFFFGGGGGHHHHHIIIIIJJJJJKKKKKLLLLLMMMMM
The input overflowed the buffer and changed the integer variable after it, but did not corrupt the stored registers required for the program to exit.输入溢出缓冲区并在其后更改整数变量,但不会破坏程序退出所需的存储寄存器。
In gdb, execute these commands:在gdb中,执行以下命令:
The program waits for input.程序等待输入。 Enter the line shown below and press Enter .输入下面显示的行,然后按Enter键 。run跑 continue继续
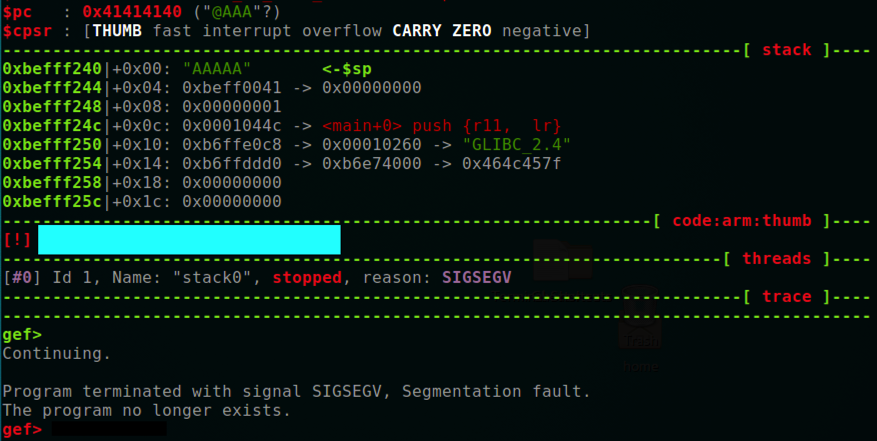
AAAAABBBBBCCCCCDDDDDEEEEEFFFFFGGGGGHHHHHIIIIIJJJJJKKKKKLLLLLMMMMMAAAAAAAAAAAAAAAA AAAAABBBBBCCCCCDDDDDEEEEEFFFFFGGGGGHHHHHIIIIIJJJJJKKKKKLLLLLMMMMMAAAAAAAAAAAAAAAA
Notice that $r11 contains 0x41414141 , as it does when overflowing the stack on a x86 processor, but $pc contains 0x41414140 , as shown below.请注意, $ r11包含0x41414141 ,就像在x86处理器上溢出堆栈时一样,但$ pc包含0x41414140 ,如下所示。
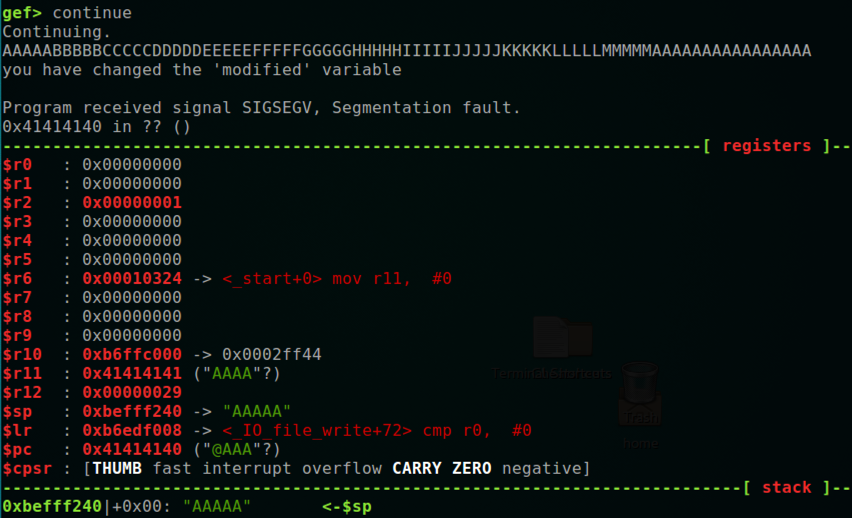
The last bit of the address controls the processing mode, as explained here .地址的最后一位控制处理模式,如此处所述。 This is one reason it's confusing to exploit buffer overflows in main(), and we generally use code with overflows in other "leaf" functions.这是在main()中利用缓冲区溢出而混淆的一个原因,我们通常在其他“叶子”函数中使用溢出代码。
The flag is covered by the blue box in the image below.该标志由下图中的蓝色框覆盖。