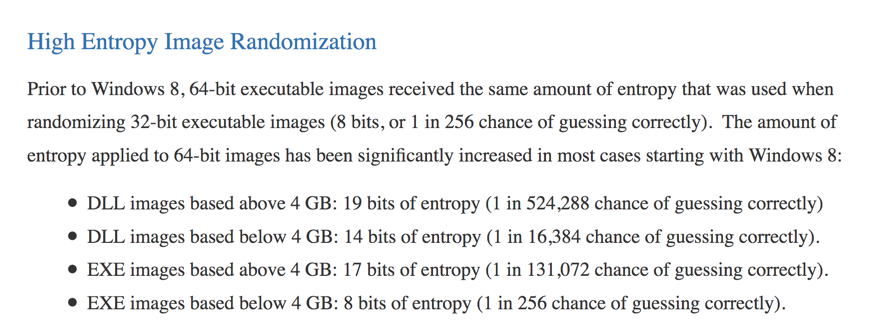
Here's what Microsoft says about ASLR randomness:以下是微软关于ASLR随机性的说法 :
It seems like there's a 1 in 256 chance of guessing correctly for many EXE files!对于许多EXE文件来说,似乎有一个256的机会正确猜测!
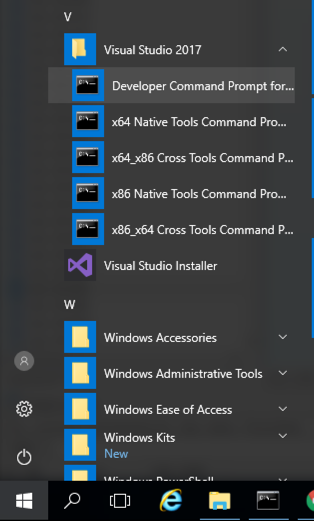
Click the Start button, scroll to the V secton, expand " Visual Studion 2017 ", and click " Developer Command Prompt for VS 2017 ", as shown below.单击开始按钮,滚动到V secton,展开“ Visual Studion 2017 ”,然后单击“ VS 2017的开发人员命令提示符 ”,如下所示。
A box pops up, asking "Do you want to create a new file?".弹出一个框,询问“你想创建一个新文件吗?”。 Click Yes .单击是 。mkdir c:\127a mkdir c:\ 127a cd c:\127a cd c:\ 127a notepad esp3.cpp记事本esp3.cpp
Enter this code, as shown below:输入此代码,如下所示:
#include <iostream> #include <iostream>
using namespace std; using namespace std;

void main() { void main(){
	int data = 0; int data = 0;
	__asm { __asm {
	    mov data, esp mov数据,尤其是
	} }
   cout << hex << data << endl; cout << hex << data << endl;
} }
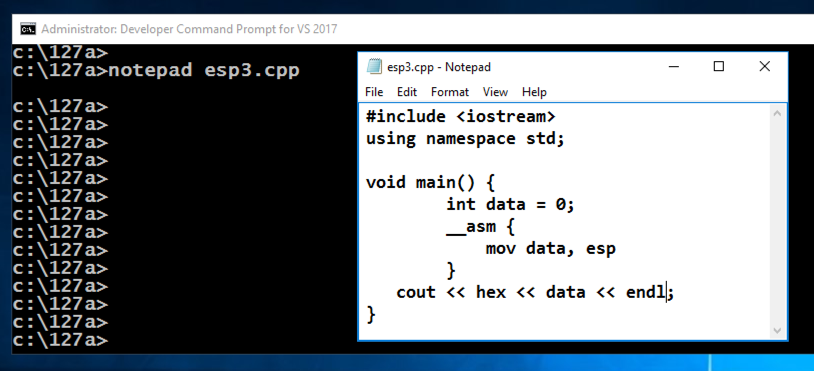
In Notepad, click File , Save .在记事本中,单击“ 文件” ,“ 保存” 。
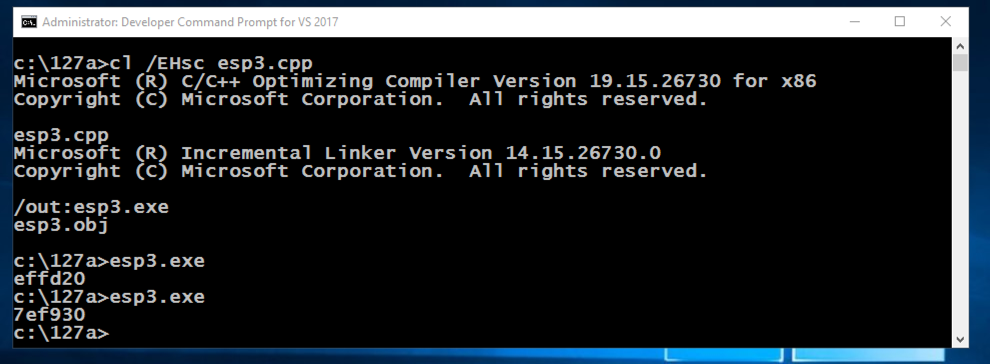
The ESP value changes each time the program runs, as shown below.每次程序运行时ESP值都会改变,如下所示。 This happens because ASLR is activated by default in Windows.发生这种情况是因为Windows中默认激活了ASLR。cl /EHsc esp3.cpp cl / EHsc esp3.cpp esp3.exe esp3.exe esp3.exe esp3.exe
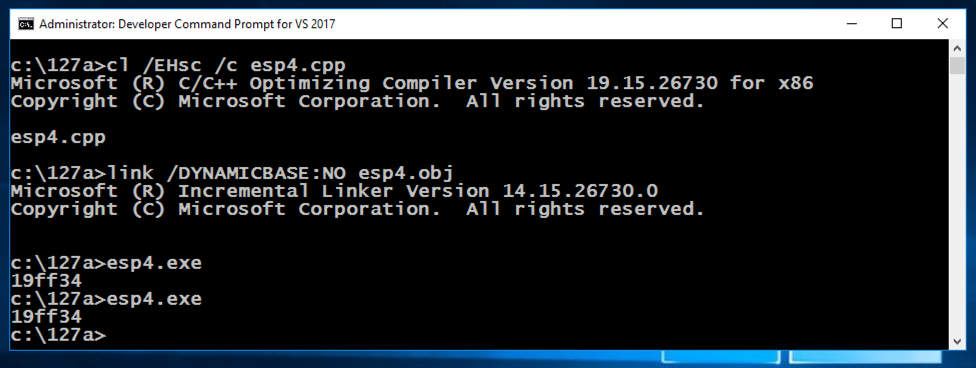
The ESP value remains the same each time the program runs, as shown below, because ASLR is turned off for this application.每次程序运行时ESP值都保持不变,如下所示,因为此应用程序的ASLR已关闭。copy esp3.cpp esp4.cpp复制esp3.cpp esp4.cpp cl /EHsc /c esp4.cpp cl / EHsc / c esp4.cpp link /DYNAMICBASE:NO esp4.obj link / DYNAMICBASE:没有esp4.obj esp4.exe esp4.exe esp4.exe esp4.exe
In the Developer Command Prompt window, execute these commands:在Developer Command Prompt窗口中,执行以下命令:
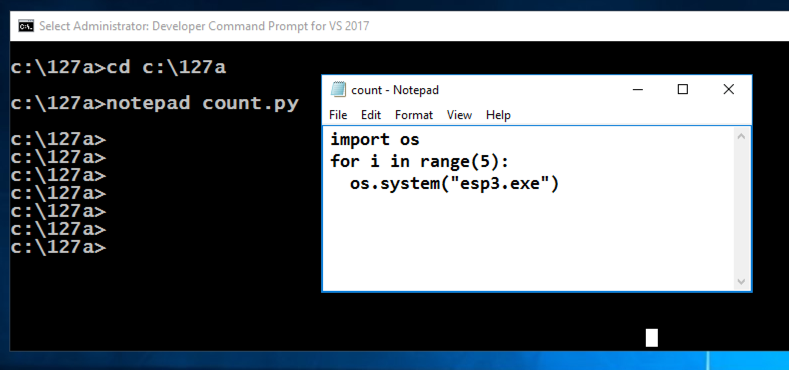
A box pops up, asking "Do you want to create a new file?".弹出一个框,询问“你想创建一个新文件吗?”。 Click Yes .单击是 。cd c:\127a cd c:\ 127a notepad test.py记事本test.py
Enter this code, as shown below.输入此代码,如下所示。 It will run the esp3.exe program 5 times and print out the results.它将运行esp3.exe程序5次并打印出结果。
import os进口口
for i in range(5): for i in range(5):
  os.system("esp3.exe")使用os.system( “esp3.exe”)
In Notepad, click File , Save .在记事本中,单击“ 文件” ,“ 保存” 。
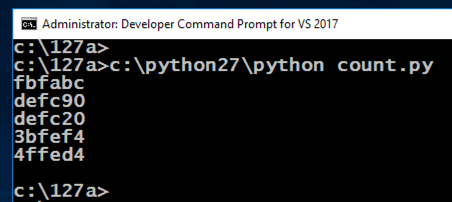
c:\python27\python test.py c:\ python27 \ python test.py
notepad test.py记事本test.py
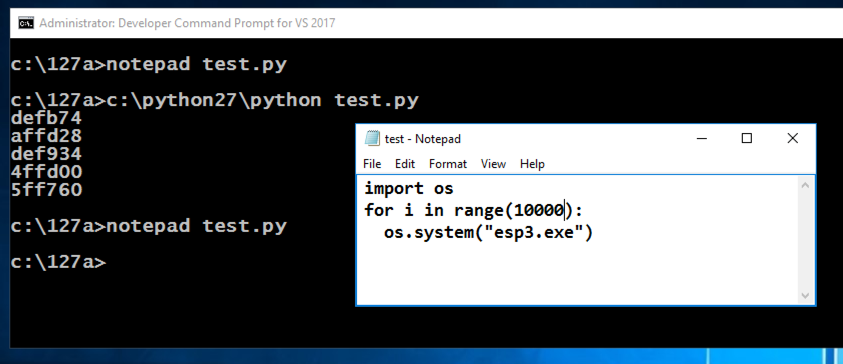
In Notepad, click File , Save .在记事本中,单击“ 文件” ,“ 保存” 。
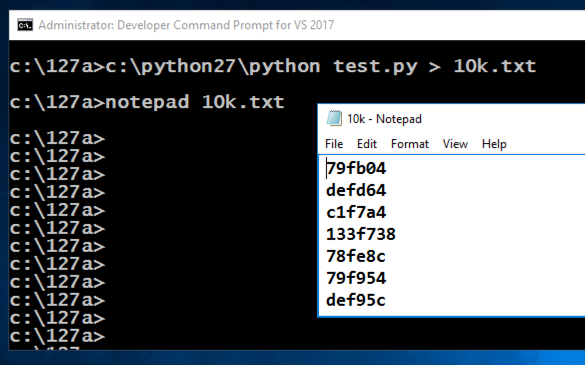
c:\python27\python test.py > 10k.txt c:\ python27 \ python test.py> 10k.txt
notepad 10k.txt记事本10k.txt

In the Developer Command Prompt window, execute this command:在Developer Command Prompt窗口中,执行以下命令:
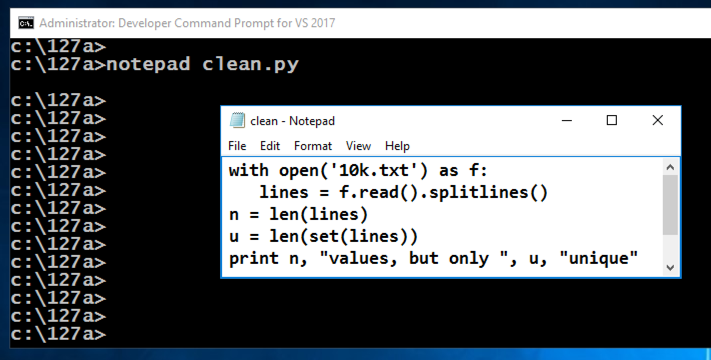
notepad clean.py记事本clean.py
Enter this code, as shown below.输入此代码,如下所示。 It will run the esp3.exe program 5 times and print out the results.它将运行esp3.exe程序5次并打印出结果。
with open('10k.txt') as f:打开('10k.txt')作为f:
   lines = f.read().splitlines() lines = f.read()。splitlines()
n = len(lines) n = len(行)
u = len(set(lines)) u = len(set(lines))
print n, "values, but only ", u, "unique"打印n,“值,但只有”,u,“unique”
In Notepad, click File , Save .在记事本中,单击“ 文件” ,“ 保存” 。
c:\python27\python clean.py c:\ python27 \ python clean.py

From the Immunity menu bar, click File , Open .从Immunity菜单栏中,单击File , Open 。 Navigate to C:\127\esp3.exe and double-click it.导航到C:\ 127 \ esp3.exe并双击它。
Immunity loads the program.免疫加载程序。
From the Immunity menu bar, click Debug , Run .从Immunity菜单栏中,单击Debug , Run 。
Click Debug , Run again.单击Debug ,再次运行 。
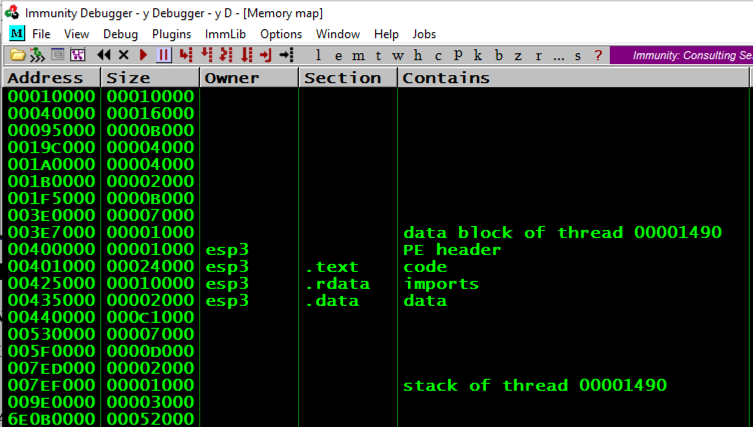
From the Immunity menu bar, click View , Memory .从Immunity菜单栏中,单击View , Memory 。
Notice the Address of these items, as shown below:注意这些项目的地址,如下所示:
From the Immunity menu bar, click Debug , Run .从Immunity菜单栏中,单击Debug , Run 。
Click Debug , Run again.单击Debug ,再次运行 。
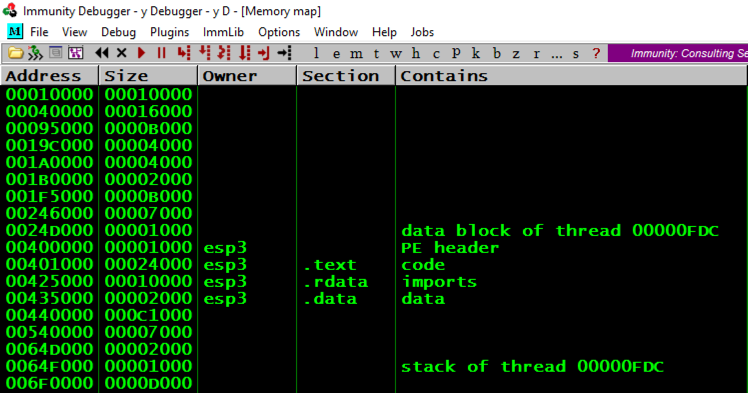
From the Immunity menu bar, click View , Memory .从Immunity菜单栏中,单击View , Memory 。
Notice that the "stack of thread..." address changes, and so does the "data block of thread..." address, but the other items are always at the same address, as shown below.请注意,“堆栈的线程...”地址会发生变化,“线程数据块...”地址也会发生变化,但其他项目始终位于同一地址,如下所示。
A box pops up, asking "Do you want to create a new file?".弹出一个框,询问“你想创建一个新文件吗?”。 Click Yes .单击是 。cd c:\127a cd c:\ 127a notepad mem.cpp记事本mem.cpp
Enter this code, as shown below.输入此代码,如下所示。
#include <cstdio> #include <cstdio>
#include <cstdlib> #include <cstdlib>
#include <iostream> #include <iostream>
using namespace std; using namespace std;

int d; int d; /* in .data section */ / * in .data section * /

void main() void main()
{ {
    int i=1, j; int i = 1,j;
    int * p; int * p; /* pointer */ / *指针* /

    char buf[5]; char buf [5]; /* Activate stack cookie protection */ / *激活堆栈cookie保护* /
    strcpy(buf, "HERE"); strcpy(buf,“HERE”); /* To help find code in IDA */ / *帮助在IDA中找到代码* /

    __asm {mov edx, LABEL __asm {mov edx,LABEL
          mov d, edx mov d,edx
          LABEL: NOP};标签:NOP}; /* in .text */ / * in .text * /

    char * heapbuf; char * heapbuf;
    heapbuf = (char*) malloc(1); heapbuf =(char *)malloc(1); /* on heap */ / *在堆上* /

    printf("Address in .text: %08x\n", d); printf(“.text:%08x \ n”中的地址,d);
    printf("Address in .data: %08p\n", (void *) &d); printf(“.data中的地址:%08p \ n”,(void *)&d);
    printf("Address in .heap: %08p\n", (void *) heapbuf); printf(“.heap:%08p \ n”中的地址,(void *)heapbuf);
    printf("Address in stack: %08p\n", (void *) &i); printf(“堆栈中的地址:%08p \ n”,(void *)&i);

    printf("\nStack:\n");的printf( “\ nStack:\ n”);
    p = &i; p =&i;
    for (j=0; j<9; j++) { for(j = 0; j <9; j ++){
        printf("%d %08p %08x\n", j, (void *) p, *p); printf(“%d%08p%08x \ n”,j,(void *)p,* p);
        p++;的p ++;
    } }
    __asm int 3 __asm int 3
} }
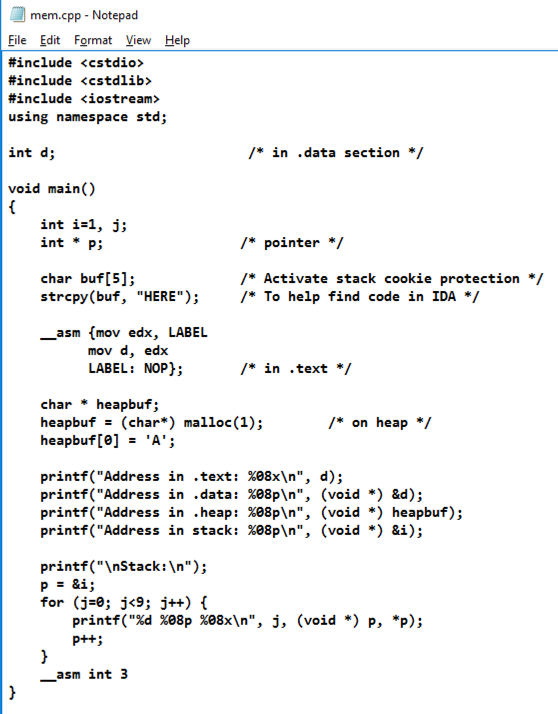
In Notepad, click File , Save .在记事本中,单击“ 文件” ,“ 保存” 。
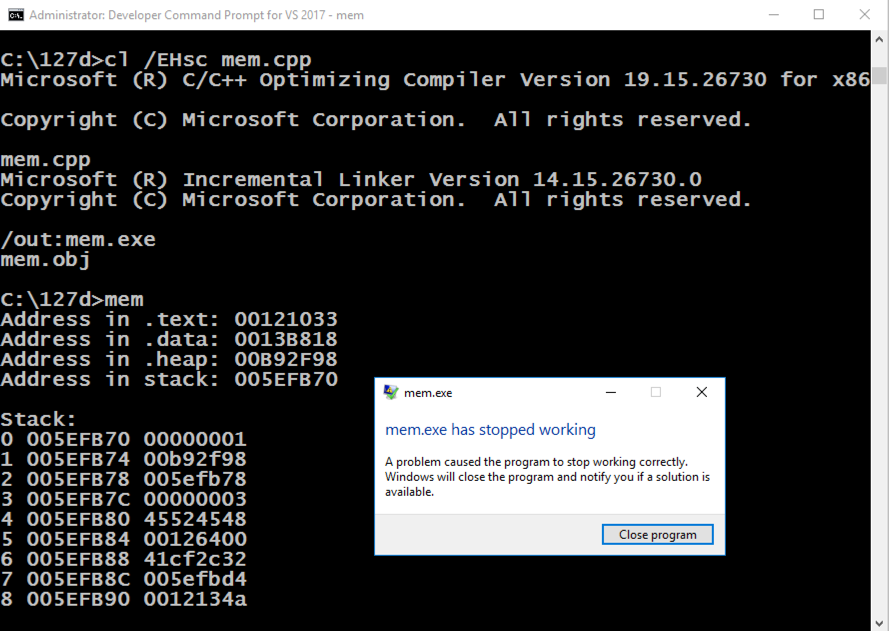
The program runs, showing memory information, as shown below, and then crashes when it hits the "INT 3".程序运行,显示内存信息,如下所示,然后在命中“INT 3”时崩溃。cl /EHsc mem.cpp cl / EHsc mem.cpp mem.exe MEM.EXE
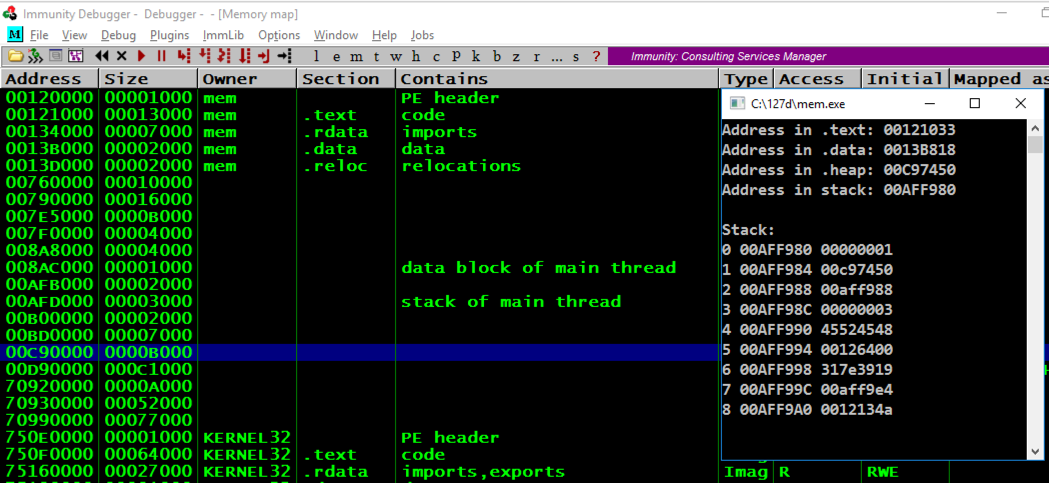
From the Immunity menu bar, click File , Open .从Immunity菜单栏中,单击File , Open 。 Navigate to C:\127a\mem.exe and double-click it.导航到C:\ 127a \ mem.exe并双击它。
Immunity loads the program.免疫加载程序。
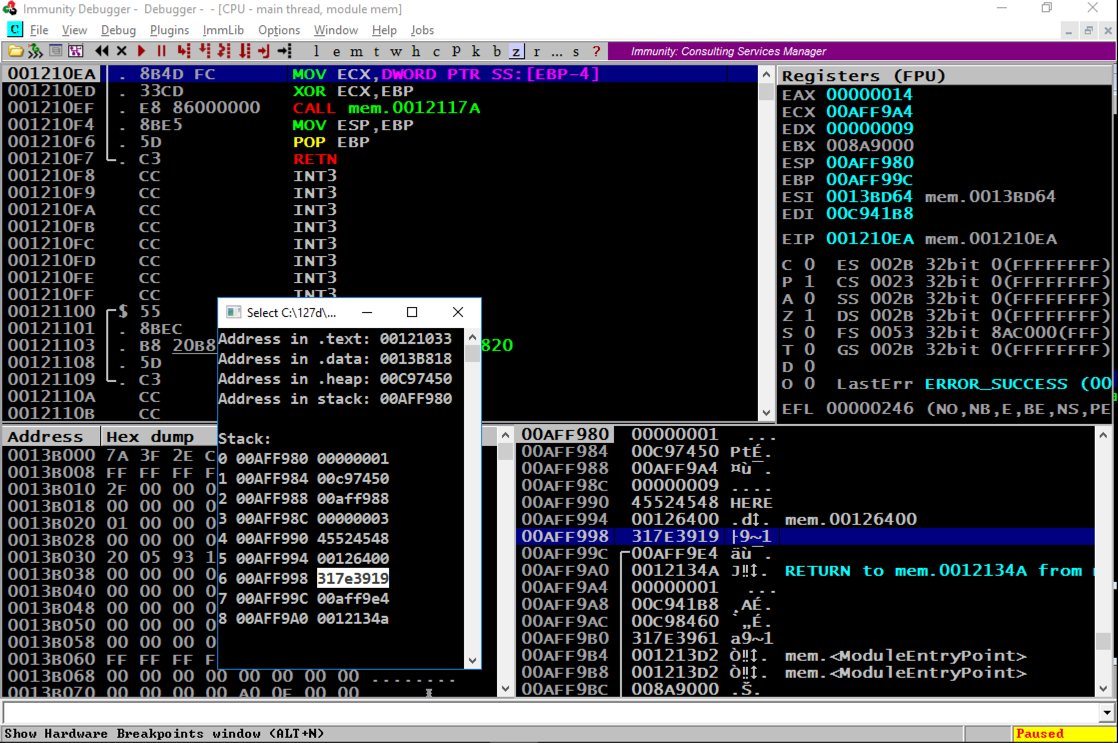
From the Immunity menu bar, click Debug , Run .从Immunity菜单栏中,单击Debug , Run 。
Click Debug , Run again.单击Debug ,再次运行 。
From the Immunity menu bar, click View , Memory .从Immunity菜单栏中,单击View , Memory 。
Press Alt + Tar to make the Command Prompt running "mem.exe" visible, as shown below.按Alt + Tar使命令提示符运行“mem.exe”可见,如下所示。
Notice these items:注意这些项目:
Press Alt + Tar to make the Command Prompt running "mem.exe" visible, as shown below.按Alt + Tar使命令提示符运行“mem.exe”可见,如下所示。
Notice these items, referred to by the item number that count from 0 to 8 in the Command Prompt window:请注意这些项目,在“命令提示符”窗口中由项目编号引用,从0到8计数:
Close Immunity.关闭免疫力。
__asm int 3 __asm int 3
In the Developer Command Prompt window, execute this command to compile the program again, with ASLR enabled, and with stack cookies.在Developer Command Prompt窗口中,执行此命令以再次编译程序,启用ASLR,并使用堆栈cookie。
cl /EHsc mem.cpp cl / EHsc mem.cpp
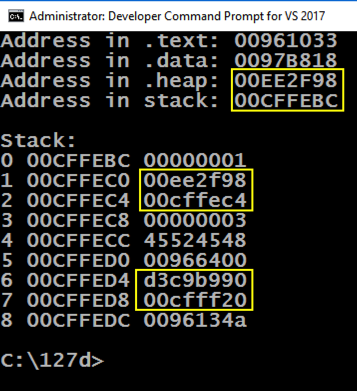
cls && mem cls && mem
You should see the values outlined in yellow in the image below changing, while the other values stay the same.您应该会看到下图中黄色轮廓的值发生变化,而其他值保持不变。
Note these items:请注意以下事项:
The program runs, showing memory information, as shown below.程序运行,显示内存信息,如下所示。copy mem.cpp mem0.cpp复制mem.cpp mem0.cpp cl /EHsc /c /GS- mem0.cpp cl / EHsc / c / GS- mem0.cpp link /DYNAMICBASE:NO mem0.obj link / DYNAMICBASE:没有mem0.obj mem0.exe mem0.exe
Notice that the .text section is near the classical value of 400000, which we've seen before.请注意,.text部分接近我们之前看到的经典值400000。
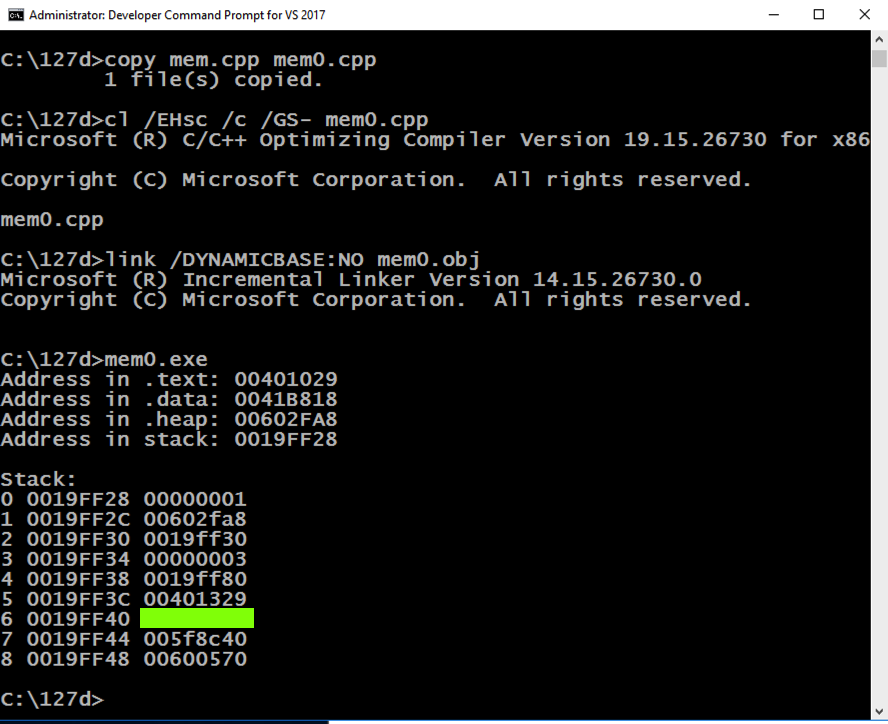
cls && mem0 cls && mem0
You should see the values outlined in yellow in the image below changing, while the other values stay the same.您应该会看到下图中黄色轮廓的值发生变化,而其他值保持不变。
Note these items:请注意以下事项:

Posted: 11-9-18发表时间:11-9-18
Typo in C code: i -> j 12-11-18 C代码错字:i - > j 12-11-18


